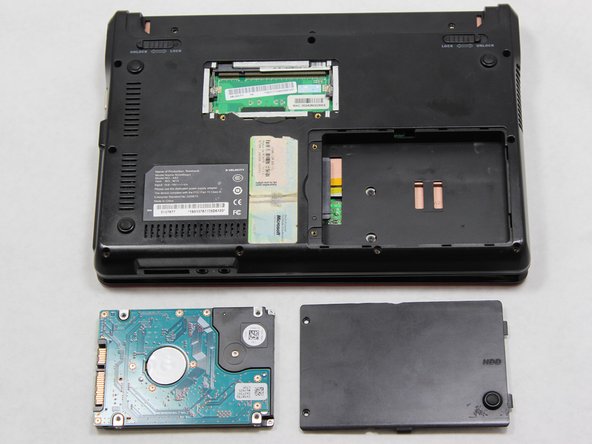
メインコンテンツにスキップ

Velocity NoteMagix M10 A82 Hard Drive Replacement

必要な工具と部品

  1. Velocity NoteMagix M10 A82 Hard Drive Replacement, Battery: 手順 1、 2の画像 1 Velocity NoteMagix M10 A82 Hard Drive Replacement, Battery: 手順 1、 2の画像 2
    • Place the notebook on the table, with the battery facing away from you.

    • Slide the switch from "lock" to "unlock" with your right hand on the right side of the computer.

    • Maintain holding the right switch in the "unlock" position.

    • Use your left hand to slide the left switch from "lock" to "unlock".

  2. Velocity NoteMagix M10 A82 Hard Drive Replacement: 手順 2、 2の画像 1 Velocity NoteMagix M10 A82 Hard Drive Replacement: 手順 2、 2の画像 2
    • Maintain both left and right switches in the "unlock" position.

    • Use your forefingers to push the battery out of the computer.

  3. Velocity NoteMagix M10 A82 Hard Drive Replacement, Hard Drive: 手順 3、 2の画像 1 Velocity NoteMagix M10 A82 Hard Drive Replacement, Hard Drive: 手順 3、 2の画像 2
    • Unscrew the two 3.65mm Phillips #1 screws on the plate marked "HDD".

  4. Velocity NoteMagix M10 A82 Hard Drive Replacement: 手順 4、 1の画像 1
    • Lift the HDD plate off of the back to reveal the hard drive.

  5. Velocity NoteMagix M10 A82 Hard Drive Replacement: 手順 5、 2の画像 1 Velocity NoteMagix M10 A82 Hard Drive Replacement: 手順 5、 2の画像 2
    • Use the spudger to push the area above the connector on the hard drive to the right.

    • Lift the hard drive gently from the computer with the spudger.

終わりに

To reassemble your device, follow these instructions in reverse order.

作成者

6人の作成者と共同で作成されました。

Sam Middleton

メンバー登録日: 10/01/13

401 ポイント

4のガイドは作成済み

チーム

Cal Poly, Team 14-9, Forte Fall 2013 Cal Poly, Team 14-9, Forte Fall 2013人のメンバー

CPSU-FORTE-F13S14G9

5 メンバー

6のガイドは作成済み

0 件のコメント

コメントを追加

統計データ:

過去 24時間: 0

過去 7 日: 8

過去 30 日: 8

今までの合計 305