メインコンテンツにスキップ

この修理ガイドは変更されています。最新の未承認バージョンに切り替えます。

Vaio FS series VGRFS640 Fan Replacement

アーカイブされたガイド
このガイドは将来的な使用のためにのみ保存されてます。ご自身の修理作業には更新バージョンをご利用ください。

必要な工具と部品

  1. Vaio FS series VGRFS640 Fan Replacement, Backplate: 手順 1、 1の画像 1
    • Turn off the laptop and disconnect any charging cables.

    • Flip the laptop over so that the Service Tag is shown at the top left corner.

  2. Vaio FS series VGRFS640 Fan Replacement: 手順 2、 1の画像 1
    • Remove the highlighted screws from the back of the laptop with a Phillips #0 Screwdriver.

  3. Vaio FS series VGRFS640 Fan Replacement: 手順 3、 1の画像 1
    • Remove the highlighted screws from the panels in the bottom right-hand corner of the laptop using the Phillips #0 Screwdriver.

  4. Vaio FS series VGRFS640 Fan Replacement: 手順 4、 1の画像 1
    • Remove the two panels in the bottom right-hand corner by sliding in the direction of the arrows imprinted on the panels.

  5. Vaio FS series VGRFS640 Fan Replacement: 手順 5、 1の画像 1
    • Remove the highlighted screws underneath the removed panels using the Phillips #0 Screwdriver.

  6. Vaio FS series VGRFS640 Fan Replacement: 手順 6、 1の画像 1
    • Carefully remove the hard drive from the panel in the bottom right-hand corner of the laptop.

  7. Vaio FS series VGRFS640 Fan Replacement: 手順 7、 1の画像 1
    • Locate the battery, located on the top side of the laptop to the right of the Service Tag .

    • Remove the battery by pressing inwards on the tabs on either side of the battery.

  8. Vaio FS series VGRFS640 Fan Replacement: 手順 8、 1の画像 1
    • Remove cover in the top left side of the laptop next to the battery by pulling it outwards.

  9. Vaio FS series VGRFS640 Fan Replacement: 手順 9、 1の画像 1
    • Remove the backplate of the laptop by pulling it away from the laptop.

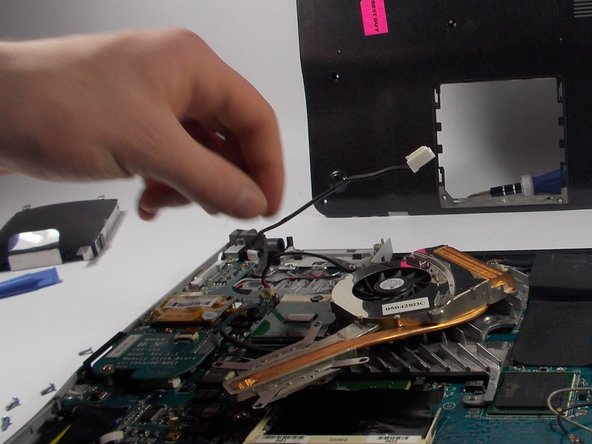
  10. Vaio FS series VGRFS640 Fan Replacement, Fan: 手順 10、 3の画像 1 Vaio FS series VGRFS640 Fan Replacement, Fan: 手順 10、 3の画像 2 Vaio FS series VGRFS640 Fan Replacement, Fan: 手順 10、 3の画像 3
    • Gently remove the connector for the wire running over the fan by lifting the tab on top up with your fingernail and sliding it out.

  11. Vaio FS series VGRFS640 Fan Replacement: 手順 11、 2の画像 1 Vaio FS series VGRFS640 Fan Replacement: 手順 11、 2の画像 2
    • Unscrew the four screws which hold in the fan.

  12. Vaio FS series VGRFS640 Fan Replacement: 手順 12、 2の画像 1 Vaio FS series VGRFS640 Fan Replacement: 手順 12、 2の画像 2
    • Lift out the fan and place it to the side.

    • DO NOT FORCEFULLY PULL THE FAN AWAY there is still a wire attaching it to the circuit board and you don't want to damage the circuit board.

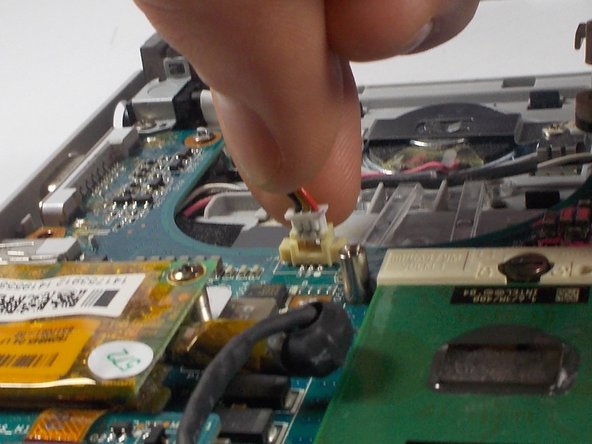
  13. Vaio FS series VGRFS640 Fan Replacement: 手順 13、 2の画像 1 Vaio FS series VGRFS640 Fan Replacement: 手順 13、 2の画像 2
    • Remove the connection by gently pull the remaining connection up from where it is attached.

  14. Vaio FS series VGRFS640 Fan Replacement: 手順 14、 1の画像 1
    • Replace the old fan with the new one.

    • Make sure that fan being used to replace is compatible with computer.

    • Sony no-longer has a list of compatible fans, so this may be difficult if not impossible.

    • Another option to making it quieter it is to blow off the accumulated dust either by blowing on it, or more effectively by using an air hose.

終わりに

To reassemble your device, follow these instructions in reverse order.

ある他の人がこのガイドを完成しました。

作成者

5人の作成者と共同で作成されました。

Geoffrey

メンバー登録日: 03/28/14

252 ポイント

2のガイドは作成済み

チーム

UMass Dartmouth, Team 2-6, Vijaybhaskar Spring 2014 UMass Dartmouth, Team 2-6, Vijaybhaskar Spring 2014人のメンバー

UMASSD-VIJAYBHASKAR-S14S2G6

4 メンバー

3のガイドは作成済み

0 件のコメント

コメントを追加

統計データ:

過去 24時間: 0

過去 7 日: 4

過去 30 日: 7

今までの合計 538