メインコンテンツにスキップ

VTech Kidizoom Camera Connect Speaker Replacement

必要な工具と部品

  1. VTech Kidizoom Camera Connect Speaker Replacement, Front Case: 手順 1、 2の画像 1 VTech Kidizoom Camera Connect Speaker Replacement, Front Case: 手順 1、 2の画像 2
    • Remove batteries and SD card before beginning disassembly!

    • Locate the four plastic screw covers denoted by the markers and gently pry them up with the metal spudger.

  2. VTech Kidizoom Camera Connect Speaker Replacement: 手順 2、 2の画像 1 VTech Kidizoom Camera Connect Speaker Replacement: 手順 2、 2の画像 2
    • Remove all four (11mm) screws with the Philips #0 screwdriver.

  3. VTech Kidizoom Camera Connect Speaker Replacement: 手順 3、 3の画像 1 VTech Kidizoom Camera Connect Speaker Replacement: 手順 3、 3の画像 2 VTech Kidizoom Camera Connect Speaker Replacement: 手順 3、 3の画像 3
    • Remove the two battery cartridges located on the underside of the camera.

    • Once cartridges are removed, use the metal spudger to pry open the top, bottom, and both sides of the camera.

  4. VTech Kidizoom Camera Connect Speaker Replacement: 手順 4、 1の画像 1
    • Beware of the two black viewfinder lens falling out as you pry open the device!

    • The device should now be open and ready for further repair and/or replacement parts.

  5. VTech Kidizoom Camera Connect Speaker Replacement, Motherboard: 手順 5、 1の画像 1
    • Locate and remove the screws circled in the provided image with a Philips #0 screwdriver.

  6. VTech Kidizoom Camera Connect Speaker Replacement: 手順 6、 2の画像 1 VTech Kidizoom Camera Connect Speaker Replacement: 手順 6、 2の画像 2
    • Unsolder the connection points on the motherboard.

  7. VTech Kidizoom Camera Connect Speaker Replacement: 手順 7、 3の画像 1 VTech Kidizoom Camera Connect Speaker Replacement: 手順 7、 3の画像 2 VTech Kidizoom Camera Connect Speaker Replacement: 手順 7、 3の画像 3
    • Unsolder the connections to the right battery terminal. Removing the terminal allows easier access to the motherboard.

  8. VTech Kidizoom Camera Connect Speaker Replacement: 手順 8、 3の画像 1 VTech Kidizoom Camera Connect Speaker Replacement: 手順 8、 3の画像 2 VTech Kidizoom Camera Connect Speaker Replacement: 手順 8、 3の画像 3
    • Carefully pull up on the motherboard and pink plastic underneath the motherboard. The pink plastic contains the display and is connected to the motherboard.

  9. VTech Kidizoom Camera Connect Speaker Replacement, Speaker: 手順 9、 1の画像 1
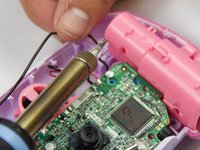
    • The speaker is glued in so you must use the metal spudger to break the seal made by the glue.

  10. VTech Kidizoom Camera Connect Speaker Replacement: 手順 10、 1の画像 1
    • Once the seal is broken the speaker should move freely. Carefully lift and remove the speaker along with its attached red and black wires.

終わりに

To reassemble your device, follow these instructions in reverse order.

ある他の人がこのガイドを完成しました。

作成者

1人の作成者と共同作成されました。

Justin Sanchez

メンバー登録日: 02/08/16

520 ポイント

4のガイドは作成済み

チーム

USF Tampa, Team 6-4, Eyestone Spring 2016 USF Tampa, Team 6-4, Eyestone Spring 2016人のメンバー

USFT-EYESTONE-S16S6G4

4 メンバー

5のガイドは作成済み

0 件のコメント

コメントを追加

統計データ:

過去 24時間: 0

過去 7 日: 0

過去 30 日: 9

今までの合計 556