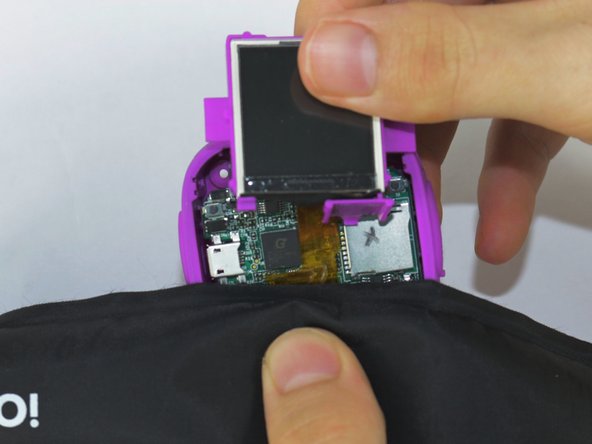
メインコンテンツにスキップ

VTech Kidizoom Action Cam LCD Screen Replacement

必要な工具と部品

  1. VTech Kidizoom Action Cam LCD Screen Replacement, Display Assembly: 手順 1、 1の画像 1
    • Make sure that the master power switch is set to the (O) position.

  2. VTech Kidizoom Action Cam LCD Screen Replacement: 手順 2、 1の画像 1
    • Using a plastic opening tool, gently pry off the circular plating over the camera lens.

    • The circular plating is held by a mild adhesive. It will not be necessary to replace this adhesive during the reassembly process.

  3. VTech Kidizoom Action Cam LCD Screen Replacement: 手順 3、 1の画像 1
    この手順で使用する道具:
    Magnetic Project Mat
    $19.95
    購入する
    • Use a #0 screwdriver to remove the two 2.5mm Phillips head screws located on the second layer of plating.

    • Remove the second layer of plating previously held down by the screws by gripping it with your fingers and pulling upward.

    • As there will be many screws being removed from the device, we recommend using a magnetic device such as the iFixit Magnetic Project Mat.

  4. VTech Kidizoom Action Cam LCD Screen Replacement: 手順 4、 1の画像 1
    • Pry off the transparent plating and paper design using a plastic opening tool.

  5. VTech Kidizoom Action Cam LCD Screen Replacement: 手順 5、 1の画像 1
    • Unscrew the (4) 2.5mm Phillips head screws from the third layer of plating using a #0 screwdriver.

  6. VTech Kidizoom Action Cam LCD Screen Replacement: 手順 6、 1の画像 1
    • Turn the camera around and gently remove the plating that surrounds the LCD screen by grasping it with your fingers and pulling away from the device.

  7. VTech Kidizoom Action Cam LCD Screen Replacement: 手順 7、 3の画像 1 VTech Kidizoom Action Cam LCD Screen Replacement: 手順 7、 3の画像 2 VTech Kidizoom Action Cam LCD Screen Replacement: 手順 7、 3の画像 3
    • Use the plastic opening tool to lift the LCD screen, including the purple casing and set it aside, revealing the motherboard and connector ribbon.

    • Exercise caution while performing this step, as any excessive pulling may tear the connector ribbon from the motherboard.

  8. VTech Kidizoom Action Cam LCD Screen Replacement, LCD Screen: 手順 8、 3の画像 1 VTech Kidizoom Action Cam LCD Screen Replacement, LCD Screen: 手順 8、 3の画像 2 VTech Kidizoom Action Cam LCD Screen Replacement, LCD Screen: 手順 8、 3の画像 3
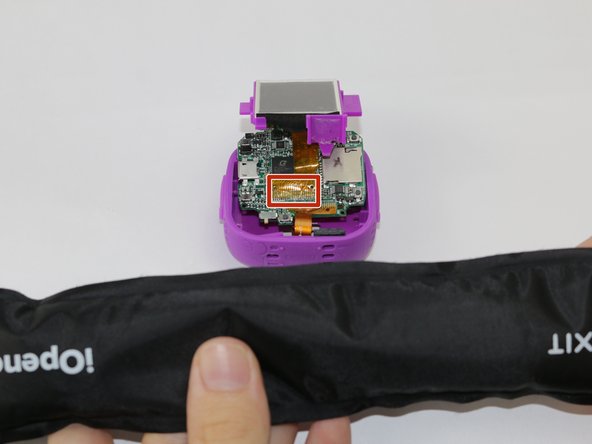
    • Heat the iOpener tool, then press the iOpener tool onto the connectors to heat the glue on the connector ribbon.

    • If the iOpener tool is not available, use a hair dryer to heat the glue on the connector ribbon and then use a Q-tip dabbed in Isopropyl alcohol to dab the heated glue.

  9. VTech Kidizoom Action Cam LCD Screen Replacement: 手順 9、 1の画像 1
    • Gently peel the connector ribbon being held down by the heated glue until it is completely removed.

    • Be cautious of very hot glue when peeling the connector ribbon off of the motherboard

終わりに

To reassemble your device, follow these instructions in reverse order.

4 の人々がこのガイドを完成させました。

作成者

3人の作成者と共同で作成されました。

Anthony Teresi

メンバー登録日: 02/10/16

689 ポイント

4のガイドは作成済み

チーム

USF Tampa, Team 3-5, Sullivan Spring 2016 USF Tampa, Team 3-5, Sullivan Spring 2016人のメンバー

USFT-SULLIVAN-S16S3G5

3 メンバー

6のガイドは作成済み

コメント 1 件

Where do I find a new LCD screen replacement part?

Abbie - 返信

コメントを追加

統計データ:

過去 24時間: 0

過去 7 日: 0

過去 30 日: 6

今までの合計 3,387