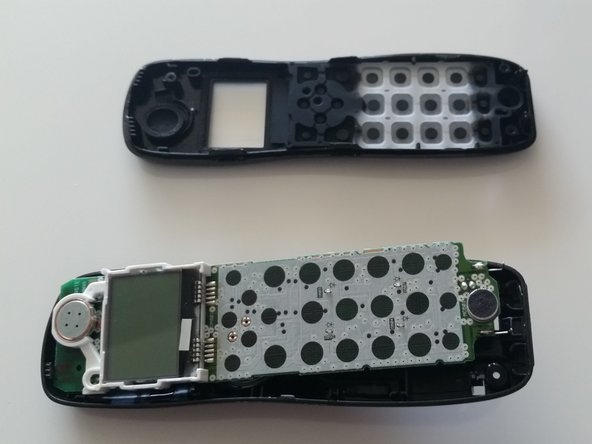
メインコンテンツにスキップ

Uniden D1483-3BK Circuit Board/Screen Replacement

必要な工具と部品

  1. Uniden D1483-3BK Circuit Board/Screen Replacement, Battery: 手順 1、 1の画像 1
    • Set the phone with dial keys facing downward.

  2. Uniden D1483-3BK Circuit Board/Screen Replacement: 手順 2、 2の画像 1 Uniden D1483-3BK Circuit Board/Screen Replacement: 手順 2、 2の画像 2
    • Slide the battery cover toward the bottom of the phone.

    • Lift and remove the back cover from the phone.

  3. Uniden D1483-3BK Circuit Board/Screen Replacement: 手順 3、 1の画像 1
    • Remove the battery from its compartment.

    • Pinch the end of cord where the battery is attached to the phone and pull up gently.

  4. Uniden D1483-3BK Circuit Board/Screen Replacement, Handset Case: 手順 4、 2の画像 1 Uniden D1483-3BK Circuit Board/Screen Replacement, Handset Case: 手順 4、 2の画像 2
    • Remove the two 9mm Phillips #1 screws in the battery compartment.

  5. Uniden D1483-3BK Circuit Board/Screen Replacement: 手順 5、 3の画像 1 Uniden D1483-3BK Circuit Board/Screen Replacement: 手順 5、 3の画像 2 Uniden D1483-3BK Circuit Board/Screen Replacement: 手順 5、 3の画像 3
    • Use the plastic opening tool to carefully separate the two halves of the case.

    • Slowly work around the entire case to fully separate the halves before pulling them apart.

    • Wires inside the case hold the two halves together, tearing these wires will lead to a need for additional repair.

  6. Uniden D1483-3BK Circuit Board/Screen Replacement: 手順 6、 2の画像 1 Uniden D1483-3BK Circuit Board/Screen Replacement: 手順 6、 2の画像 2
    • Carefully remove the 9mm Phillips #1 screw from the top corner of the circuit board.

  7. Uniden D1483-3BK Circuit Board/Screen Replacement: 手順 7、 2の画像 1 Uniden D1483-3BK Circuit Board/Screen Replacement: 手順 7、 2の画像 2
    • Carefully grasp either side of the circuit board and lift it straight out of the front half of the case.

    • Set the board in the lower half of the case.

  8. Uniden D1483-3BK Circuit Board/Screen Replacement, Circuit Board/Screen: 手順 8、 1の画像 1
    • Set the circuit board on the table with the screen facing down.

  9. Uniden D1483-3BK Circuit Board/Screen Replacement: 手順 9、 1の画像 1
    • Using the desoldering braid and soldering iron, remove the solder around the cable for the speaker.

    • When installing the new board, use the soldering iron and solder to reattach the speaker cables.

終わりに

To reassemble your device, follow these instructions in reverse order.

6 の人々がこのガイドを完成させました。

作成者

2人の作成者と共同で作成されました。

Arbitrary Name

メンバー登録日: 01/28/15

1,083 ポイント

4のガイドは作成済み

チーム

Penn State, Team 1-8, Kaschak Winter 2015 Penn State, Team 1-8, Kaschak Winter 2015人のメンバー

PSU-KASCHAK-W15S1G8

4 メンバー

8のガイドは作成済み

0 件のコメント

コメントを追加

統計データ:

過去 24時間: 0

過去 7 日: 0

過去 30 日: 3

今までの合計 293