メインコンテンツにスキップ

Turtle Beach Ear Force Stealth 500P Speaker Replacement

必要な工具と部品

  1. Turtle Beach Ear Force Stealth 500P Speaker Replacement, Earpad Assembly: 手順 1、 3の画像 1 Turtle Beach Ear Force Stealth 500P Speaker Replacement, Earpad Assembly: 手順 1、 3の画像 2 Turtle Beach Ear Force Stealth 500P Speaker Replacement, Earpad Assembly: 手順 1、 3の画像 3
    • Remove the ear pad from the earphone by gently pulling the cloth pad outwards from the slot holding the cloth.

    • Work circularly until removed.

  2. Turtle Beach Ear Force Stealth 500P Speaker Replacement: 手順 2、 2の画像 1 Turtle Beach Ear Force Stealth 500P Speaker Replacement: 手順 2、 2の画像 2
    • Using a Phillips #1 screwdriver, remove the four fastening screws that hold the blue plastic speaker mount in place.

    • Gently pull blue plastic from black housing by hand until separated.

  3. Turtle Beach Ear Force Stealth 500P Speaker Replacement, Speaker: 手順 3、 1の画像 1
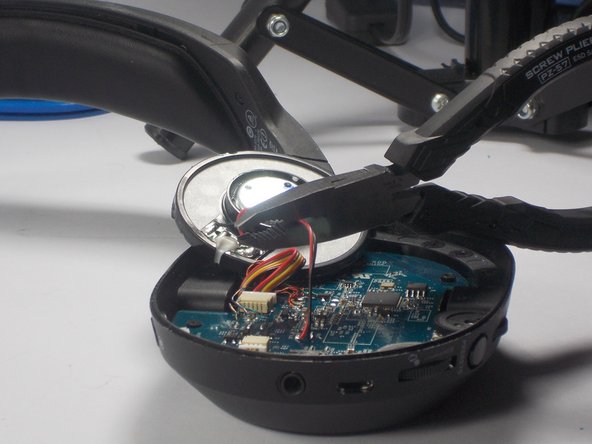
    • Using metal prying tool, gently slide the tool between the speaker and the blue plastic holder to break up the adhesive.

  4. Turtle Beach Ear Force Stealth 500P Speaker Replacement: 手順 4、 1の画像 1
    • Depending on how much of the adhesive was able to be removed, you should be able to pry up the speaker assembly using plastic pry tool. If unsuccessful, use metal tool by gently working around speaker using small twisting motions until free.

  5. Turtle Beach Ear Force Stealth 500P Speaker Replacement: 手順 5、 2の画像 1 Turtle Beach Ear Force Stealth 500P Speaker Replacement: 手順 5、 2の画像 2
    • Using wire cutters, cut the red and black wires connecting the speaker to the circuit board. Be careful to leave at least one inch of wire to use reconnect wires to new speaker.

  6. Turtle Beach Ear Force Stealth 500P Speaker Replacement: 手順 6、 1の画像 1
    • Use wire strippers to strip a portion of the rubber colored coating on the wires about a quarter inch long from both the wires connected to the circuit board and the two red and blacks wires connected to the new speaker.

  7. Turtle Beach Ear Force Stealth 500P Speaker Replacement: 手順 7、 1の画像 1
    • Twist together the matching pairs of un-shielded copper wire (black on black and red on red) and cover with wire connectors to prevent shorting.

終わりに

To reassemble your device, follow these instructions in reverse order.

ある他の人がこのガイドを完成しました。

作成者

3人の作成者と共同で作成されました。

Noah Franklin

メンバー登録日: 10/27/15

445 ポイント

5のガイドは作成済み

チーム

UMass Dartmouth, Team 2-3, Shastany Fall 2015 UMass Dartmouth, Team 2-3, Shastany Fall 2015人のメンバー

UMASSD-SHASTANY-F15S2G3

3 メンバー

10のガイドは作成済み

コメント 1 件

This is the first guide I've found that covers how the speaker is mounted to the plate. Thanks!

Michael Merrell - 返信

コメントを追加

統計データ:

過去 24時間: 1

過去 7 日: 3

過去 30 日: 9

今までの合計 3,545