メインコンテンツにスキップ

Trio AXS 3G Motherboard Replacement

必要な工具と部品

  1. Trio AXS 3G Motherboard Replacement, Back Case: 手順 1、 1の画像 1
    • On the back of the device there is a white SD card case that shelters the screws that attach the back panel to the tablet.

    • Use your thumbs to slide up and off the small SD card case.

  2. Trio AXS 3G Motherboard Replacement: 手順 2、 2の画像 1 Trio AXS 3G Motherboard Replacement: 手順 2、 2の画像 2
    • Using the Phillips Head #000, unscrew the 5 4mm and 3mm screws at the top.

  3. Trio AXS 3G Motherboard Replacement: 手順 3、 1の画像 1
    • Insert a plastic opening tool between the back panel and the front of the tablet, and gently pry it away from the tablet.

    • Do not pry too hard as the screen is fragile and might crack.

    • It is best to start at the bottom of the tablet when prying the back panel off.

    • The volume piece will also dislodge when the back panel is removed.

  4. Trio AXS 3G Motherboard Replacement, Motherboard: 手順 4、 1の画像 1
    • The motherboard is a series of green panels. The larger portion is located above the battery and supports the camera. The smaller portion is located towards the bottom and supports the speakers. There are several connections that will need to be detached using a soldering tool.

  5. Trio AXS 3G Motherboard Replacement: 手順 5、 1の画像 1
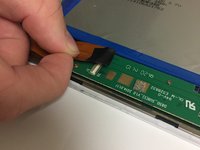
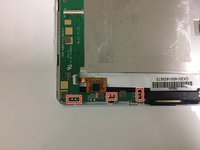
    • Using a #000 screwdriver, unscrew the 5 screws connecting the motherboard to the device.

  6. Trio AXS 3G Motherboard Replacement: 手順 6、 1の画像 1
    • The battery will need to be disconnected from the motherboard.

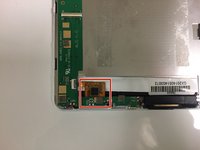
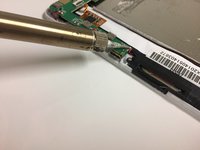
    • Using a soldering tool, melt the two metal parts connecting the battery wires to the motherboard.

    • You have the option of removing the battery completely at this point. It will make the next step easier, but it is not required.

  7. Trio AXS 3G Motherboard Replacement: 手順 7、 1の画像 1
    • Disconnect the silver tape that attaches the motherboard to the metal panel.

  8. Trio AXS 3G Motherboard Replacement: 手順 8、 2の画像 1 Trio AXS 3G Motherboard Replacement: 手順 8、 2の画像 2
    • Disconnect the ribbon from the bottom portion of the motherboard.

  9. Trio AXS 3G Motherboard Replacement: 手順 9、 1の画像 1
    • Remove the motherboard and set aside.

  10. Trio AXS 3G Motherboard Replacement: 手順 10、 1の画像 1
    • The smaller portion of the motherboard is located at the bottom with the speaker.

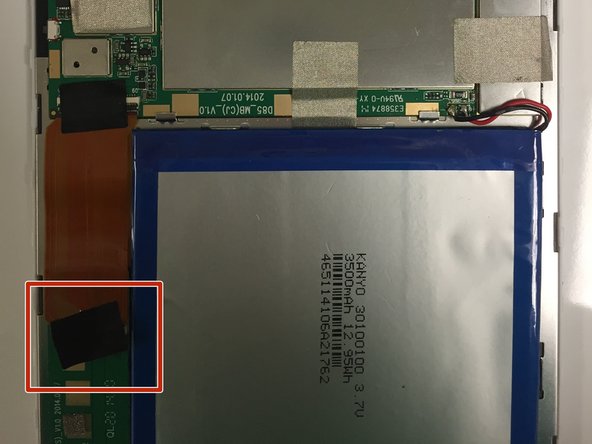
    • Using a #000 screwdriver, unscrew the three 3 mm screws that fasten the smaller segment of the motherboard to the tablet.

  11. Trio AXS 3G Motherboard Replacement: 手順 11、 3の画像 1 Trio AXS 3G Motherboard Replacement: 手順 11、 3の画像 2 Trio AXS 3G Motherboard Replacement: 手順 11、 3の画像 3
    • Located toward the bottom, carefully remove the yellow film.

  12. Trio AXS 3G Motherboard Replacement: 手順 12、 1の画像 1
    • Gently disconnect the small ribbon found underneath the film.

  13. Trio AXS 3G Motherboard Replacement: 手順 13、 1の画像 1
    • There is another connection found underneath this portion of the motherboard.

    • Lifting up the motherboard, disconnect the second ribbon found underneath.

  14. Trio AXS 3G Motherboard Replacement: 手順 14、 2の画像 1 Trio AXS 3G Motherboard Replacement: 手順 14、 2の画像 2
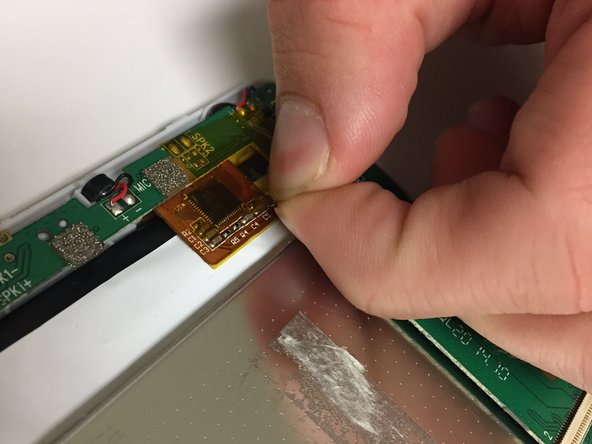
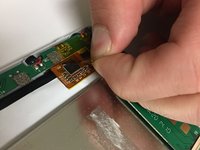
    • Using a soldering tool, melt the six metal connections located towards the bottom of the tablet.

    • Do not melt the wires.

    • Once the connections are melted, the rest of the motherboard can be removed from the tablet.

終わりに

To reassemble your device, follow these instructions in reverse order.

作成者

3人の作成者と共同で作成されました。

Michaela Causey

メンバー登録日: 09/20/17

328 ポイント

3のガイドは作成済み

チーム

University of North Texas, Team S7-G6, Thomas Fall 2017 University of North Texas, Team S7-G6, Thomas Fall 2017人のメンバー

UNT-THOMAS-F17S7G6

3 メンバー

12のガイドは作成済み

コメント 1 件

My grandma owns the 4G model and someone broke the volume down button. because of this the volume goes down on its own or the device goes into recovery mode. It actually reset it self by doing this but there is no use in me setting it back up just for it to be reset again. Any help you be great.

Dudefoxlive - 返信

コメントを追加

統計データ:

過去 24時間: 0

過去 7 日: 0

過去 30 日: 3

今までの合計 492