メインコンテンツにスキップ

Triace A310 Chain Replacement

必要な工具と部品

  1. Triace A310 Chain Replacement, Tire: 手順 1、 1の画像 1
    • Begin loosening the tire by turning the quick release handle.

  2. Triace A310 Chain Replacement: 手順 2、 2の画像 1 Triace A310 Chain Replacement: 手順 2、 2の画像 2
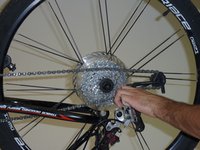
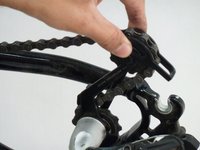
    • Gripping the rear derailleur, pull the arm back, away from the front of the bike.

    • Notice how the derailleur becomes almost vertical in the second picture when compared to the first.

  3. Triace A310 Chain Replacement: 手順 3、 2の画像 1 Triace A310 Chain Replacement: 手順 3、 2の画像 2
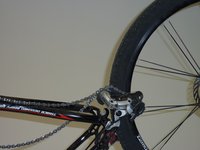
    • There should be enough slack, in the chain, at this point to remove the tire from the bike.

    • Note: You may need to wiggle the tire and chain around in order to create enough slack.

    • Remove the tire from the bike.

  4. Triace A310 Chain Replacement, Chain: 手順 4、 3の画像 1 Triace A310 Chain Replacement, Chain: 手順 4、 3の画像 2 Triace A310 Chain Replacement, Chain: 手順 4、 3の画像 3
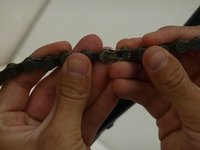
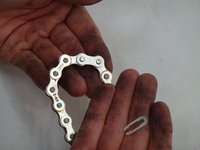
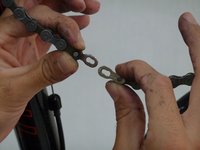
    • Locate the master link along the chain.

    • Note: If the master link matches the one pictured in this step continue with the instructions, if not skip to the next step.

    • With pliers squeeze the two pins together so that the chain comes apart.

  5. Triace A310 Chain Replacement: 手順 5、 3の画像 1 Triace A310 Chain Replacement: 手順 5、 3の画像 2 Triace A310 Chain Replacement: 手順 5、 3の画像 3
    • Note: This step is only for chains with a master link clip.

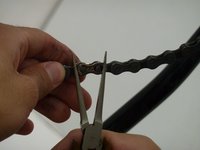
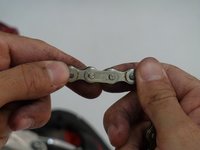
    • With a plier press the two pins together and remove the clip.

    • Once the clip is removed the chain should easily come apart.

  6. Triace A310 Chain Replacement: 手順 6、 1の画像 1
    • Once the chain is separated, remove it from the bike by pulling one end.

  7. Triace A310 Chain Replacement: 手順 7、 3の画像 1 Triace A310 Chain Replacement: 手順 7、 3の画像 2 Triace A310 Chain Replacement: 手順 7、 3の画像 3
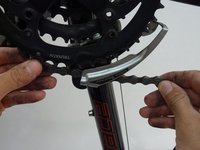
    • With the new chain, place it on the current gear that your bike is in.

    • Note: If you don't know which gear your bike is in place the chain on one of the middle gears.

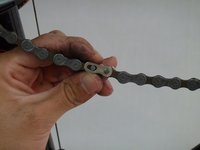
    • Thread one end of the chain through the derailleur from top to bottom so it is in the shape of a 'S'.

    • Next place the chain on the back gears, making sure that it is threaded through the guide.

  8. Triace A310 Chain Replacement: 手順 8、 3の画像 1 Triace A310 Chain Replacement: 手順 8、 3の画像 2 Triace A310 Chain Replacement: 手順 8、 3の画像 3
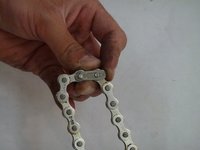
    • To reassemble the chain bring both ends of the chain together so that the pins on each one lineup.

    • Grip the chain on both sides of the master link and pull.

  9. Triace A310 Chain Replacement: 手順 9、 3の画像 1 Triace A310 Chain Replacement: 手順 9、 3の画像 2 Triace A310 Chain Replacement: 手順 9、 3の画像 3
    • If your chain does have a master link clip replace the link around the two pins.

    • Use a plier to slide the clip back into place.

終わりに

Once your chain is back together, you are ready to once again, hit the trails.

ある他の人がこのガイドを完成しました。

作成者

2人の作成者と共同で作成されました。

Jacob Rickman

メンバー登録日: 01/26/14

159 ポイント

1ガイドが承認済み

チーム

Cal Poly, Team 1-37, Maness Winter 2014 Cal Poly, Team 1-37, Maness Winter 2014人のメンバー

CPSU-MANESS-W14S1G37

4 メンバー

11のガイドは作成済み

0 件のコメント

コメントを追加

統計データ:

過去 24時間: 0

過去 7 日: 0

過去 30 日: 2

今までの合計 694