メインコンテンツにスキップ

Toshiba Satellite P75-A7100 Display Screen Replacement

必要な工具と部品

  1. Toshiba Satellite P75-A7100 Display Screen Replacement, Display Screen: 手順 1、 2の画像 1 Toshiba Satellite P75-A7100 Display Screen Replacement, Display Screen: 手順 1、 2の画像 2
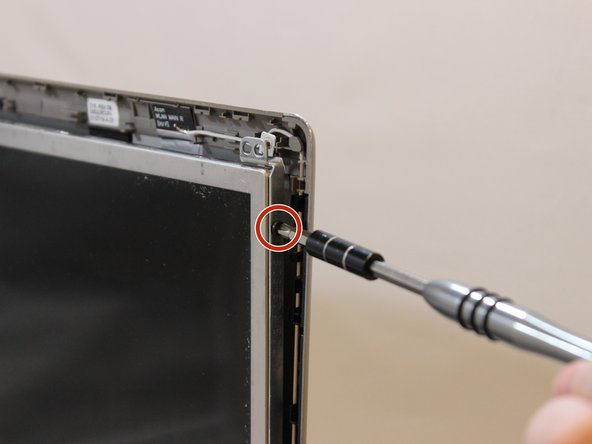
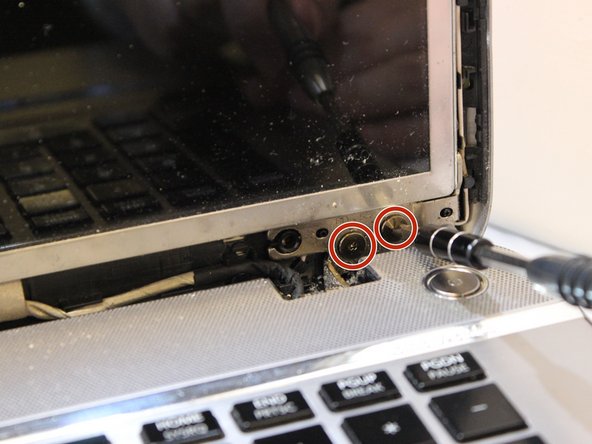
    • Open the laptop and unscrew each of the screws that are in the corners of the screen using a Phillips #1 screwdriver.

  2. Toshiba Satellite P75-A7100 Display Screen Replacement: 手順 2、 3の画像 1 Toshiba Satellite P75-A7100 Display Screen Replacement: 手順 2、 3の画像 2 Toshiba Satellite P75-A7100 Display Screen Replacement: 手順 2、 3の画像 3
    • Using a metal spudger, insert the spudger around the edges and the bottom to detach the frame from the screen.

  3. Toshiba Satellite P75-A7100 Display Screen Replacement: 手順 3、 1の画像 1
    • Remove the frame from the device.

  4. Toshiba Satellite P75-A7100 Display Screen Replacement: 手順 4、 3の画像 1 Toshiba Satellite P75-A7100 Display Screen Replacement: 手順 4、 3の画像 2 Toshiba Satellite P75-A7100 Display Screen Replacement: 手順 4、 3の画像 3
    • Using a Phillips #1 screwdriver, unscrew all of the screws on the sides of the screen.

  5. Toshiba Satellite P75-A7100 Display Screen Replacement: 手順 5、 2の画像 1 Toshiba Satellite P75-A7100 Display Screen Replacement: 手順 5、 2の画像 2
    • Disconnect the webcam from the screen and unhook any tape.

  6. Toshiba Satellite P75-A7100 Display Screen Replacement: 手順 6、 1の画像 1
    • Remove the display from the device and add the new one.

終わりに

To reassemble your device, follow these instructions in reverse order.

作成者

2人の作成者と共同で作成されました。

Mayra Zuniga

メンバー登録日: 01/17/18

300 ポイント

2のガイドは作成済み

チーム

0 件のコメント

コメントを追加

統計データ:

過去 24時間: 2

過去 7 日: 7

過去 30 日: 11

今までの合計 748