メインコンテンツにスキップ

Toshiba Satellite P205D-S8804 Screen Replacement

必要な工具と部品

  1. Toshiba Satellite P205D-S8804 Screen Replacement, Screen: 手順 1、 1の画像 1
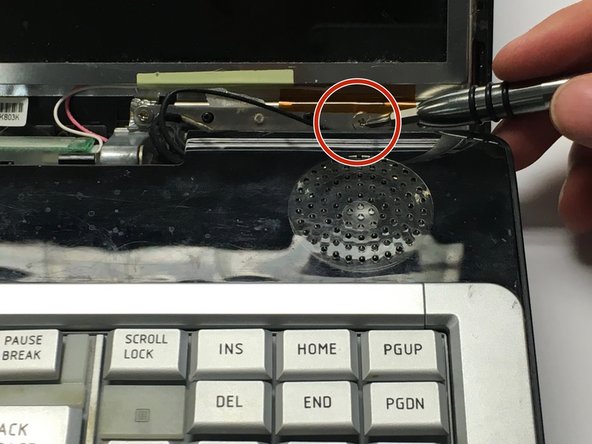
    • With the screen on a flat surface, remove the screws in each corner of the screen. There will be 4 in total.

    • Note: The screws for the screen may be hidden under rubber pad at the top of the screen so they will have to be removed.

  2. Toshiba Satellite P205D-S8804 Screen Replacement: 手順 2、 1の画像 1
    • Using a metal spudger wedge open the front and back cover of the screen.

    • Take care to not damage the camera in the process.

  3. Toshiba Satellite P205D-S8804 Screen Replacement: 手順 3、 2の画像 1 Toshiba Satellite P205D-S8804 Screen Replacement: 手順 3、 2の画像 2
    • After the front cover is removed remove the two screws at the very bottom of the screen.

    • This will give you access to the screws running along the side of the screen.

  4. Toshiba Satellite P205D-S8804 Screen Replacement: 手順 4、 1の画像 1
    • Remove the four screws on the each side of the screen. There will be eight in total.

    • We recommend starting from the bottom and working upward.

  5. Toshiba Satellite P205D-S8804 Screen Replacement: 手順 5、 1の画像 1
    • Lay the screen flat on the keyboard so they the back panel can be accessed.

    • Remove all the tape on the video cable that connects the screen to the computer.

  6. Toshiba Satellite P205D-S8804 Screen Replacement: 手順 6、 1の画像 1
    • Remove the video cable from the screen.

    • After the video cable is removed the screen is free and can be removed from the computer.

終わりに

To reassemble your device, follow these instructions in reverse order.

作成者

5人の作成者と共同で作成されました。

Caroline Camp

メンバー登録日: 01/30/17

1 ポイント

3のガイドは作成済み

チーム

Baylor, Team 3-2, Whitney Spring 2017 Baylor, Team 3-2, Whitney Spring 2017人のメンバー

BU-WHITNEY-S17S3G2

4 メンバー

4のガイドは作成済み

0 件のコメント

コメントを追加

統計データ:

過去 24時間: 2

過去 7 日: 2

過去 30 日: 4

今までの合計 86