メインコンテンツにスキップ

Toshiba Satellite P205-S8811 Hard Drive Replacement

必要な工具と部品

  1. Toshiba Satellite P205-S8811 Hard Drive Replacement, Battery: 手順 1、 2の画像 1 Toshiba Satellite P205-S8811 Hard Drive Replacement, Battery: 手順 1、 2の画像 2
    • Flip the laptop over so the bottom is facing upward and the battery is on top.

    • Slide the tab below the battery to the left.

  2. Toshiba Satellite P205-S8811 Hard Drive Replacement: 手順 2、 2の画像 1 Toshiba Satellite P205-S8811 Hard Drive Replacement: 手順 2、 2の画像 2
    • Slide and hold the tab on the right side of the battery to the right.

    • While holding the right tab, slide the battery upward and out its socket.

  3. Toshiba Satellite P205-S8811 Hard Drive Replacement, Hard Drive: 手順 3、 1の画像 1
    • Use a #1 Phillips screwdriver to take out the 8mm Phillips #1 screw holding the hard drive panel on.

  4. Toshiba Satellite P205-S8811 Hard Drive Replacement: 手順 4、 1の画像 1
    • Place one finger under the tab of the hard drive panel and lift up with medium force.

  5. Toshiba Satellite P205-S8811 Hard Drive Replacement: 手順 5、 2の画像 1 Toshiba Satellite P205-S8811 Hard Drive Replacement: 手順 5、 2の画像 2
    • Hold the black tab attached to the hard drive and pull with medium force to the side that the tab is on. This will pull the hard drive out of it's socket.

  6. Toshiba Satellite P205-S8811 Hard Drive Replacement: 手順 6、 2の画像 1 Toshiba Satellite P205-S8811 Hard Drive Replacement: 手順 6、 2の画像 2
    • Use a #1 Phillips screwdriver to unscrew the four 4mm Phillips #1 screws (2 on each side) holding the brackets to the hard drive.

    • With the screws undone, the brackets should come right off. Next, pull on the black tab again to pull the cover off of the hard drive.

終わりに

To reassemble your device, follow these instructions in reverse order.

ある他の人がこのガイドを完成しました。

作成者

1人の作成者と共同作成されました。

Andrew Meyer

メンバー登録日: 02/03/14

245 ポイント

2のガイドは作成済み

チーム

Cal Poly, Team 2-8, Amido Winter 2014 Cal Poly, Team 2-8, Amido Winter 2014人のメンバー

CPSU-AMIDO-W14S2G8

4 メンバー

7のガイドは作成済み

コメント 1 件

There is a missing step between 4 and 5.

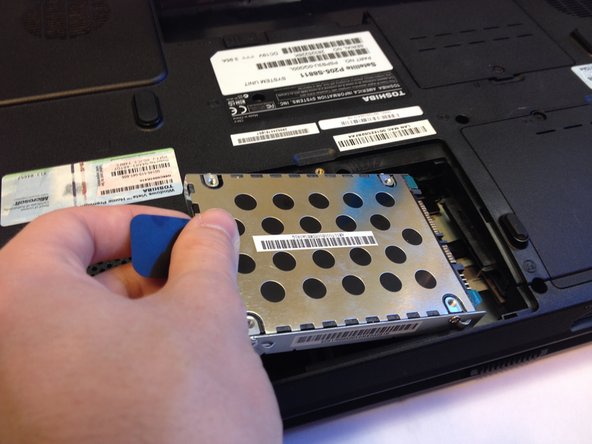
- Remove the screw(s) that hold the HDD assembly in its compartment.

...only then can you move on to step 5.

Robert Cartier - 返信

コメントを追加

統計データ:

過去 24時間: 0

過去 7 日: 0

過去 30 日: 1

今までの合計 1,067