メインコンテンツにスキップ

Toshiba Satellite M305D-S4829 Screen Replacement

必要な工具と部品

  1. Toshiba Satellite M305D-S4829 Screen Replacement, Battery: 手順 1、 1の画像 1
    • Unlatch the battery by pushing outward on both latches.

  2. Toshiba Satellite M305D-S4829 Screen Replacement: 手順 2、 1の画像 1
    • Slide battery out.

  3. Toshiba Satellite M305D-S4829 Screen Replacement, Screen: 手順 3、 2の画像 1 Toshiba Satellite M305D-S4829 Screen Replacement, Screen: 手順 3、 2の画像 2
    • Remove the four rubber coverings at the corners of the screen frame to access the screws behind them.

    • Using a Phillips #0 screwdriver, remove the four screws at the corners of the screen frame.

  4. Toshiba Satellite M305D-S4829 Screen Replacement: 手順 4、 2の画像 1 Toshiba Satellite M305D-S4829 Screen Replacement: 手順 4、 2の画像 2
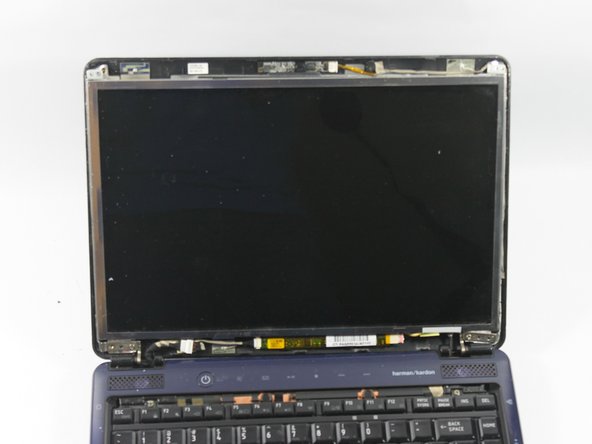
    • Now you need to remove the bezel. This is the plastic frame around the screen. Gently pull it forward, and then upward to unsnap it from where it is connected at the hinges.

    • The second picture shows what the laptop will look like thus far.

  5. Toshiba Satellite M305D-S4829 Screen Replacement: 手順 5、 1の画像 1
    • Turn the laptop around so that you can view the lid. Gently pull the lid away from the screen so that you can view the white clips near the base of the screen, as shown in the picture.

    • Un-clip the three connections to disconnect the wiring.

    • Unsnap the lid as well at this point. It pulls away just like the bezel (the plastic frame) did.

  6. Toshiba Satellite M305D-S4829 Screen Replacement: 手順 6、 1の画像 1
    • Remove the tape at the spots shown in the picture to detach the screen from the ribbon.

  7. Toshiba Satellite M305D-S4829 Screen Replacement: 手順 7、 2の画像 1 Toshiba Satellite M305D-S4829 Screen Replacement: 手順 7、 2の画像 2
    • Turn the laptop so the screen faces you again. Remove this screw, and the corresponding screw on the left hand side.

    • Remove the four screws on the sides of the metal frame, located at the upper right and left, as well as the lower right and left.

    • The screen may now be removed, and the replacement screen may be installed.

終わりに

To reassemble your device, follow these instructions in reverse order.

作成者

1人の作成者と共同作成されました。

Allison Collard

メンバー登録日: 03/12/14

111 ポイント

1ガイドが承認済み

チーム

UMass Dartmouth, Team 2-4, Vijaybhaskar Spring 2014 UMass Dartmouth, Team 2-4, Vijaybhaskar Spring 2014人のメンバー

UMASSD-VIJAYBHASKAR-S14S2G4

4 メンバー

1のガイドは作成済み

0 件のコメント

コメントを追加

統計データ:

過去 24時間: 0

過去 7 日: 0

過去 30 日: 0

今までの合計 917