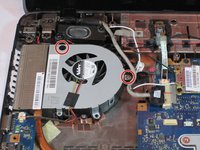
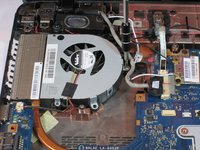
メインコンテンツにスキップ

Toshiba Satellite L675D-S7016 Fan Replacement

必要な工具と部品

  1. Toshiba Satellite L675D-S7016 Fan Replacement, Battery: 手順 1、 1の画像 1
    • Power down the computer and unplug the power adapter.

  2. Toshiba Satellite L675D-S7016 Fan Replacement: 手順 2、 1の画像 1
    • Flip the laptop upside down. Locate the two latches on both sides of the battery.

  3. Toshiba Satellite L675D-S7016 Fan Replacement: 手順 3、 3の画像 1 Toshiba Satellite L675D-S7016 Fan Replacement: 手順 3、 3の画像 2 Toshiba Satellite L675D-S7016 Fan Replacement: 手順 3、 3の画像 3
    • Slide the latch on the right outwards, releasing the lock. The latch stays unlocked once moved.

    • Simultaneously slide the latch on the left outwards while pulling the battery towards you.

    • Do not touch the metal connectors on the laptop and the battery.

  4. Toshiba Satellite L675D-S7016 Fan Replacement, Back Panel Removal: 手順 4、 1の画像 1
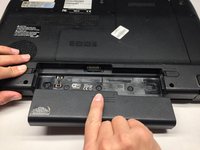
    • Remove the single captive screw on the back panel with your Phillips #1 screwdriver.

  5. Toshiba Satellite L675D-S7016 Fan Replacement: 手順 5、 2の画像 1 Toshiba Satellite L675D-S7016 Fan Replacement: 手順 5、 2の画像 2
    • Pry the removal tab up. You will feel and hear the first clip release, popping up slightly.

    • Work your way around the border of the panel, releasing the rest of the clips.

    • Once all clips are released, lift the cover up and pull towards you.

  6. Toshiba Satellite L675D-S7016 Fan Replacement, Hard Drive: 手順 6、 2の画像 1 Toshiba Satellite L675D-S7016 Fan Replacement, Hard Drive: 手順 6、 2の画像 2
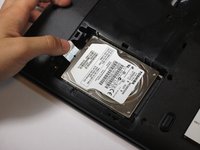
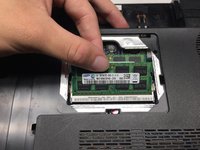
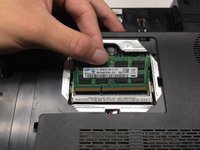
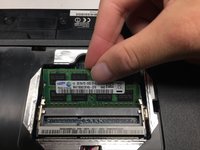
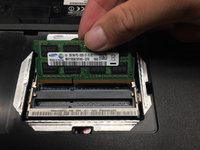
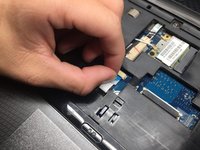
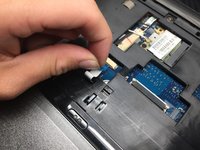
    • Slide the hard drive to the left, using the silver tab.

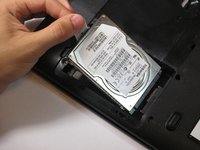
    • Pull up the silver tab, removing the hard drive from the slot.

    • Do not touch the metal data pins on the hard drive or computer.

  7. Toshiba Satellite L675D-S7016 Fan Replacement, RAM: 手順 7、 3の画像 1 Toshiba Satellite L675D-S7016 Fan Replacement, RAM: 手順 7、 3の画像 2 Toshiba Satellite L675D-S7016 Fan Replacement, RAM: 手順 7、 3の画像 3
    • Using your fingers, spread the spring tabs holding the top stick of RAM in place.

    • Once the tabs are spread apart, the stick of RAM will pop up.

    • Remove the first stick of RAM by pulling out along the same angle the RAM stick springs up.

  8. Toshiba Satellite L675D-S7016 Fan Replacement: 手順 8、 3の画像 1 Toshiba Satellite L675D-S7016 Fan Replacement: 手順 8、 3の画像 2 Toshiba Satellite L675D-S7016 Fan Replacement: 手順 8、 3の画像 3
    • Repeat the same procedure to remove the second stick of RAM.

  9. Toshiba Satellite L675D-S7016 Fan Replacement, Keyboard: 手順 9、 3の画像 1 Toshiba Satellite L675D-S7016 Fan Replacement, Keyboard: 手順 9、 3の画像 2 Toshiba Satellite L675D-S7016 Fan Replacement, Keyboard: 手順 9、 3の画像 3
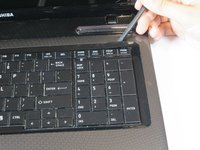
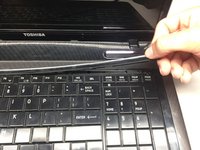
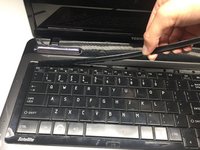
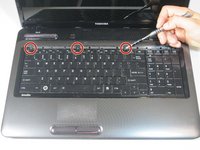
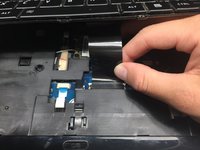
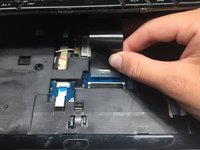
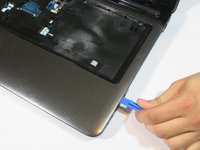
    • Pry under the plastic strip, starting on the top right side of the key board with a Heavy Duty Spudger.

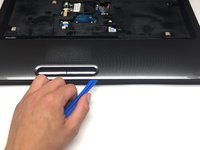
    • Once the first corner is raised, use your hand pulling upwards and release the rest of the strip.

  10. Toshiba Satellite L675D-S7016 Fan Replacement: 手順 10、 2の画像 1 Toshiba Satellite L675D-S7016 Fan Replacement: 手順 10、 2の画像 2
    • Remove the first 3mm screw with the Phillips #1 screwdriver.

    • Remove the next three 3mm screws.

  11. Toshiba Satellite L675D-S7016 Fan Replacement: 手順 11、 2の画像 1 Toshiba Satellite L675D-S7016 Fan Replacement: 手順 11、 2の画像 2
    • Lift the keyboard gently . Slide it forward towards the screen and speakers. This reveals the connection needed for the next step.

  12. Toshiba Satellite L675D-S7016 Fan Replacement: 手順 12、 3の画像 1 Toshiba Satellite L675D-S7016 Fan Replacement: 手順 12、 3の画像 2 Toshiba Satellite L675D-S7016 Fan Replacement: 手順 12、 3の画像 3
    • Use the pointed end of the Heavy-Duty Spudger and push the pins toward the screen, leaving them in this position.

    • Carefully slide the connector out of the port.

  13. Toshiba Satellite L675D-S7016 Fan Replacement, Top Case Housing: 手順 13、 1の画像 1
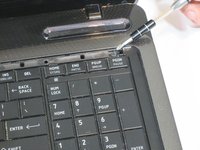
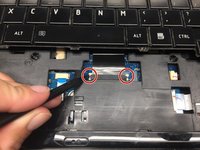
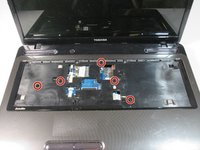
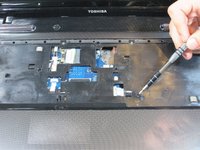
    • Remove the following screws with a Phillips #1 screwdriver.

    • Seventeen 5mm screws (recessed)

    • Three 2mm screws in the battery bay (flush-mounted)

    • Single 5mm screw does not need removal unless working on the screen

  14. Toshiba Satellite L675D-S7016 Fan Replacement: 手順 14、 2の画像 1 Toshiba Satellite L675D-S7016 Fan Replacement: 手順 14、 2の画像 2
    • Remove five 5mm screws with the screwdriver.

  15. Toshiba Satellite L675D-S7016 Fan Replacement: 手順 15、 2の画像 1 Toshiba Satellite L675D-S7016 Fan Replacement: 手順 15、 2の画像 2
    • Locate the trackpad connector.

    • Pull the ribbon from the connector.

  16. Toshiba Satellite L675D-S7016 Fan Replacement: 手順 16、 2の画像 1 Toshiba Satellite L675D-S7016 Fan Replacement: 手順 16、 2の画像 2
    • Pry under the top case housing along the perimeter with a plastic opening tool.

    • Be careful and gentle with this step, the clips you are releasing here are plastic and can be broken by violent prying.

  17. Toshiba Satellite L675D-S7016 Fan Replacement, Fan: 手順 17、 2の画像 1 Toshiba Satellite L675D-S7016 Fan Replacement, Fan: 手順 17、 2の画像 2
    • Remove the two 5mm screws using screwdriver.

  18. Toshiba Satellite L675D-S7016 Fan Replacement: 手順 18、 1の画像 1
    • Disconnect fan wire from connector with metal Spudger -- the fan can now be removed completely.

    • Be careful when removing this connector! It is very delicate. If you break this connector the whole fan needs replacement. If you break the connector on the motherboard side, you may be need a whole new motherboard.

終わりに

To reassemble your device, follow these instructions in reverse order.

3 の人々がこのガイドを完成させました。

作成者

6人の作成者と共同で作成されました。

Austin Bons

メンバー登録日: 09/22/16

1,131 ポイント

8のガイドは作成済み

チーム

UC Davis, Team 2-2, Oliver Fall 2016 UC Davis, Team 2-2, Oliver Fall 2016人のメンバー

UCD-OLIVER-F16S2G2

5 メンバー

10のガイドは作成済み

0 件のコメント

コメントを追加

統計データ:

過去 24時間: 0

過去 7 日: 0

過去 30 日: 1

今までの合計 897