メインコンテンツにスキップ

Toshiba Satellite L675D-S7016 Disk Drive Replacement

必要な工具と部品

  1. Toshiba Satellite L675D-S7016 Disk Drive Replacement, Back Panel Removal: 手順 1、 1の画像 1
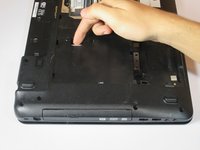
    • Remove the single captive screw on the back panel with your Phillips #1 screwdriver.

  2. Toshiba Satellite L675D-S7016 Disk Drive Replacement: 手順 2、 2の画像 1 Toshiba Satellite L675D-S7016 Disk Drive Replacement: 手順 2、 2の画像 2
    • Pry the removal tab up. You will feel and hear the first clip release, popping up slightly.

    • Work your way around the border of the panel, releasing the rest of the clips.

    • Once all clips are released, lift the cover up and pull towards you.

  3. Toshiba Satellite L675D-S7016 Disk Drive Replacement, Disk Drive: 手順 3、 1の画像 1
    • Remove the single 5mm Phillips #1 screw using the screwdriver.

  4. Toshiba Satellite L675D-S7016 Disk Drive Replacement: 手順 4、 2の画像 1 Toshiba Satellite L675D-S7016 Disk Drive Replacement: 手順 4、 2の画像 2
    • Push the exposed portion of the Disk Drive outwards.

    • The Disk Drive will begin sliding out of its slot. Remove Disk Drive from the laptop by hand.

  5. Toshiba Satellite L675D-S7016 Disk Drive Replacement: 手順 5、 2の画像 1 Toshiba Satellite L675D-S7016 Disk Drive Replacement: 手順 5、 2の画像 2
    • This step is only necessary if there is a disc stuck inside the drive! If you are replacing the drive and do not need to remove a disc, this can be skipped.

    • On the front of the Disk Drive, below the eject button, insert a pin or paperclip into the hole.

    • Push the pin into hole until the Disk Drive pops out.

終わりに

To reassemble your device, follow these instructions in reverse order.

ある他の人がこのガイドを完成しました。

作成者

5人の作成者と共同で作成されました。

Austin Bons

メンバー登録日: 09/22/16

1,131 ポイント

8のガイドは作成済み

チーム

UC Davis, Team 2-2, Oliver Fall 2016 UC Davis, Team 2-2, Oliver Fall 2016人のメンバー

UCD-OLIVER-F16S2G2

5 メンバー

10のガイドは作成済み

0 件のコメント

コメントを追加

統計データ:

過去 24時間: 0

過去 7 日: 0

過去 30 日: 0

今までの合計 333