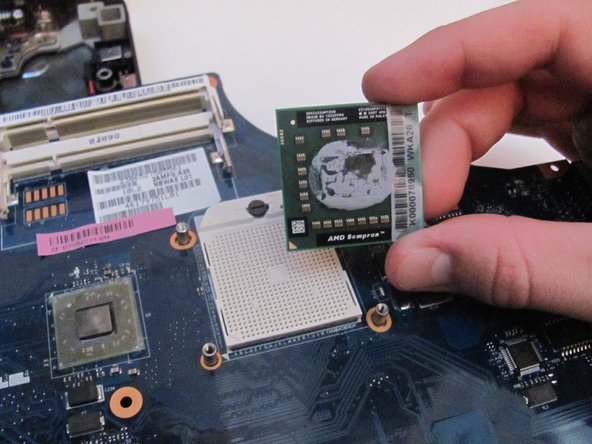
メインコンテンツにスキップ

Toshiba Satellite L455D-S5976 CPU Replacement

必要な工具と部品

  1. Toshiba Satellite L455D-S5976 CPU Replacement, Battery: 手順 1、 1の画像 1
    • Unlock the right tab by sliding it to the right with your finger.

  2. Toshiba Satellite L455D-S5976 CPU Replacement: 手順 2、 1の画像 1
    • Hold the left tab to the left using your left hand.

  3. Toshiba Satellite L455D-S5976 CPU Replacement: 手順 3、 1の画像 1
    • Remove the battery by placing your finger in the middle groove and lifting up.

  4. Toshiba Satellite L455D-S5976 CPU Replacement, Optical Drive: 手順 4、 1の画像 1
    • Remove the 13 Phillips #1 10mm screws from the backside of your computer using a Phillips #1 screwdriver.

  5. Toshiba Satellite L455D-S5976 CPU Replacement: 手順 5、 1の画像 1
    • Remove the two Phillips #1 6mm screws from the backside of your computer using a Phillips #1 screwdriver.

  6. Toshiba Satellite L455D-S5976 CPU Replacement: 手順 6、 1の画像 1
    • Remove the three 3mm screws from beneath the battery with a Phillips #1 screwdriver.

  7. Toshiba Satellite L455D-S5976 CPU Replacement: 手順 7、 1の画像 1
    • Lift up the corner panel and remove it with your hand.

  8. Toshiba Satellite L455D-S5976 CPU Replacement: 手順 8、 1の画像 1
    • Unscrew the four Phillips #1 3mm using a Phillips #1 screwdriver.

    • Unscrew the four 10mm screws around hard drive using a Phillips #1 screwdriver.

  9. Toshiba Satellite L455D-S5976 CPU Replacement: 手順 9、 2の画像 1 Toshiba Satellite L455D-S5976 CPU Replacement: 手順 9、 2の画像 2
    • To remove the hard drive case, first pull the black tab to the right.

    • Then pull the black tab up to remove the case.

  10. Toshiba Satellite L455D-S5976 CPU Replacement: 手順 10、 3の画像 1 Toshiba Satellite L455D-S5976 CPU Replacement: 手順 10、 3の画像 2 Toshiba Satellite L455D-S5976 CPU Replacement: 手順 10、 3の画像 3
    • Remove the plastic strip above the "F" keys using the spudger by placing the small end of the spudger under the strip and lifting up.

  11. Toshiba Satellite L455D-S5976 CPU Replacement: 手順 11、 1の画像 1
    • Remove the two Phillips #1 3mm screws underneath the plastic strip using a Phillips #1 screwdriver.

  12. Toshiba Satellite L455D-S5976 CPU Replacement: 手順 12、 1の画像 1
    • Lift the keyboard up and remove it with your hands.

  13. Toshiba Satellite L455D-S5976 CPU Replacement: 手順 13、 1の画像 1
    • Remove the five Phillips #1 10mm screws underneath the keyboard using a Phillips #1 screwdriver.

  14. Toshiba Satellite L455D-S5976 CPU Replacement: 手順 14、 3の画像 1 Toshiba Satellite L455D-S5976 CPU Replacement: 手順 14、 3の画像 2 Toshiba Satellite L455D-S5976 CPU Replacement: 手順 14、 3の画像 3
    • Lift up the plastic panel and carefully disconnect the red and white ports.

    • Remove the panel

  15. Toshiba Satellite L455D-S5976 CPU Replacement: 手順 15、 1の画像 1
    • Turn the laptop over so the bottom is facing up

    • Then remove the 3mm screw with a #1 screwdriver, located underneath the panel containing the wifi card and RAM

  16. Toshiba Satellite L455D-S5976 CPU Replacement: 手順 16、 1の画像 1
    • Turn the laptop back over so the motherboard is facing up

    • Now slide the optical drive out of the computer by gently pulling it to the right

  17. Toshiba Satellite L455D-S5976 CPU Replacement, CPU: 手順 17、 1の画像 1
    • Remove the two Phillips #1 3mm screws from the fan using a Phillips #1 screwdriver.

  18. Toshiba Satellite L455D-S5976 CPU Replacement: 手順 18、 1の画像 1
    • Remove the two cables from the fan.

  19. Toshiba Satellite L455D-S5976 CPU Replacement: 手順 19、 2の画像 1 Toshiba Satellite L455D-S5976 CPU Replacement: 手順 19、 2の画像 2
    • LIft up on the fan and remove it from the computer.

  20. Toshiba Satellite L455D-S5976 CPU Replacement: 手順 20、 1の画像 1
    • Remove the six 6mm screws from the motherboard with a #1 phillips screwdriver.

  21. Toshiba Satellite L455D-S5976 CPU Replacement: 手順 21、 1の画像 1
    • Remove the lone 10mm screw from the motherboard with a phillips #1 screwdriver.

  22. Toshiba Satellite L455D-S5976 CPU Replacement: 手順 22、 2の画像 1 Toshiba Satellite L455D-S5976 CPU Replacement: 手順 22、 2の画像 2
    • Remove the motherboard with your hands by carefully lifting up and pulling out.

  23. Toshiba Satellite L455D-S5976 CPU Replacement: 手順 23、 2の画像 1 Toshiba Satellite L455D-S5976 CPU Replacement: 手順 23、 2の画像 2
    • Remove the four Phillips #1 6mm single coil pickup screws from the cooling unit and remove the cooling unit.

  24. Toshiba Satellite L455D-S5976 CPU Replacement: 手順 24、 2の画像 1 Toshiba Satellite L455D-S5976 CPU Replacement: 手順 24、 2の画像 2
    • Using a flathead screwdriver, undo the lock on the CPU with a half turn in the counterclockwise direction.

    • Remove the CPU by lifting up on the chip.

終わりに

To reassemble your device, follow these instructions in reverse order.

11 の人々がこのガイドを完成させました。

作成者

4人の作成者と共同で作成されました。

NateJohnson

メンバー登録日: 01/26/14

1,047 ポイント

5のガイドは作成済み

チーム

Cal Poly, Team 9-26, Maness Winter 2014 Cal Poly, Team 9-26, Maness Winter 2014人のメンバー

CPSU-MANESS-W14S9G26

4 メンバー

5のガイドは作成済み

コメント 1 件

Just be vary careful with unplugging any connectors. one false step and you could wind up with some more problems.

harh027213 - 返信

コメントを追加

統計データ:

過去 24時間: 0

過去 7 日: 0

過去 30 日: 4

今までの合計 3,826