メインコンテンツにスキップ

Toshiba Satellite L45-S7423 LCD Display Replacement

必要な工具と部品

  1. Toshiba Satellite L45-S7423 LCD Display Replacement, Battery: 手順 1、 3の画像 1 Toshiba Satellite L45-S7423 LCD Display Replacement, Battery: 手順 1、 3の画像 2 Toshiba Satellite L45-S7423 LCD Display Replacement, Battery: 手順 1、 3の画像 3
    • Make sure the battery lock switch is switched to the unlocked position.

    • The battery is unlocked when the battery lock switch is slid to the side with an image of an unlocked lock.

  2. Toshiba Satellite L45-S7423 LCD Display Replacement: 手順 2、 2の画像 1 Toshiba Satellite L45-S7423 LCD Display Replacement: 手順 2、 2の画像 2
    • Slide the battery release switch to the left.

    • The switch is spring loaded, so you must hold the switch in place while removing the battery.

  3. Toshiba Satellite L45-S7423 LCD Display Replacement: 手順 3、 2の画像 1 Toshiba Satellite L45-S7423 LCD Display Replacement: 手順 3、 2の画像 2
    • Using a finger, lift up the battery.

    • The battery release switch must be held in place.

  4. Toshiba Satellite L45-S7423 LCD Display Replacement, Bottom Access Panel: 手順 4、 3の画像 1 Toshiba Satellite L45-S7423 LCD Display Replacement, Bottom Access Panel: 手順 4、 3の画像 2 Toshiba Satellite L45-S7423 LCD Display Replacement, Bottom Access Panel: 手順 4、 3の画像 3
    • Remove the 5 Phillips screws holding the panel in place.

    • These screws are permanently fastened to the panel; they are designed to be removed only partially to avoid loss.

  5. Toshiba Satellite L45-S7423 LCD Display Replacement: 手順 5、 3の画像 1 Toshiba Satellite L45-S7423 LCD Display Replacement: 手順 5、 3の画像 2 Toshiba Satellite L45-S7423 LCD Display Replacement: 手順 5、 3の画像 3
    • Use a finger to remove the panel by lifting up on the provided removal tab.

  6. Toshiba Satellite L45-S7423 LCD Display Replacement, LCD Display: 手順 6、 3の画像 1 Toshiba Satellite L45-S7423 LCD Display Replacement, LCD Display: 手順 6、 3の画像 2 Toshiba Satellite L45-S7423 LCD Display Replacement, LCD Display: 手順 6、 3の画像 3
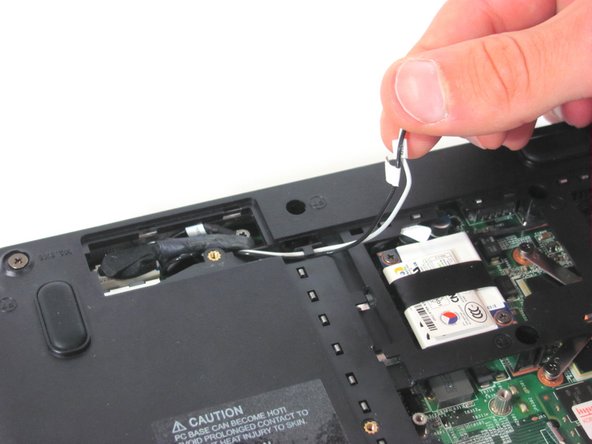
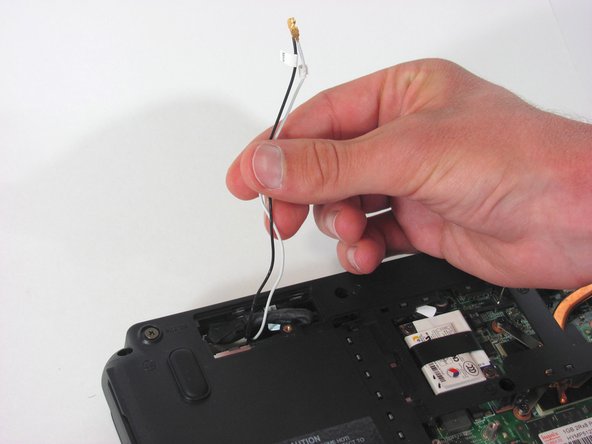
    • Remove the Phillips screw holding the panel in place and then use a finger to remove the panel.

    • This screw is not designed to be completely removed, it is permanently fastened to the panel to avoid loss.

  7. Toshiba Satellite L45-S7423 LCD Display Replacement: 手順 7、 3の画像 1 Toshiba Satellite L45-S7423 LCD Display Replacement: 手順 7、 3の画像 2 Toshiba Satellite L45-S7423 LCD Display Replacement: 手順 7、 3の画像 3
    • With the aid of a plastic removal, disconnect the two wires attached to the wireless card.

  8. Toshiba Satellite L45-S7423 LCD Display Replacement: 手順 8、 1の画像 1
    • Remove the yellow tape holding the black and the white wires in place.

  9. Toshiba Satellite L45-S7423 LCD Display Replacement: 手順 9、 3の画像 1 Toshiba Satellite L45-S7423 LCD Display Replacement: 手順 9、 3の画像 2 Toshiba Satellite L45-S7423 LCD Display Replacement: 手順 9、 3の画像 3
    • Unwind the wires from the plastic tabs holding the wires in place.

  10. Toshiba Satellite L45-S7423 LCD Display Replacement: 手順 10、 2の画像 1 Toshiba Satellite L45-S7423 LCD Display Replacement: 手順 10、 2の画像 2
    • Remove the screw holding the ground cable in place.

    • One 4.5 mm Phillips screw.

  11. Toshiba Satellite L45-S7423 LCD Display Replacement: 手順 11、 2の画像 1 Toshiba Satellite L45-S7423 LCD Display Replacement: 手順 11、 2の画像 2
    • Disconnect the video cable connecting the display to the base of the laptop.

  12. Toshiba Satellite L45-S7423 LCD Display Replacement: 手順 12、 3の画像 1 Toshiba Satellite L45-S7423 LCD Display Replacement: 手順 12、 3の画像 2 Toshiba Satellite L45-S7423 LCD Display Replacement: 手順 12、 3の画像 3
    • Pop off the laptop's hinge covers using a spudger tool.

    • Only a small amount of force is required. Excessive force may permanently damage the hinge covers.

  13. Toshiba Satellite L45-S7423 LCD Display Replacement: 手順 13、 2の画像 1 Toshiba Satellite L45-S7423 LCD Display Replacement: 手順 13、 2の画像 2
    • Remove the two screws on the back side of the laptop holding the LCD display in place.

    • Two 8.5 mm Phillips screws.

  14. Toshiba Satellite L45-S7423 LCD Display Replacement: 手順 14、 2の画像 1 Toshiba Satellite L45-S7423 LCD Display Replacement: 手順 14、 2の画像 2
    • Remove the final two screws on the bottom side of the laptop holding the LCD display in place.

    • Two 8.5 mm Phillips screws.

  15. Toshiba Satellite L45-S7423 LCD Display Replacement: 手順 15、 3の画像 1 Toshiba Satellite L45-S7423 LCD Display Replacement: 手順 15、 3の画像 2 Toshiba Satellite L45-S7423 LCD Display Replacement: 手順 15、 3の画像 3
    • Carefully pull apart the LCD display from the base by pulling vertically upwards on the display.

    • Be careful as you remove the display not to pull too hard on the cables as they pass through the opening.

終わりに

To reassemble your device, follow these instructions in reverse order.

3 の人々がこのガイドを完成させました。

作成者

3人の作成者と共同で作成されました。

Stephen Sippel

メンバー登録日: 04/16/13

194 ポイント

9のガイドは作成済み

チーム

Cal Poly, Team 21-54, Johann Spring 2013 Cal Poly, Team 21-54, Johann Spring 2013人のメンバー

CPSU-JOHANN-S13S21G54

4 メンバー

18のガイドは作成済み

0 件のコメント

コメントを追加

統計データ:

過去 24時間: 0

過去 7 日: 1

過去 30 日: 4

今までの合計 1,879