メインコンテンツにスキップ

Toshiba Satellite L45-S7423 Keyboard Replacement

必要な工具と部品

  1. Toshiba Satellite L45-S7423 Keyboard Replacement, Battery: 手順 1、 3の画像 1 Toshiba Satellite L45-S7423 Keyboard Replacement, Battery: 手順 1、 3の画像 2 Toshiba Satellite L45-S7423 Keyboard Replacement, Battery: 手順 1、 3の画像 3
    • Make sure the battery lock switch is switched to the unlocked position.

    • The battery is unlocked when the battery lock switch is slid to the side with an image of an unlocked lock.

  2. Toshiba Satellite L45-S7423 Keyboard Replacement: 手順 2、 2の画像 1 Toshiba Satellite L45-S7423 Keyboard Replacement: 手順 2、 2の画像 2
    • Slide the battery release switch to the left.

    • The switch is spring loaded, so you must hold the switch in place while removing the battery.

  3. Toshiba Satellite L45-S7423 Keyboard Replacement: 手順 3、 2の画像 1 Toshiba Satellite L45-S7423 Keyboard Replacement: 手順 3、 2の画像 2
    • Using a finger, lift up the battery.

    • The battery release switch must be held in place.

  4. Toshiba Satellite L45-S7423 Keyboard Replacement, Bottom Access Panel: 手順 4、 3の画像 1 Toshiba Satellite L45-S7423 Keyboard Replacement, Bottom Access Panel: 手順 4、 3の画像 2 Toshiba Satellite L45-S7423 Keyboard Replacement, Bottom Access Panel: 手順 4、 3の画像 3
    • Remove the 5 Phillips screws holding the panel in place.

    • These screws are permanently fastened to the panel; they are designed to be removed only partially to avoid loss.

  5. Toshiba Satellite L45-S7423 Keyboard Replacement: 手順 5、 3の画像 1 Toshiba Satellite L45-S7423 Keyboard Replacement: 手順 5、 3の画像 2 Toshiba Satellite L45-S7423 Keyboard Replacement: 手順 5、 3の画像 3
    • Use a finger to remove the panel by lifting up on the provided removal tab.

  6. Toshiba Satellite L45-S7423 Keyboard Replacement, Keyboard: 手順 6、 3の画像 1 Toshiba Satellite L45-S7423 Keyboard Replacement, Keyboard: 手順 6、 3の画像 2 Toshiba Satellite L45-S7423 Keyboard Replacement, Keyboard: 手順 6、 3の画像 3
    • Remove the two screws holding the keyboard in place.

    • Two 5.7 mm Phillips screws.

    • 'KB' is written alongside the screw holes. This indicates the screws hold the keyboard in place.

  7. Toshiba Satellite L45-S7423 Keyboard Replacement: 手順 7、 3の画像 1 Toshiba Satellite L45-S7423 Keyboard Replacement: 手順 7、 3の画像 2 Toshiba Satellite L45-S7423 Keyboard Replacement: 手順 7、 3の画像 3
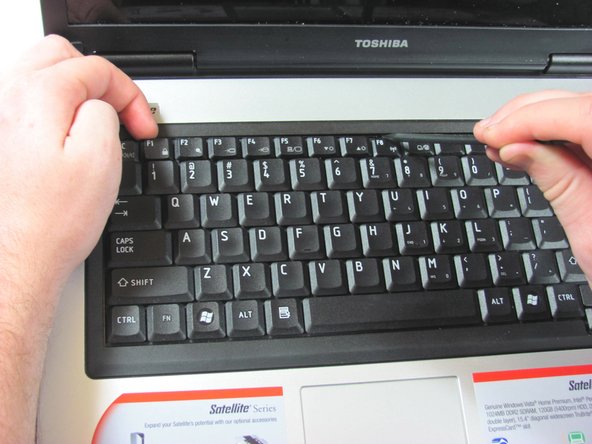
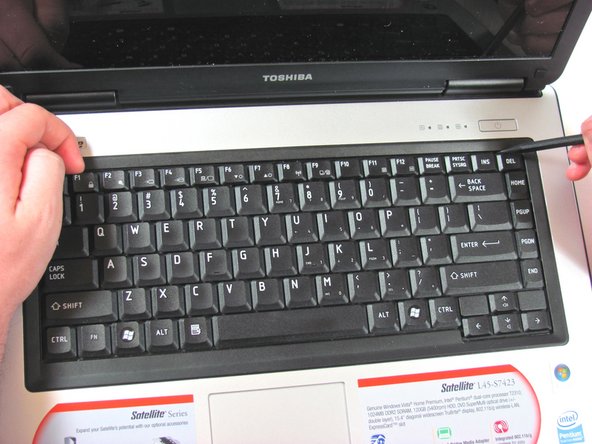
    • There are three tabs holding the keyboard in place.

    • They are located under the ESC, F8, and DEL keys.

    • Expose the tabs by pressing down on adjacent keys.

  8. Toshiba Satellite L45-S7423 Keyboard Replacement: 手順 8、 3の画像 1 Toshiba Satellite L45-S7423 Keyboard Replacement: 手順 8、 3の画像 2 Toshiba Satellite L45-S7423 Keyboard Replacement: 手順 8、 3の画像 3
    • While you press down the ESC key, push the tab with the spudger to release that side of the keyboard.

    • Use a finger to prevent the keyboard from locking back in place.

    • Repeat the previous step for the tabs under the F8 and DEL keys.

  9. Toshiba Satellite L45-S7423 Keyboard Replacement: 手順 9、 3の画像 1 Toshiba Satellite L45-S7423 Keyboard Replacement: 手順 9、 3の画像 2 Toshiba Satellite L45-S7423 Keyboard Replacement: 手順 9、 3の画像 3
    • Pick up the keyboard. This exposes a cable that connects the keyboard to the laptop.

    • Lift the keyboard gently. The cable connecting it to the computer is a ribbon. If pulled too hard, the ribbon may be damaged.

  10. Toshiba Satellite L45-S7423 Keyboard Replacement: 手順 10、 2の画像 1 Toshiba Satellite L45-S7423 Keyboard Replacement: 手順 10、 2の画像 2
    • Gently unplug the ribbon cable connecting the keyboard to the laptop by pulling horizontally.

終わりに

To reassemble your device, follow these instructions in reverse order.

3 の人々がこのガイドを完成させました。

作成者

4人の作成者と共同で作成されました。

Stephen Sippel

メンバー登録日: 04/16/13

194 ポイント

9のガイドは作成済み

チーム

Cal Poly, Team 21-54, Johann Spring 2013 Cal Poly, Team 21-54, Johann Spring 2013人のメンバー

CPSU-JOHANN-S13S21G54

4 メンバー

18のガイドは作成済み

コメント 1 件

Great instuctions plus photos. Spot on, tx

Darrell - 返信

コメントを追加

統計データ:

過去 24時間: 0

過去 7 日: 3

過去 30 日: 6

今までの合計 3,173