メインコンテンツにスキップ

このバージョンは誤った内容を含んでいる可能性があります。最新の承認済みスナップショットに切り替えてください。

必要な工具と部品

  1. この手順は未翻訳です。 翻訳を手伝う。

    : 手順 1、 1の画像 1
    • Close the laptop lid and flip the laptop over.

    • Switch the lock button on the left to the unlock position. (The unlock position is to the left side.)

  2. この手順は未翻訳です。 翻訳を手伝う。

    : 手順 2、 3の画像 1 : 手順 2、 3の画像 2 : 手順 2、 3の画像 3
    • Push the release button to the right.

    • Hold the release button to the right and lift the battery out of its housing.

  3. この手順は未翻訳です。 翻訳を手伝う。

    : 手順 3、 3の画像 1 : 手順 3、 3の画像 2 : 手順 3、 3の画像 3
    • Locate the RAM Module compartment on the bottom side of the laptop.

    • Carefully remove the 4.6mm 0 Phillips head screw and put it in a safe place.

    • Locate the notch on the screw side of the lid and lift to remove it.

  4. この手順は未翻訳です。 翻訳を手伝う。

    : 手順 4、 3の画像 1 : 手順 4、 3の画像 2 : 手順 4、 3の画像 3
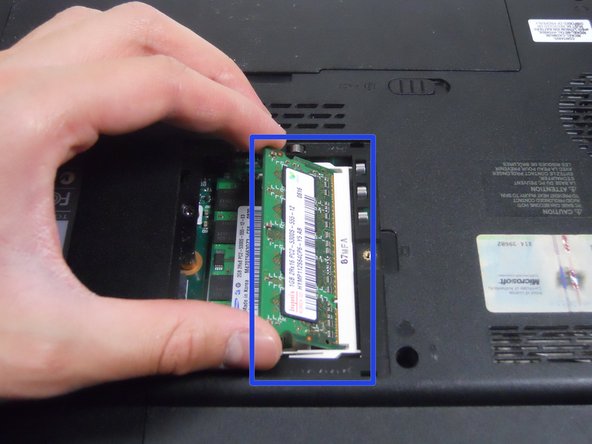
    • Push the metal tabs on the sides of the RAM outward and the RAM will pop up.

    • Gently pull the RAM out.

    • Replace the RAM by sliding the new one into the angled socket similarly to how you removed the old RAM.

    • Gently apply pressure until the metal tabs on the sides click into place.

ゴール

3 の人々がこのガイドを完成させました。

作成者

10人の作成者と共同で作成されました。

Elliot Fiske

メンバー登録日: 01/30/13

36 ポイント

1ガイドが承認済み

チーム

Cal Poly, Team 20-5, Maness Winter 2013 Cal Poly, Team 20-5, Maness Winter 2013人のメンバー

CPSU-MANESS-W13S20G5

4 メンバー

10のガイドは作成済み

0 件のコメント

コメントを追加

統計データ:

過去 24時間: 0

過去 7 日: 1

過去 30 日: 6

今までの合計 6,761