メインコンテンツにスキップ

Toshiba Satellite E105-S1602 Disk Drive Replacement

必要な工具と部品

  1. Toshiba Satellite E105-S1602 Disk Drive Replacement, Battery: 手順 1、 2の画像 1 Toshiba Satellite E105-S1602 Disk Drive Replacement, Battery: 手順 1、 2の画像 2
    • Slide both of the latches to the outside to release the battery.

  2. Toshiba Satellite E105-S1602 Disk Drive Replacement: 手順 2、 2の画像 1 Toshiba Satellite E105-S1602 Disk Drive Replacement: 手順 2、 2の画像 2
    • Pull the battery out by lifting the battery cover away from the laptop.

  3. Toshiba Satellite E105-S1602 Disk Drive Replacement, Keyboard: 手順 3、 3の画像 1 Toshiba Satellite E105-S1602 Disk Drive Replacement, Keyboard: 手順 3、 3の画像 2 Toshiba Satellite E105-S1602 Disk Drive Replacement, Keyboard: 手順 3、 3の画像 3
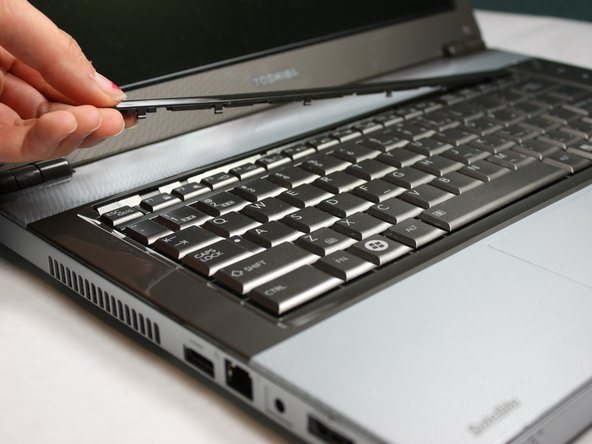
    • Flip the computer over and insert the plastic opening tool under the plastic strip at the top of the keyboard.

    • Pry the top plastic strip from the top of the keyboard.

    • Peel the strip completely away from the keyboard.

  4. Toshiba Satellite E105-S1602 Disk Drive Replacement: 手順 4、 2の画像 1 Toshiba Satellite E105-S1602 Disk Drive Replacement: 手順 4、 2の画像 2
    • Using your Phillips #00, unscrew the two 4.80mm screws at the top of the keyboard.

  5. Toshiba Satellite E105-S1602 Disk Drive Replacement: 手順 5、 2の画像 1 Toshiba Satellite E105-S1602 Disk Drive Replacement: 手順 5、 2の画像 2
    • When removing the keyboard, be careful not to rip the ribbon cable connecting the keyboard to the computer, to avoid damaging it.

    • Flip the keyboard up from the bottom in order to see the two ribbons connecting it to the motherboard.

  6. Toshiba Satellite E105-S1602 Disk Drive Replacement: 手順 6、 1の画像 1
    • Using the plastic opening tools, pop out the ribbon cable from the rest of the computer.

  7. Toshiba Satellite E105-S1602 Disk Drive Replacement: 手順 7、 1の画像 1
    • Using the plastic opening tools, pop out the second ribbon cable from the rest of the computer.

  8. Toshiba Satellite E105-S1602 Disk Drive Replacement: 手順 8、 2の画像 1 Toshiba Satellite E105-S1602 Disk Drive Replacement: 手順 8、 2の画像 2
    • Completely remove the keyboard from the laptop by lifting up the part closest to the screen, and then gently pulling out the bottom half.

    • Keep the keyboard safe by storing it on a flat, non-metallic surface until needed.

  9. Toshiba Satellite E105-S1602 Disk Drive Replacement, Front Panel: 手順 9、 2の画像 1 Toshiba Satellite E105-S1602 Disk Drive Replacement, Front Panel: 手順 9、 2の画像 2
    • Locate the four silver screws on the front panel.

    • Using the Phillips #0, unscrew to remove all four 2.95mm silver screws.

  10. Toshiba Satellite E105-S1602 Disk Drive Replacement: 手順 10、 2の画像 1 Toshiba Satellite E105-S1602 Disk Drive Replacement: 手順 10、 2の画像 2
    • Flip the laptop over and locate all seven screws on the bottom of the laptop.

    • Unscrew all seven Philips#00 7.70mm screws.

  11. Toshiba Satellite E105-S1602 Disk Drive Replacement: 手順 11、 2の画像 1 Toshiba Satellite E105-S1602 Disk Drive Replacement: 手順 11、 2の画像 2
    • Locate and unscrew the three silver Philips #00 2.85mm screws inside the battery compartment.

    • Locate and unscrew the five black Philips #00 3.25mm screws inside the battery compartment.

  12. Toshiba Satellite E105-S1602 Disk Drive Replacement: 手順 12、 2の画像 1 Toshiba Satellite E105-S1602 Disk Drive Replacement: 手順 12、 2の画像 2
    • Rotate the laptop so the back faces you.

    • Locate the two black Philips #00 7.65 screws, one by each hinge, and remove.

  13. Toshiba Satellite E105-S1602 Disk Drive Replacement: 手順 13、 3の画像 1 Toshiba Satellite E105-S1602 Disk Drive Replacement: 手順 13、 3の画像 2 Toshiba Satellite E105-S1602 Disk Drive Replacement: 手順 13、 3の画像 3
    • Use the plastic opening tool to pry the top panel up from the base of the computer.

    • Slowly work your way around the computer with the plastic removing tool to make it easier to lift the top panel away from the base.

    • Carefully lift the top panel no more than six inches, as there are ribbon cables connecting the two pieces.

    • Disconnect ribbons, and slowly lift the top panel up, away from the base.

  14. Toshiba Satellite E105-S1602 Disk Drive Replacement: 手順 14、 2の画像 1 Toshiba Satellite E105-S1602 Disk Drive Replacement: 手順 14、 2の画像 2
    • Locate the ribbon cable from the motherboard.

    • Using plastic removing tools, pop the ribbon base from the motherboard.

  15. Toshiba Satellite E105-S1602 Disk Drive Replacement: 手順 15、 2の画像 1 Toshiba Satellite E105-S1602 Disk Drive Replacement: 手順 15、 2の画像 2
    • Locate the two plugs from the motherboard.

    • Using plastic opening tools, remove each plug from the motherboard.

  16. Toshiba Satellite E105-S1602 Disk Drive Replacement: 手順 16、 2の画像 1 Toshiba Satellite E105-S1602 Disk Drive Replacement: 手順 16、 2の画像 2
    • Locate the ribbon cable partially hidden under the front panel.

    • Using plastic opening tools, pop out the ribbon cable from the motherboard.

  17. Toshiba Satellite E105-S1602 Disk Drive Replacement: 手順 17、 1の画像 1
    • Make sure that all wires have been disconnected before proceeding to avoid damaging components.

    • Slowly lift the top panel away from the base of the computer.

    • Place the top panel away from the computer and keep in a flat non-metallic surface until needed.

  18. Toshiba Satellite E105-S1602 Disk Drive Replacement, Disk Drive: 手順 18、 2の画像 1 Toshiba Satellite E105-S1602 Disk Drive Replacement, Disk Drive: 手順 18、 2の画像 2
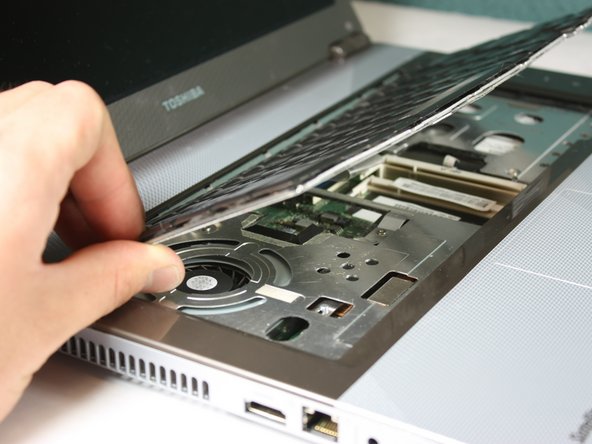
    • Locate and unscrew the Phillips-head #00 4.65mm screw that attaches the drive to the motherboard. It is located on the left hand side of the actual drive.

  19. Toshiba Satellite E105-S1602 Disk Drive Replacement: 手順 19、 3の画像 1 Toshiba Satellite E105-S1602 Disk Drive Replacement: 手順 19、 3の画像 2 Toshiba Satellite E105-S1602 Disk Drive Replacement: 手順 19、 3の画像 3
    • Push to the right with your finger placed on the left side of the drive until it is completely removed.

終わりに

To reassemble your device, follow these instructions in reverse order.

作成者

1人の作成者と共同作成されました。

Henry Smith

メンバー登録日: 03/12/14

124 ポイント

1ガイドが承認済み

チーム

UMass Dartmouth, Team 5-5, Cichon Spring 2014 UMass Dartmouth, Team 5-5, Cichon Spring 2014人のメンバー

UMASSD-CICHON-S14S5G5

3 メンバー

2のガイドは作成済み

0 件のコメント

コメントを追加

統計データ:

過去 24時間: 0

過去 7 日: 0

過去 30 日: 2

今までの合計 882