メインコンテンツにスキップ

Toshiba Satellite C855D-S5109 Motherboard Replacement

必要な工具と部品

  1. Toshiba Satellite C855D-S5109 Motherboard Replacement, Battery: 手順 1、 2の画像 1 Toshiba Satellite C855D-S5109 Motherboard Replacement, Battery: 手順 1、 2の画像 2
    • Flip the laptop over so the bottom is facing up.

  2. Toshiba Satellite C855D-S5109 Motherboard Replacement: 手順 2、 2の画像 1 Toshiba Satellite C855D-S5109 Motherboard Replacement: 手順 2、 2の画像 2
    • Slide the two lock tabs on the battery to the open position.

  3. Toshiba Satellite C855D-S5109 Motherboard Replacement: 手順 3、 3の画像 1 Toshiba Satellite C855D-S5109 Motherboard Replacement: 手順 3、 3の画像 2 Toshiba Satellite C855D-S5109 Motherboard Replacement: 手順 3、 3の画像 3
    • While still holding the lock tabs outward, use your hand to grab the top of battery and pull up.

    • Remove the battery.

  4. Toshiba Satellite C855D-S5109 Motherboard Replacement, Keyboard: 手順 4、 2の画像 1 Toshiba Satellite C855D-S5109 Motherboard Replacement, Keyboard: 手順 4、 2の画像 2
    • Using a Jimmy, slowly lift the keyboard up and away from the palm-rest. Slowly work around the edges, pushing the clips back, prying the keyboard up with minimal force.

    • Be sure to place the tool under the keyboard not the keys themselves!

    • Patience is key on this step; it might take a while, but don't force anything or you'll risk breaking a clip.

  5. Toshiba Satellite C855D-S5109 Motherboard Replacement: 手順 5、 3の画像 1 Toshiba Satellite C855D-S5109 Motherboard Replacement: 手順 5、 3の画像 2 Toshiba Satellite C855D-S5109 Motherboard Replacement: 手順 5、 3の画像 3
    • Flip up the locking flap of the ZIF connector holding the keyboard cable on the motherboard.

    • Pull the keyboard ribbon cable out from the connector on the motherboard.

    • The ribbon should detach from the palm-rest not the underside of the keyboard.

    • Remove the keyboard from the laptop.

    • While replacing the keyboard, you will not need the Jimmy. Just gently press down around the edges of the new keyboard after plugging the ribbon cable in. You will hear it click back into place as the clips engage.

  6. Toshiba Satellite C855D-S5109 Motherboard Replacement, Motherboard: 手順 6、 2の画像 1 Toshiba Satellite C855D-S5109 Motherboard Replacement, Motherboard: 手順 6、 2の画像 2
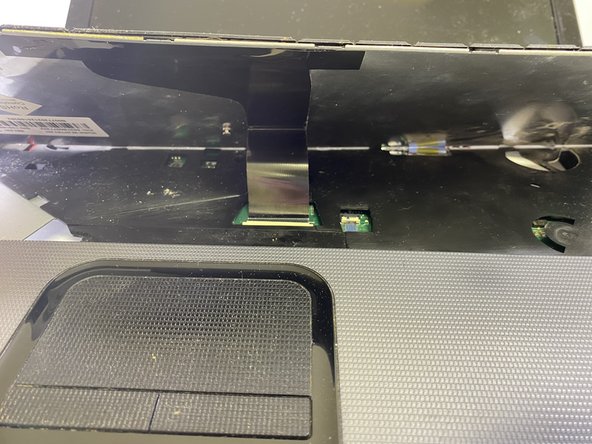
    • In the area under the keyboard, disconnect the first cable that is located inside of the square near the front right of the laptop.

    • Disconnect the next two cables that are located inside of the square located at the back right of the laptop.

  7. Toshiba Satellite C855D-S5109 Motherboard Replacement: 手順 7、 3の画像 1 Toshiba Satellite C855D-S5109 Motherboard Replacement: 手順 7、 3の画像 2 Toshiba Satellite C855D-S5109 Motherboard Replacement: 手順 7、 3の画像 3
    • Flip the laptop over and locate all of the underside screws.

    • Remove the ten 6mm Phillips #00 screws around the outside of the bottom panel.

    • Remove the two 6mm Phillips #00 screws in the panel that cover the hard drive.

    • Remove the panel that covers the hard drive.

  8. Toshiba Satellite C855D-S5109 Motherboard Replacement: 手順 8、 2の画像 1 Toshiba Satellite C855D-S5109 Motherboard Replacement: 手順 8、 2の画像 2
    • Remove the four 6mm Phillips #00 screws scattered around the hard drive.

  9. Toshiba Satellite C855D-S5109 Motherboard Replacement: 手順 9、 3の画像 1 Toshiba Satellite C855D-S5109 Motherboard Replacement: 手順 9、 3の画像 2 Toshiba Satellite C855D-S5109 Motherboard Replacement: 手順 9、 3の画像 3
    • Remove the DVD RW Drive by sliding it out.

    • Pull the back panel of the laptop off, exposing the motherboard and other inside components.

  10. Toshiba Satellite C855D-S5109 Motherboard Replacement: 手順 10、 2の画像 1 Toshiba Satellite C855D-S5109 Motherboard Replacement: 手順 10、 2の画像 2
    • Remove the two screws holding down the wifi card

    • Pull and disconnect the wifi card from the motherboard

  11. Toshiba Satellite C855D-S5109 Motherboard Replacement: 手順 11、 2の画像 1 Toshiba Satellite C855D-S5109 Motherboard Replacement: 手順 11、 2の画像 2
    • Disconnect the two cables for the DC power socket jack and the side usb board ribbon.

  12. Toshiba Satellite C855D-S5109 Motherboard Replacement: 手順 12、 3の画像 1 Toshiba Satellite C855D-S5109 Motherboard Replacement: 手順 12、 3の画像 2 Toshiba Satellite C855D-S5109 Motherboard Replacement: 手順 12、 3の画像 3
    • Remove the two 3mm Phillips #00 screws that are holding the cooling fan down.

    • Unplug the wire that is holding the cooling fan to the motherboard.

    • Pull the cooling fan out.

  13. Toshiba Satellite C855D-S5109 Motherboard Replacement: 手順 13、 3の画像 1 Toshiba Satellite C855D-S5109 Motherboard Replacement: 手順 13、 3の画像 2 Toshiba Satellite C855D-S5109 Motherboard Replacement: 手順 13、 3の画像 3
    • Remove the nine 6mm Phillips #00 screws around the motherboard that are located inside of the yellow circles.

    • Pull the motherboard out of the panel.

終わりに

To reassemble your device, follow these instructions in reverse order.

ある他の人がこのガイドを完成しました。

作成者

1人の作成者と共同作成されました。

Ernest Armstrong

メンバー登録日: 09/27/21

184 ポイント

1ガイドが承認済み

チーム

Casper College, Team 1-3, Lareau Fall 2021 Casper College, Team 1-3, Lareau Fall 2021人のメンバー

CASC-LAREAU-F21S1G3

3 メンバー

8のガイドは作成済み

0 件のコメント

コメントを追加

統計データ:

過去 24時間: 1

過去 7 日: 4

過去 30 日: 17

今までの合計 316