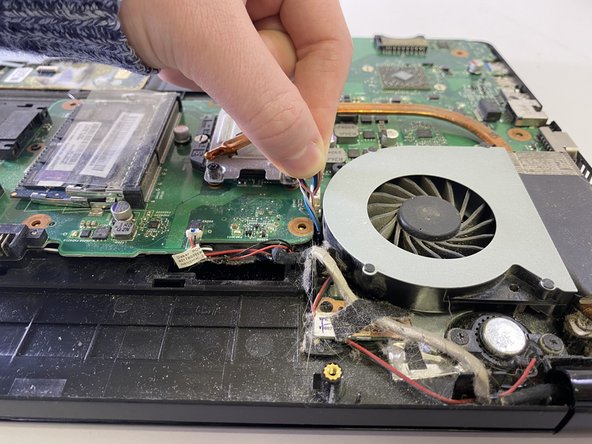
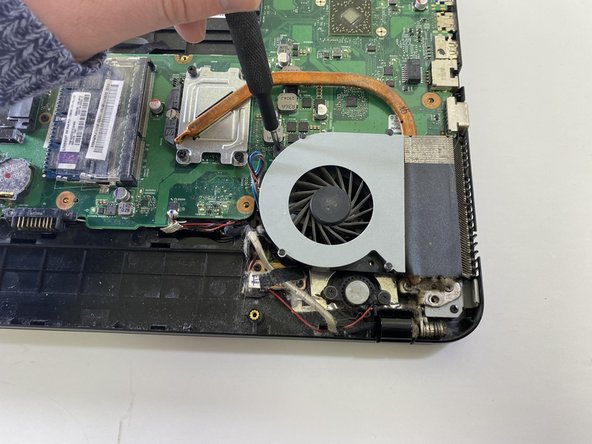
メインコンテンツにスキップ

Toshiba Satellite C855D-S5109 Cooling Fan Replacement

必要な工具と部品

  1. Toshiba Satellite C855D-S5109 Cooling Fan Replacement, Battery: 手順 1、 2の画像 1 Toshiba Satellite C855D-S5109 Cooling Fan Replacement, Battery: 手順 1、 2の画像 2
    • Flip the laptop over so the bottom is facing up.

  2. Toshiba Satellite C855D-S5109 Cooling Fan Replacement: 手順 2、 2の画像 1 Toshiba Satellite C855D-S5109 Cooling Fan Replacement: 手順 2、 2の画像 2
    • Slide the two lock tabs on the battery to the open position.

  3. Toshiba Satellite C855D-S5109 Cooling Fan Replacement: 手順 3、 3の画像 1 Toshiba Satellite C855D-S5109 Cooling Fan Replacement: 手順 3、 3の画像 2 Toshiba Satellite C855D-S5109 Cooling Fan Replacement: 手順 3、 3の画像 3
    • While still holding the lock tabs outward, use your hand to grab the top of battery and pull up.

    • Remove the battery.

  4. Toshiba Satellite C855D-S5109 Cooling Fan Replacement, Hard Drive: 手順 4、 2の画像 1 Toshiba Satellite C855D-S5109 Cooling Fan Replacement, Hard Drive: 手順 4、 2の画像 2
    • Use the Phillips #00 screwdriver to unscrew the captive screw on the L-Shaped panel.

    • Remove the L-Shaped panel.

  5. Toshiba Satellite C855D-S5109 Cooling Fan Replacement: 手順 5、 2の画像 1 Toshiba Satellite C855D-S5109 Cooling Fan Replacement: 手順 5、 2の画像 2
    • Using a Phillips #00 screwdriver, remove the screw(s) securing the hard drive to the laptop case.

    • Carefully pull the tab on the hard drive to detach the connecting wire to the right of the hard drive.

    • Remove the hard drive.

  6. Toshiba Satellite C855D-S5109 Cooling Fan Replacement, Cooling Fan: 手順 6、 2の画像 1 Toshiba Satellite C855D-S5109 Cooling Fan Replacement, Cooling Fan: 手順 6、 2の画像 2
    • Remove the twelve 6 mm screws from the back of the laptop with a Phillips #00 screwdriver.

    • There are 12 screws holding the back panel on the laptop. Two of the screws are located underneath the service panel.

  7. Toshiba Satellite C855D-S5109 Cooling Fan Replacement: 手順 7、 3の画像 1 Toshiba Satellite C855D-S5109 Cooling Fan Replacement: 手順 7、 3の画像 2 Toshiba Satellite C855D-S5109 Cooling Fan Replacement: 手順 7、 3の画像 3
    • Remove the DVD RW Drive by sliding it out.

    • Use a jimmy to pry open the back panel.

    • Pull the back panel of the laptop off, exposing the motherboard and other inside components.

  8. Toshiba Satellite C855D-S5109 Cooling Fan Replacement: 手順 8、 3の画像 1 Toshiba Satellite C855D-S5109 Cooling Fan Replacement: 手順 8、 3の画像 2 Toshiba Satellite C855D-S5109 Cooling Fan Replacement: 手順 8、 3の画像 3
    • The cooling fan is in the bottom right corner of the laptop.

    • Unplug the small red and blue wire connecting the cooling fan to the motherboard.

    • Remove the two 3 mm screws securing the fan to the motherboard with a Phillips #00 screwdriver.

    • Remove the fan from the laptop.

終わりに

To reassemble your device, follow these instructions in reverse order.

作成者

2人の作成者と共同で作成されました。

Brook Ostrander

メンバー登録日: 09/27/21

169 ポイント

2のガイドは作成済み

チーム

Casper College, Team 1-3, Lareau Fall 2021 Casper College, Team 1-3, Lareau Fall 2021人のメンバー

CASC-LAREAU-F21S1G3

3 メンバー

8のガイドは作成済み

0 件のコメント

コメントを追加

統計データ:

過去 24時間: 2

過去 7 日: 2

過去 30 日: 13

今までの合計 288