メインコンテンツにスキップ

Toshiba Satellite A105-S4284 Trackpad Replacement

必要な工具と部品

  1. Toshiba Satellite A105-S4284 Trackpad Replacement, Battery: 手順 1、 2の画像 1 Toshiba Satellite A105-S4284 Trackpad Replacement, Battery: 手順 1、 2の画像 2
    • Make sure your computer is turned off and the computer is not plugged in.

    • Turn your laptop upside down, and slide the right release tab outward.

    • Using you left hand, hold the left release tab towards the left side and then pull the battery out.

  2. Toshiba Satellite A105-S4284 Trackpad Replacement, Casing: 手順 2、 3の画像 1 Toshiba Satellite A105-S4284 Trackpad Replacement, Casing: 手順 2、 3の画像 2 Toshiba Satellite A105-S4284 Trackpad Replacement, Casing: 手順 2、 3の画像 3
    • Disconnect wire attaching LCD to motherboard

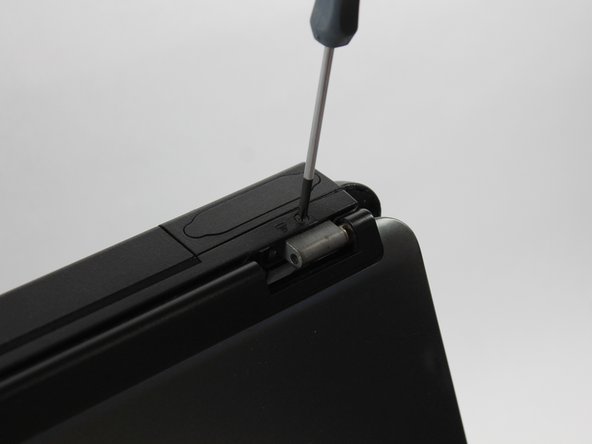
    • Using the Phillips screwdriver remove the two 4.0mm screws from each hinge above speakers

    • Partially close the lid and remove the last two 4.0mm screws from the back of the laptop.

  3. Toshiba Satellite A105-S4284 Trackpad Replacement: 手順 3、 2の画像 1 Toshiba Satellite A105-S4284 Trackpad Replacement: 手順 3、 2の画像 2
    • Remove the seventeen 4.5mm phillips screws on the bottom of the laptop.

    • Using the pry tool separate the two halves of the laptop base.

    • Use caution when separating the laptop halves as they are still connected by two ribbon cables.

  4. Toshiba Satellite A105-S4284 Trackpad Replacement: 手順 4、 2の画像 1 Toshiba Satellite A105-S4284 Trackpad Replacement: 手順 4、 2の画像 2
    • Lift the top half of the case enough to get your hand beneath it, and then remove the two ribbon cables that connect it to the motherboard.

  5. Toshiba Satellite A105-S4284 Trackpad Replacement, Trackpad: 手順 5、 1の画像 1
    • the upper half of the computer base.

  6. Toshiba Satellite A105-S4284 Trackpad Replacement: 手順 6、 2の画像 1 Toshiba Satellite A105-S4284 Trackpad Replacement: 手順 6、 2の画像 2
    • Remove the 3 4.5mm screws holding the track-pad in place.

    • There are some screws that will be hidden by assembly tape.

  7. Toshiba Satellite A105-S4284 Trackpad Replacement: 手順 7、 1の画像 1
    • Slide green circuit board to right and lift track pad free from laptop.

終わりに

To reassemble your device, follow these instructions in reverse order.

作成者

3人の作成者と共同で作成されました。

Josh

メンバー登録日: 03/12/14

685 ポイント

5のガイドは作成済み

チーム

UMass Dartmouth, Team 1-6, Cichon Spring 2014 UMass Dartmouth, Team 1-6, Cichon Spring 2014人のメンバー

UMASSD-CICHON-S14S1G6

3 メンバー

6のガイドは作成済み

0 件のコメント

コメントを追加

統計データ:

過去 24時間: 0

過去 7 日: 0

過去 30 日: 5

今までの合計 485