メインコンテンツにスキップ

このバージョンは誤った内容を含んでいる可能性があります。最新の承認済みスナップショットに切り替えてください。

必要な工具と部品

  1. この手順は未翻訳です。 翻訳を手伝う。

    : 手順 1、 1の画像 1
    • Flip the laptop over so it is rightside up, and open the laptop all the way so that the screen is horizontal.

  2. この手順は未翻訳です。 翻訳を手伝う。

    : 手順 2、 3の画像 1 : 手順 2、 3の画像 2 : 手順 2、 3の画像 3
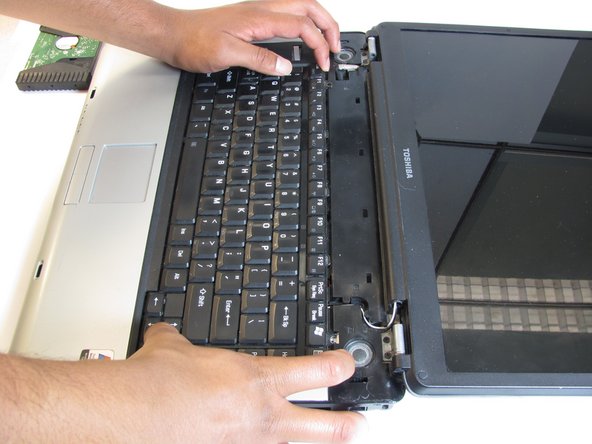
    • Using the plastic opening tool, pry off the panel above the keyboard, starting near the right front speaker.

    • Use the plastic opening tool to pop off tabs along the length of this panel.

    • This may feel like you're about to break something, but as long as you work your way down the panel and don't yank it out, the laptop will be fine.

  3. この手順は未翻訳です。 翻訳を手伝う。

    : 手順 3、 2の画像 1 : 手順 3、 2の画像 2
    • Unscrew the two 4.5 mm screws holding the keyboard on with the Phillips #1 screwdriver.

  4. この手順は未翻訳です。 翻訳を手伝う。

    : 手順 4、 3の画像 1 : 手順 4、 3の画像 2 : 手順 4、 3の画像 3
    • Lift the keyboard gently from the side closest the screen.

    • Pull out the ribbon connecting the keyboard to the laptop.

  5. この手順は未翻訳です。 翻訳を手伝う。

    : 手順 5、 2の画像 1 : 手順 5、 2の画像 2
    • Make sure your computer is turned off and the computer is not plugged in.

    • Turn your laptop upside down, and slide the right release tab outward.

    • Using you left hand, hold the left release tab towards the left side and then pull the battery out.

  6. この手順は未翻訳です。 翻訳を手伝う。

    : 手順 6、 3の画像 1 : 手順 6、 3の画像 2 : 手順 6、 3の画像 3
    • Remove the black and white wires. they simply lift off the posts.

    • Remove the cable attaching the LCD to the motherboard, on the left side of the laptop.

  7. この手順は未翻訳です。 翻訳を手伝う。

    : 手順 7、 2の画像 1 : 手順 7、 2の画像 2
    • Using the Phillips screwdriver remove the two 4.0mm screws from each hinge above speakers.

    • Partially close the lid and remove the last two 4.0mm screws from the back of the laptop.

  8. この手順は未翻訳です。 翻訳を手伝う。

    : 手順 8、 3の画像 1 : 手順 8、 3の画像 2 : 手順 8、 3の画像 3
    • Peel off the rubber circles from the four corners.

    • Remove the four 4.0mm phillips screws.

  9. この手順は未翻訳です。 翻訳を手伝う。

    : 手順 9、 3の画像 1 : 手順 9、 3の画像 2 : 手順 9、 3の画像 3
    • Using the plastic prying tools separate the plastic surrounding the screen

    • Lift out the broken LCD to be replaced.

ゴール

作成者

3人の作成者と共同で作成されました。

Josh

メンバー登録日: 03/12/14

685 ポイント

5のガイドは作成済み

チーム

UMass Dartmouth, Team 1-6, Cichon Spring 2014 UMass Dartmouth, Team 1-6, Cichon Spring 2014人のメンバー

UMASSD-CICHON-S14S1G6

3 メンバー

6のガイドは作成済み

0 件のコメント

コメントを追加

統計データ:

過去 24時間: 1

過去 7 日: 5

過去 30 日: 27

今までの合計 1,885