メインコンテンツにスキップ

Toshiba Satellite A105-S4011 Optical Drive Replacement

必要な工具と部品

  1. Toshiba Satellite A105-S4011 Optical Drive Replacement, Battery: 手順 1、 2の画像 1 Toshiba Satellite A105-S4011 Optical Drive Replacement, Battery: 手順 1、 2の画像 2
    • Turn the laptop over and locate the lock and battery release switches. Unlock the battery by changing the switch on the right from locked to unlocked by sliding the switch outward.

  2. Toshiba Satellite A105-S4011 Optical Drive Replacement: 手順 2、 2の画像 1 Toshiba Satellite A105-S4011 Optical Drive Replacement: 手順 2、 2の画像 2
    • Hold the release switch and pull out the battery towards you.

  3. Toshiba Satellite A105-S4011 Optical Drive Replacement, Keyboard: 手順 3、 3の画像 1 Toshiba Satellite A105-S4011 Optical Drive Replacement, Keyboard: 手順 3、 3の画像 2 Toshiba Satellite A105-S4011 Optical Drive Replacement, Keyboard: 手順 3、 3の画像 3
    • Make sure to turn off the laptop, unplug the device and/or remove any batteries.

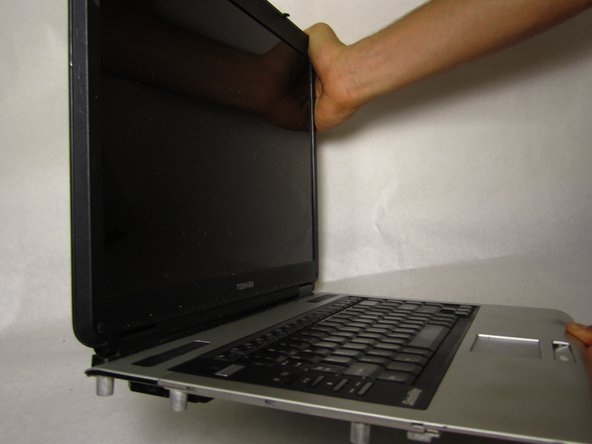
    • Open the laptop so the display screen is bent fully back with the display facing upward, parallel to the surface you are working on.

    • Wedge the Phillips 00 screwdriver above the F1 key, and separate the top piece of plastic from the body of the laptop. Don't worry about breaking it! You will need to forcefully wedge the screwdriver under the plastic, simultaneously pushing upward and forward.

    • Once that section has popped up, work on pulling the rest of the plastic piece up and out, alternating from left to right.

  4. Toshiba Satellite A105-S4011 Optical Drive Replacement: 手順 4、 3の画像 1 Toshiba Satellite A105-S4011 Optical Drive Replacement: 手順 4、 3の画像 2 Toshiba Satellite A105-S4011 Optical Drive Replacement: 手順 4、 3の画像 3
    • Completely remove the plastic piece from the body of the laptop.

    • Using the Phillips 1 screwdriver, unscrew the two 3mm screws located at the top corners of the keyboard. (See the second picture for additional clarification.)

  5. Toshiba Satellite A105-S4011 Optical Drive Replacement: 手順 5、 3の画像 1 Toshiba Satellite A105-S4011 Optical Drive Replacement: 手順 5、 3の画像 2 Toshiba Satellite A105-S4011 Optical Drive Replacement: 手順 5、 3の画像 3
    • Without yanking, lift the keyboard up carefully.

    • Now that the board is free, cautiously undo and pull free the ribbon that connects the keyboard to the body of the laptop.

  6. 注意: 手順 6-7 は、作業進行中としてマークされている ガイド から引用されています。

    Toshiba Satellite A105-S4011 Optical Drive Replacement, Display: 手順 6、 1の画像 1
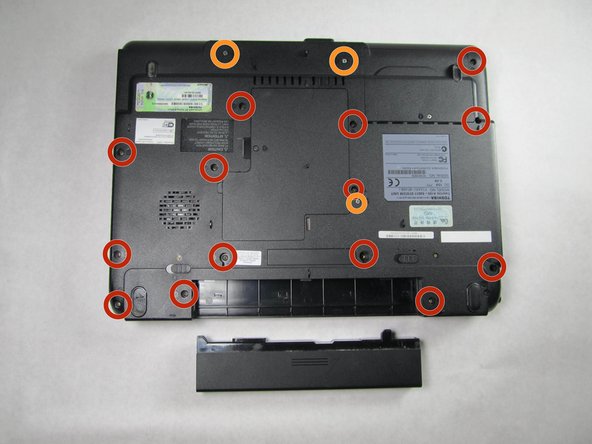
    • Turn the laptop over, so that you are now looking at the bottom of the laptop.

    • Using the Phillips #1 screwdriver remove the fourteen 6mm screws.

    • Using the Phillips #1 screwdriver remove the three 4mm screws.

    • Before beginning this guide, make sure you have disconnected the seven wires described in step 4 of the keyboard guide (the guide that proceeds this one).

  7. Toshiba Satellite A105-S4011 Optical Drive Replacement: 手順 7、 1の画像 1
    • Completely remove the display piece by pulling between the silver display-component and the black bottom-component. The display- component is an all-in-one component pictured here.

    • You may need to use the plastic opening tool to pry the two sections apart

    • Manufacturer sells the display piece, pictured here, as a complete piece for replacement purposes.

  8. Toshiba Satellite A105-S4011 Optical Drive Replacement, Optical Drive: 手順 8、 1の画像 1
    • Using the #00 Phillips Screwdriver, remove the single screw that holds the optical drive in place.

    • Once again you may want to consider grounding yourself before touching the disk drive.

  9. Toshiba Satellite A105-S4011 Optical Drive Replacement: 手順 9、 1の画像 1
    • Simply push the disk drive to the left, as demonstrated in the picture, until the disk drive is completely outside of the casing.

    • Keep the disk drive in a place that is cool and dry. This will help prevent any damage from occurring.

  10. Toshiba Satellite A105-S4011 Optical Drive Replacement: 手順 10、 1の画像 1
    • This disk drive model appears to not have any connecting wires, however your disk drive might need additional steps to connect it to the motherboard.

終わりに

To reassemble your device, follow these instructions in reverse order.

作成者

5人の作成者と共同で作成されました。

Cara Sloth

メンバー登録日: 04/17/13

208 ポイント

2のガイドは作成済み

チーム

Cal Poly, Team 4-14, Maness Spring 2013 Cal Poly, Team 4-14, Maness Spring 2013人のメンバー

CPSU-MANESS-S13S4G14

4 メンバー

14のガイドは作成済み

0 件のコメント

コメントを追加

統計データ:

過去 24時間: 0

過去 7 日: 2

過去 30 日: 4

今までの合計 1,048