メインコンテンツにスキップ

このバージョンは誤った内容を含んでいる可能性があります。最新の承認済みスナップショットに切り替えてください。

必要な工具と部品

  1. この手順は未翻訳です。 翻訳を手伝う。

    : 手順 1、 1の画像 1
    • Unplug the DVD player before beginning.

    • Remove the three 7.7 mm screws from the back panel using a Phillips #0 screwdriver.

  2. この手順は未翻訳です。 翻訳を手伝う。

    : 手順 2、 2の画像 1 : 手順 2、 2の画像 2
    • Turn the DVD player on its side.

    • Remove the 7.7 mm screw.

    • Flip the DVD player onto its other side.

    • Remove the 7.7 mm screw.

  3. この手順は未翻訳です。 翻訳を手伝う。

    : 手順 3、 1の画像 1
    • Flip the DVD player over onto its front face.

    • Remove the back panel by lifting up and pulling it towards yourself.

  4. この手順は未翻訳です。 翻訳を手伝う。

    : 手順 4、 1の画像 1
    • Flip the DVD player so its top is sitting on your working surface.

    • Lift and push away the two tabs located in the middle of the player.

    • The front panel will not detach during this step, so do not force it.

  5. この手順は未翻訳です。 翻訳を手伝う。

    : 手順 5、 1の画像 1
    • Flip the DVD player on its side.

    • Lift and slide forward the single tab on the side.

    • The front panel will not detach during this step, so do not force it.

  6. この手順は未翻訳です。 翻訳を手伝う。

    : 手順 6、 2の画像 1 : 手順 6、 2の画像 2
    • Grasp the front panel and pull forward to your right to remove it.

  7. この手順は未翻訳です。 翻訳を手伝う。

    : 手順 7、 2の画像 1 : 手順 7、 2の画像 2
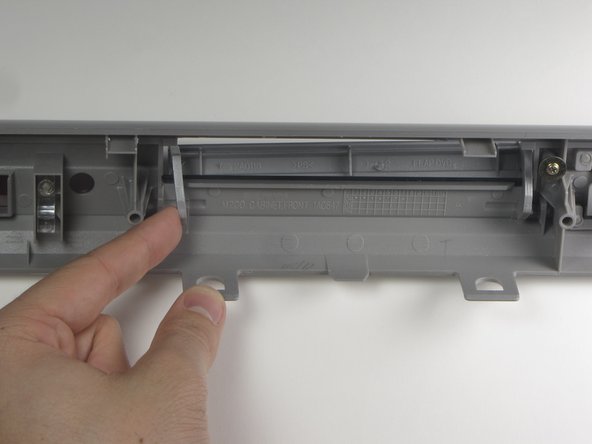
    • On back side of front panel very carefully apply pressure to the left hand side of the flap hinge.

    • There is just enough tolerance in the plastic to allow removal, be careful of brittle plastic.

  8. この手順は未翻訳です。 翻訳を手伝う。

    : 手順 8、 1の画像 1
    • Once the peg is free from the left restraint, carefully remove the left part of the flap.

    • Carefully remove the right peg from the restraint.

    • Do not pull away from the front panel because the spring is still attached.

    • Do not force the plastic.

  9. この手順は未翻訳です。 翻訳を手伝う。

    : 手順 9、 1の画像 1
    • Remove the spring from the end of the right peg by pulling the door away from the spring.

    • Do not pull away from the front panel until the spring has been removed from the flap.

  10. この手順は未翻訳です。 翻訳を手伝う。

    : 手順 10、 1の画像 1
    • Remove the .384 inch screw holding the spring to front panel.

  11. この手順は未翻訳です。 翻訳を手伝う。

    : 手順 11、 2の画像 1 : 手順 11、 2の画像 2
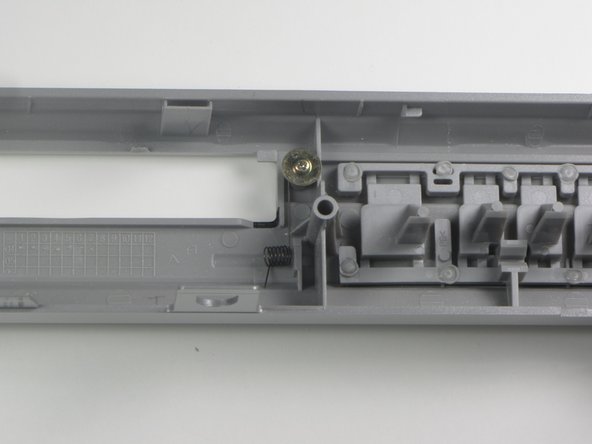
    • Slide the spring off of the underlying peg.

ゴール

作成者

6人の作成者と共同で作成されました。

John Lokker

メンバー登録日: 01/20/11

324 ポイント

3のガイドは作成済み

チーム

Cal Poly, Team 1-16, Amido Winter 2011 Cal Poly, Team 1-16, Amido Winter 2011人のメンバー

CPSU-AMIDO-W11S1G16

4 メンバー

8のガイドは作成済み

5 件のコメント

Thanks for sharing,

It's very informative for me, I really enjoy this content.

I also have Content about <a href="https://accesssecuritygates.com/"> door spring replacement</a>

Cheers.

ali - 返信

Great Article's content. Its worth reading. What type of auto gate repair is best for you? Find out by comparing repair services, prices and tech info. If you're in need of automatic gate repair, <a href="https://www.ozgaragedoorsandgates.com/"#...>Oz Garage Doors And Gates</a> can be a solution.

ozee garage - 返信

I got wonderful content after reading your article. Thankyou for information. Find out by comparing repair services, prices and tech info. If you're in need of automatic gate repair, <a href="http://elitecommercialgaterepairs.com/"#/>Elite Commercial Gate Repairs</a> can be a solution.

nature nut - 返信

Thanks for this Article! If anyone looking for a platform which provide services of repairing ad installation doors. <a href="https://http://powermastergateopenerrepair.com/"...>Power Master Gate Opener Repair Specialist</a> can be a solution.

georgia oscar - 返信

Thanks for sharing us this informative article. If you're in need of automatic gate repair, <a href="https://http://miamioverheadgaterepair.com/"#/>Miami Overhead Gate Repair</a> can be a solution.

Ella Swan - 返信

コメントを追加

統計データ:

過去 24時間: 0

過去 7 日: 7

過去 30 日: 19

今までの合計 5,197