はじめに
Guide to replace the battery in the Tom Tom XL.
必要な工具と部品
-
-
Slip a small plastic opening tool underneath the screen bezel, gently sliding it around the inside edge.
-
Starting at the corners, carefully pry up the screen bezel.
-
-
-
-
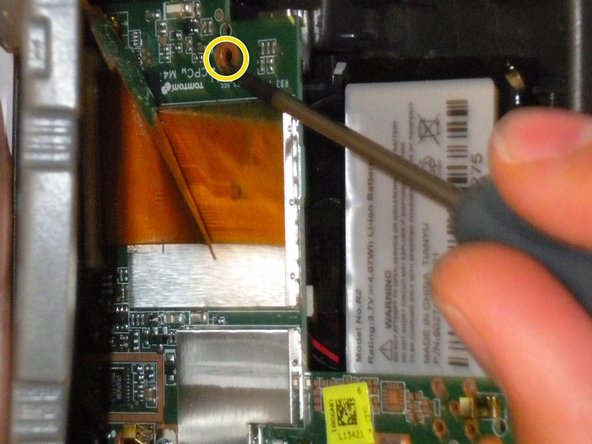
Remove the three Phillips #00 screws connecting the motherboard to the plastic housing:
-
Two Phillips #00 screws are located at the bottom of the first picture.
-
The third screw is hidden under the orange ribbon cable, near the screen.
-
-
-
Slip a small plastic opening tool under the battery and slowly pry the battery up.
-
Remove the battery from the housing.
-


To reassemble your device, follow these instructions in reverse order.
To reassemble your device, follow these instructions in reverse order.
13 の人々がこのガイドを完成させました。
チーム

Cal Poly, Team 33-84, Johann Spring 2010 Cal Poly, Team 33-84, Johann Spring 2010人のメンバー
CPSU-JOHANN-S10S33G84
4 メンバー
5のガイドは作成済み
12 件のコメント
Awesome and very detailed guide. Thanks for this.
Great demo, for replacement tomtom batteries take a look at : TomTom batteries
based in the UK they are reliable and give a truly longer charge
Yep: I didn't have a clue that there were two tiny screws under the label on the bottom - Now I'm hoping that it will "snap" back together OK. Live and Learn whether you want to or not........ lol
Great demo. It was perfect for me
Dont be tempted to fit a higher capacity battery. They are slightly thicker. Tom Tom designed it so that there is space for the battery to swell which they often do. The larger capacity batteries leave no room for this to happen.
On the model above without the two screws under the label, gently pry the top and bottom of the screen surround up about 3mm to disengage the lugs. Now slide both sides down about 3mm. The sides of the screen surround will disengage from their locating lugs.
When I opened the frame one of the small plastic links broke off, but not too serious. The model was bought in ‘91. The rest was easy.
I was struggling a bit, so pulled off the sticker strip at the bottom and found the 2 screws mentioned by others.
Then I followed this excellent guide. Purchased recommended replacement battery.
This ‘ancient navigator’ is back in operation, and suits me weill i.e. it’s cost just the battery.
TomTom kindly offered a replacement for only about $300 [for what I recall cost about $80 years ago], but I decided that I’m happy with my ‘ancient navigator’,
and spending the money on other things … And they’ve updated the map etc (for the last time of course) for free.
Lovely to have this ‘antique’ back in operation. Big thanks to Ifixit and Sean.
Some models have 2 Torx T-6 screws that must be removed first. One is under the C in the FC mark, the other is at the very beginning of the white bar code field. The bezel may be black with a silver stripe on the outside.
Morten - 返信