メインコンテンツにスキップ

このバージョンは誤った内容を含んでいる可能性があります。最新の承認済みスナップショットに切り替えてください。

必要な工具と部品

  1. , トイレの蓋: 手順 1、 3の画像 1 , トイレの蓋: 手順 1、 3の画像 2 , トイレの蓋: 手順 1、 3の画像 3
    • タンクの蓋を持ち上げて、トイレタンクから移します。

  2. , トイレの給水停止方法: 手順 2、 2の画像 1 , トイレの給水停止方法: 手順 2、 2の画像 2
    • トイレの下のストップバルブを時計回りに、これ以上回らない程度まで回します。

    • バルブの外観はトイレによって異なりますが、作業はほとんどは同じです。

  3. この手順は未翻訳です。 翻訳を手伝う。

    : 手順 3、 3の画像 1 : 手順 3、 3の画像 2 : 手順 3、 3の画像 3
    • Disconnect the fill valve's rubber refill tube from the top of the overflow tube.

  4. , トイレタンク内の水の排水: 手順 4、 2の画像 1 , トイレタンク内の水の排水: 手順 4、 2の画像 2
    • 排水レバーを下げます。

    • タンクから排水がしなくなるまでレバーを下げたままにします。

    • タンクの底に少量の水が残ります。

    • 排水レバーや中のチェーンが外れた場合は、トイレの中のフラッパーを持ち上げて排水します。

  5. , トイレタンクの内部をスポンジで乾かす: 手順 5、 3の画像 1 , トイレタンクの内部をスポンジで乾かす: 手順 5、 3の画像 2 , トイレタンクの内部をスポンジで乾かす: 手順 5、 3の画像 3
    • スポンジを使って、トイレタンクに残っている水を吸い取ります。

    • 定期的にスポンジを絞って吸い取った水をスポンジから取り除きます。

  6. , 供給チューブ: 手順 6、 3の画像 1 , 供給チューブ: 手順 6、 3の画像 2 , 供給チューブ: 手順 6、 3の画像 3
    • 滴り落ちる水を受け止めるために、供給チューブの下にバケツを置きます。

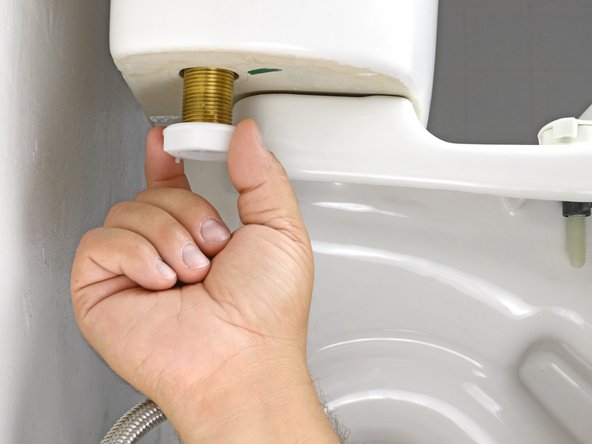
    • タンクの底部のねじ付きシャンクが外れるまで、供給チューブのカップリングナットを時計回りに回します。

  7. この手順は未翻訳です。 翻訳を手伝う。

    : 手順 7、 2の画像 1 : 手順 7、 2の画像 2
    • Using an adjustable wrench, turn the locknut on the threaded shank counter-clockwise until it becomes loose.

  8. この手順は未翻訳です。 翻訳を手伝う。

    : 手順 8、 3の画像 1 : 手順 8、 3の画像 2 : 手順 8、 3の画像 3
    • Turn the locknut counter-clockwise until it releases from the threaded shank.

  9. この手順は未翻訳です。 翻訳を手伝う。

    : 手順 9、 2の画像 1 : 手順 9、 2の画像 2
    • Lift the entire fill valve out of the tank.

    • When installing a new valve, be sure to adjust the float so that the water line stops one inch below the overflow tube.

ゴール

11 の人々がこのガイドを完成させました。

作成者

1人の作成者と共同作成されました。

Kristen Gismondi

メンバー登録日: 11/12/14

81,969 ポイント

200のガイドは作成済み

チーム

iFixit iFixit人のメンバー

Staff

135 メンバー

17,189のガイドは作成済み

4 件のコメント

Great guide for removing the fill valve, but we're missing the steps for installing the new one. In the case of a Fluidmaster fill valve, you'll want to adjust the height to either match the one being replaced, or the more time-consuming (but not hard) method of marking the fill line of water on the tank, adjusting the fill valve to be just above that, then testing. Or ... is that another guide? For the present, I'd call this "removal." Perhaps we can create a new one for "installing a new fill valve." Ping me for assistance if needed.

David Spalding - 返信

Hi David,

Thanks for checking out our guide! By default, all iFixit replacement guides conclude with "To reassemble your device, follow these instructions in reverse order." Our guide is intended to be a basic procedure that works for most fill valves. This particular fill valve is a Fluidmaster, and we do have an adjustment guide currently in the works. We'll also be updating our existing toilet guides, so make sure to check back soon.

We hope this clears everything up!

Kristen Gismondi -

Awesome guide!

It will definitely help him who wants to replace toilet fill valve by his own. I just want to know from my curiosity that , if I want to replace my fill valve should I also replace other parts like flapper or any other parts.

Thanks… :)

Rose Geiger - 返信

Fluidmaster fill valve frequently fails to cut off, runs for awhile into overflow, THEN cuts off. Won’t cut off when manually toggled either. Water is hard, so could be lime deposit somewhere inside of valve. When water is turned off and tank drained for a couple of days, valve works for a few days. Any information appreciated.

Just Me - 返信

コメントを追加

統計データ:

過去 24時間: 4

過去 7 日: 31

過去 30 日: 121

今までの合計 11,330