メインコンテンツにスキップ

Tagital T7X Camera Replacement

必要な工具と部品

  1. Tagital T7X Camera  Replacement, Case: 手順 1、 3の画像 1 Tagital T7X Camera  Replacement, Case: 手順 1、 3の画像 2 Tagital T7X Camera  Replacement, Case: 手順 1、 3の画像 3
    • Place the Tagital T7X on a sturdy surface.

    • Insert the plastic opening tool into the crack and pry open the tablet. Move the tool along the edge, while continuing to pry up the casing.

  2. Tagital T7X Camera  Replacement, Camera: 手順 2、 3の画像 1 Tagital T7X Camera  Replacement, Camera: 手順 2、 3の画像 2 Tagital T7X Camera  Replacement, Camera: 手順 2、 3の画像 3
    • Use a spudger to hold the cameras in place.

    • Gently pull the black tape away using your finger.

  3. Tagital T7X Camera  Replacement: 手順 3、 3の画像 1 Tagital T7X Camera  Replacement: 手順 3、 3の画像 2 Tagital T7X Camera  Replacement: 手順 3、 3の画像 3
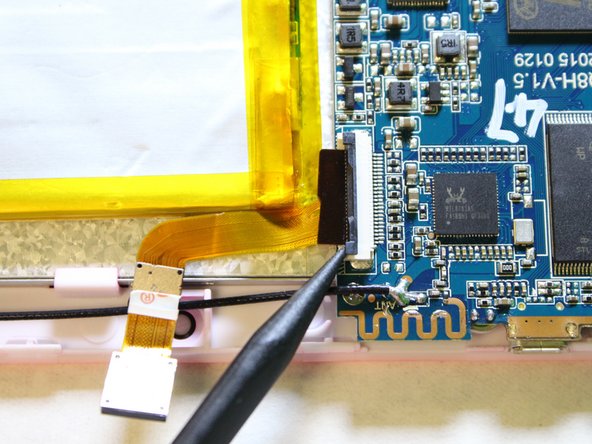
    • Remove the ribbon cable from the motherboard.

    • Use a spudger to lift the two tabs, freeing the ribbon cable from the socket.

  4. Tagital T7X Camera  Replacement: 手順 4、 3の画像 1 Tagital T7X Camera  Replacement: 手順 4、 3の画像 2 Tagital T7X Camera  Replacement: 手順 4、 3の画像 3
    • Gently pull the ribbon cable away from the motherboard.

    • Don't be afraid to use some force to pull the ribbon cable.

終わりに

To reassemble your device, follow these instructions in reverse order.

ある他の人がこのガイドを完成しました。

作成者

3人の作成者と共同で作成されました。

Hanlong Chen

メンバー登録日: 02/10/16

265 ポイント

2のガイドは作成済み

チーム

USF Tampa, Team 2-1, Sullivan Spring 2016 USF Tampa, Team 2-1, Sullivan Spring 2016人のメンバー

USFT-SULLIVAN-S16S2G1

4 メンバー

12のガイドは作成済み

0 件のコメント

コメントを追加

統計データ:

過去 24時間: 0

過去 7 日: 2

過去 30 日: 7

今までの合計 177