この翻訳は、ソースガイドの最新の更新を反映していない可能性があります。 翻訳の更新に協力してください。 または ソースガイドを参照してください。
はじめに
2番目のSSDもしくは大容量のハードドライブを搭載したいですか?このガイドに従って、ハードドライブを交換しましょう。
必要な工具と部品
-
-
Surfaceを柔らかいパッドの表面に配置します。
-
4つのゴム足の下にトルクスネジが隠されています。ゴム足を剥がしてください。
-
4本のトルクスネジを外します。
-
上部コーナーの2本のネジは下部コーナーのネジに比べて長いです。
-
吸盤カップを底面カバーに装着し、カバーが外れるまで吸盤カップを引っ張ります。
-
-
-
ミッドフレームに2つのファンを固定している5本のトルクスネジを外します。
-
2つのファンを外します。
-
ミッドフレームを固定している大サイズのトルクスネジを4本外します。
-
ミッドフレームを固定している小サイズのトルクスネジを4本外します。
4th blue is missing and is above the far right green circle. In line with the second red circle and below the GPU heat sink.
Thanks for the comment. I just figured that out when I had "extra parts laying on the bench". Wish I had read the comment first! Seems as if someone could please take a second to fix the picture.
-
-
-
-
ミッドフレームをゆっくりと外します。
-
2つのファンとスピーカー用のコネクタを外します。
-
-
-
ハードドライブブラケットを固定しているトルクスネジを3本外します。
-
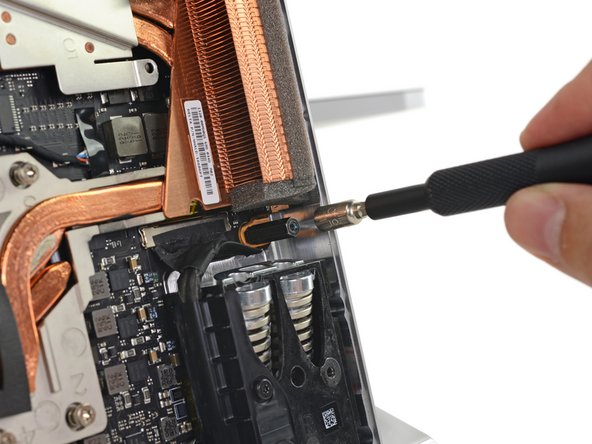
5mm六角マウントポストを外します。
-
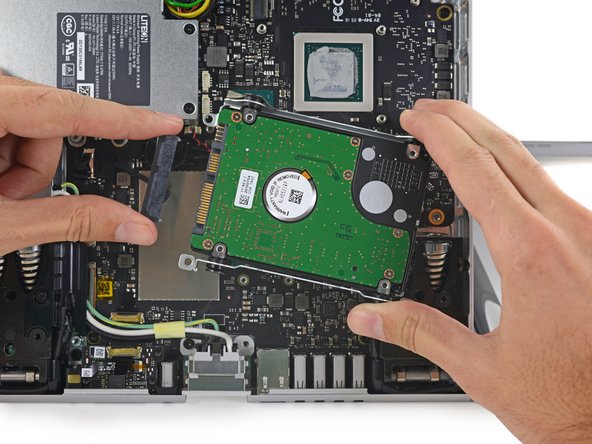
ハードドライブを取り出して、SATA/SATA 電源ケーブルの接続を外します。
-
ハードドライブにハードドライブブラケットを固定している4本のトルクスネジを外します。
Do yourself a bit of a favor and MAKE sure that you well tighten [but not overtighten] the standoffs, since the screws need to be screwed into them. If you don't, you'll find yourself needing to take the midframe off multiple times.
-


デバイスを再組み立てする際は、これらの手順を逆の順番に従って作業を進めてください。
デバイスを再組み立てする際は、これらの手順を逆の順番に従って作業を進めてください。
18 の人々がこのガイドを完成させました。
以下の翻訳者の皆さんにお礼を申し上げます:
44%

Midori Doiさんは世界中で修理する私たちを助けてくれています! あなたも貢献してみませんか?
翻訳を始める ›
14 件のコメント
Thank you for this step by step guide to replace the "Hard Drive" Here are a few measures that I took before drive replacement:
1) have to turn off drive encryption
2) I cloned the drive to the new SSD drive (I used Samsung 850 PRO 1TB) using Acronis True Image
3) Replaced the drive followed your instructions.
4) Turned ON the Surface Studio and success! no issues and better performance.
Does changing to a SSD drive cut down on the fan noise?
vanstar7 -
Does changing to a SSD drive cut down on the fan noise?
vanstar7 - January 15
No, fan noise level does not change, the heat that is been produced comes mostly from the processor.
Did you only change the m.2 drive? Or both drives?
I upgraded to to a SATA SSD 2TB and a M.2 NVMe SSD 1TB and wrote my experience here:
Hi Cesar, When I load the RST_AHCI “Intel Chipset SATA RAID Controller” drivers, downloaded from https://www.microsoft.com/en-us/download.... It doesn´t recognize my m.2 ssd 64gb/Go. I have a Surface Studio core i5. I don´t know what else to do to install windows in that disk.
Hi Cesar. I can’t get your link to the blog on the Surface Studio SSD upgrade to work. Is it still valid please?
Thank you.
David
Has anyone done this lately? The hardware update was no problem, however I can’t get past windows update. I can install windows to either drive, but as soon as I update it, the thing hangs on boot, and I can’t recover it at all, without full reload. seems like the raid driver RST_AHCI, just will not work for me.
I’m trying to convert to Ubuntu, but that won’t work with RAID. I thought if I can separate the HDD from the SSD, the 128GB SSD would be plenty to install Ubuntu and program files, then use the HDD for user files. How to separate the disks as a software fix?
Which disk number (0 or 1) is the M.2 drive? I replaced both with 2TB drives, and I don’t know which one is which.
Matt Perry - 返信
From what I have read, the M.2 is drive 1.
Is it really necessary to reapply thermal compound? That’s the first I’ve seen it mentioned.
mine does not boot, witch hard drive has the os ?? the ssd or the regular one>?