はじめに
このガイドを参照して、Steam Deck LCDの消耗したバッテリーを安全に取り出したり、交換します。
安全を考慮して、充電されたリチウムイオンポリマー電池は、誤って穴を開けると非常に危険です。充電されたバッテリーを加熱することは火災の原因になります。膨張したバッテリーは 安全に処分してください。
注意: バッテリーはSteam Deckに強く接着されているため、接着剤を加熱して温めてからこじ開けるサイクルを繰り返す必要があります。iOpenerから伝える熱は接着を緩めるのに十分でない場合がありますので、この手順ではヒートガン(またはヘアドライヤー)を推奨します。
一般的な静電気放電(ESD)の手順に従ってください。
一度外したバッテリーの再利用は潜在的な危険性がありますので、必ず新しいバッテリーに交換してください。
ご注意: Valveは2023年初めに、内部デザインを刷新したSteam Deckの出荷を開始しました。あなたがお持ちのSteam Deckは画像に写っている内部とは異なるかもしれませんが、手順は同じです。[無効なガイドリンク]、所有しているモデルバージョンを確認してください。オリジナルのSteam Deckには、このように、メタル製マザーボードシールドと四角い側面のファンが付いています。アップデートされた新Steam Deckには、こちらのように、黒いマザーボードシールドと湾曲した側面のファンが付いています。こちらからSteam Deck OLEDガイドを探してください。
必要な工具と部品
ビデオの概要
-
-
プラスドライバーを使って、バックカバーを固定している8本のネジを外します。
-
9.5mmネジー4本
-
5.8mmネジー4本
-
-
-
グリップ片側の端に沿って、バックカバーとフロントカバーの間の薄い隙間にオープニングピックを差し込みます。
-
バックカバーをこじ開けると、ロッキングクリップから外れます。
-
-
-
ピンセットを使って、ボードシールド上の隠れたネジを覆っているフォイルテープの一部分を剥がします。
Use some heat here from a hairdryer to make this part easier.
If you screw up here you can replace the little aluminium square with some aluminium tape from Amazon. No less than 50 microns thick, slightly thicker is fine. and the square is 13mm both ways.
Thanks for that Matt, i destroyed the original tape and i had no solution since i read your comment.
You should not. This is EM shielding to protect your processor and ram from radio waves in the air
I found out my 3 Weeks new Steam Deck is a old Version... gg. Valve...
wenn ich aluminium foile benutze, womit soll ich sie dann verkleben?
If we have the new version with the black shield, how do we access the SSD?
I need this part, does anyone know where to get it?
-
-
-
プラスドライバーを使って、ボードシールドを固定している3本のネジを外します。
-
3.4mmネジー1本
-
3.7mmネジー2本
The procedure ended here for me, used an ifixit PH 00 bit on the screw behind the aluminium tape, bit wouldnt bite too great, one wrong twist and the screw was stripped. Not sure who or what initially screwed in that particular screw as the rest of the screws on the shield were fine, but boy is it in there tight. So now i have a stripped screw and a botched ssd replacement, don't think valve will let me RMA for this, but i'll give it a try and update accordingly.
Any updates? Did they let you RMA?
I found one screw to be ridiculously tight too, managed to undo it without stripping thanks to reading your comment beforehand and going extra careful. Not going to lie, it was a tense moment :D
Andy HL -
I think the tendency is to go too small on the screwdriver bits because you're working on small electronics.
I used the PH1 bit on the screw under the foil and the PH0 bit for the two remaining screws without any problems.
What does this shield actually do? Some kind of magnetic protection?
if I had to replace the key (R2) and that's it, can I directly remove it or do I have to act here on the motherboard too?
have you gotten an answer yet? trying to change mines as well but dont wanna do too much to the deck
briaNN -
button Not key, i’m sorry
FYI there is a little pin on the cover that slots into the board. It is located near the top screw. I needed that to be inserted for the cover to go back down properly.
For anyone who may have stripped a 3.7mm screw, Steam Support states it's M1.6 diameter with a 0.35 thread pitch and a 3mm length. Hopefully that'll help anyone trying to locate a replacement screw. Hoping iFixIt can make an internal screws kit as they're kinda hard to find the right one online.
Did valve change the shield recently as my new 64gb deck has a black shield with no hidden screw.
Yes there's a new hardware revision out there that some people are getting. Consider stopping at this point and putting your deck back together if you have one of these new hardware revisions (the fan is quite different as well to the pictures) until iFixit has an updated repair guide.
There are only 2 screws now, but be careful taking the shield off, because there are still thermal pads under it sticking it to a heat pipe.
I need this piece, can someone help me where can I find it please?
-
-
-
ボードシールドを外します。
During reassembly, ensure that the fan cable lays on the side of the board shield and isn't pinched underneath.
Are you saying that the fan cable should be positioned above the board shield instead of being pressed down by it? Just like the image shows, where it 'lays on the side of the board shield'?
Necesito esta pieza la mía no la traía se ve que se la quitaro
-
-
-
-
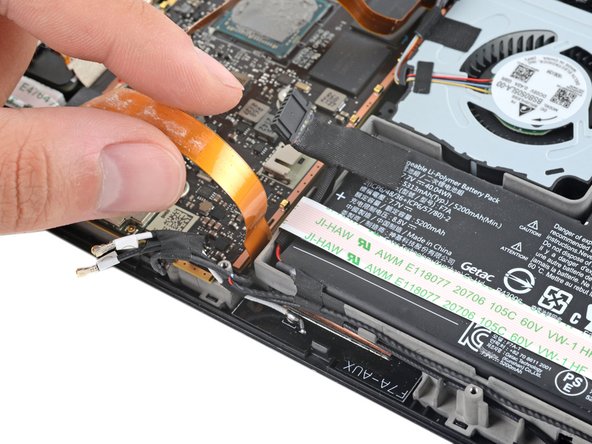
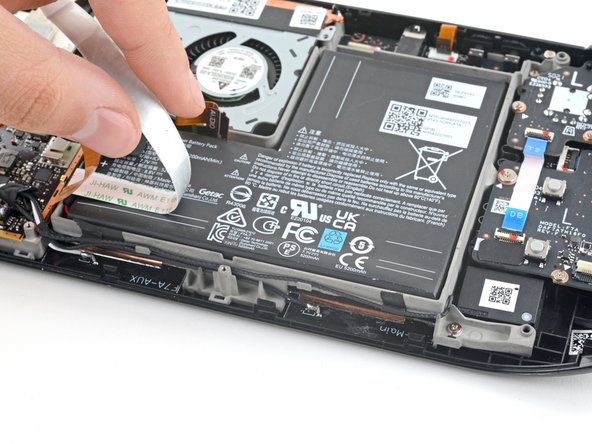
バッテリーケーブルのプルタブを持ち、マザーボードから直接引き離して、切断します。
After fully reassembling my device I found that my battery was not showing any stats anymore. I couldn't start the device without being plugged in, however if I restarted it would stay on even if my power cable was detached. Battery showed 0%. It turns out I had not fully reinserted the battery cable at this stage during reassembly. MAKE SURE YOU PUSH IT ALL THE WAY BACK IN!
Awesome thanks for this tip!
It is helpful to lift up gently with a the tapered end of a spudger underneath the tucked-in portion of the battery cable, creating a bit of flex in the cable before pulling on the pull tab. I found that without doing so, the fabric pull-tab simply tore off of the cable under light-to-moderate force (the fabric itself ripped cleanly across, like a paper towel). Careful, gentle pressure with a spudger can be used to remove the plug by prying gently on the rear ridge of the plastic plug (not the wire!) if this happens.
This is exactly what happened to me. Maybe it was a pull tab previously, mine was a ribbon cable that tore - captured the image here: https://www.ianwootten.co.uk/2022/11/22/...
This was the best approach (and I feel safest for the wiring) for me. Mostly push pressure on the plastic ridge with some minor pull tension on the fabric.
Victor -
I found it less scary and easier to remove the battery connection by using a fingernail on the ridge and pushing it off the connector. I felt like pulling on the battery cable was too harsh.
Yeah, pulling cables like these is usually ill advice. They might be fine if it's a new device, but for old devices that have been sitting there for years, there's a good chance the connector has grown brittle and the cable might just come off separately (something I learnt the hard way).
skzm -
I second this approach. For me, the cable felt way to flimsy and the connector wouldn't budge even under moderate force. Except I used the flat end of a spudger to "scrape" it out.
Misza -
Upon plugging the battery back in, I found it easy to use two spudgers- one on each side- to pull/push the connector back into it's port. Be careful to not put any pressure on the battery wires themselves.
When reconnecting the battery cable, you'll know when it's inserted and power is restored, because the white LED will illuminate at the top of the Deck near the power button. You should be able to see it while you're reconnecting the battery cable
This is only true if you haven't put the deck into battery storage mode as directed.
Why not just let the battery discharge completely and then not have to disconnect it?
Completely discharging a battery reduces its lifespan. It's completely unnecessary.
Because no lipo battery is ever completely discharged -- you would not be able to recharge it if it was. There will always be enough power left in it to cause damage if shorted even if it isn't charged enough to power up the device it's connected to.
I would personally not recommend pulling the tab. It doesn’t apply force at the correct angle. You should revise these instructions to advise using a combination of pulling on the tab, and careful pressure on the connector towards the right of the mainboard to carefully work it out.
Using the pull tab alone could cause problems if not done extremely carefully.
This part was wayyyyy easier than I anticipated and I worried for nothing because I used the ifixit spudger to push it out a bit and then I literally used my finger nail and was able to slide it right off. Dont be afraid, its not that difficult and its not that delicate to break if you do it patiently
I inserted the cable very firmly with a spunger, being careful not to press down too hard on the cables, and even tried redoing it, but I don't see any LED illumination. I am now unable to boot the deck into the boot manager. Any additional tips?
What is the risk of not unplugging the battery? Just curious!
Nick Hight - 返信
Once I was changing termal paste on my Windows based expensive tablet PC... And I was so scared to disconnect any cables (there was many of them), so I did it all with battery connected (I didn't even knew where is battery cable). When I tried to put board shield back... it didn't go right into needed place... and short circuit some small component. It flashed. That was the end of my repair. Dudies from repair service later told me that multiple components fried including CPU, so repairing is too hard. That's what can happen if you don't disconnect battery.
To pull the battery out I used my spunger, but the batter had actually not space to be pulled out completely. I needed to lift the cable up with the spunger to get the cable fully out. When plugging it in again I had to press the battery down kinda hard so it would fit again. This was really scary and I recommand using two spunger as someone said above.
Does it have to be a clean fingernail?
-
-
-
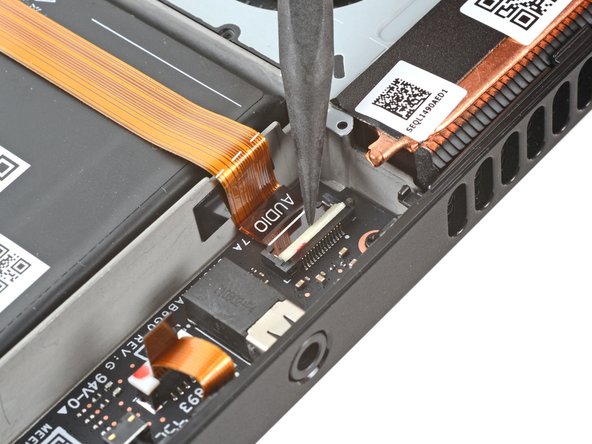
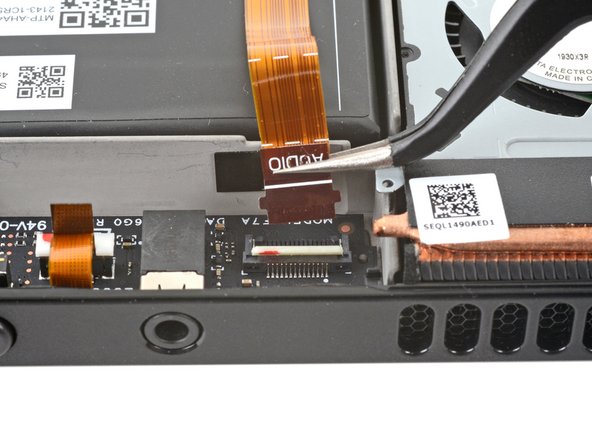
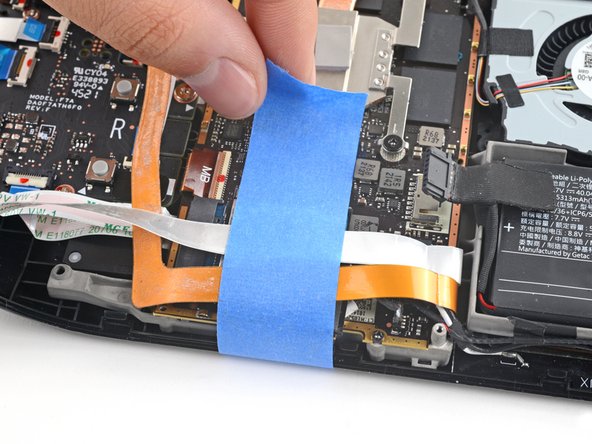
スパッジャーの先端を使って、オーディオケーブルのZIFコネクタの小さなロッキングフラップを跳ねあげます。
-
-
-
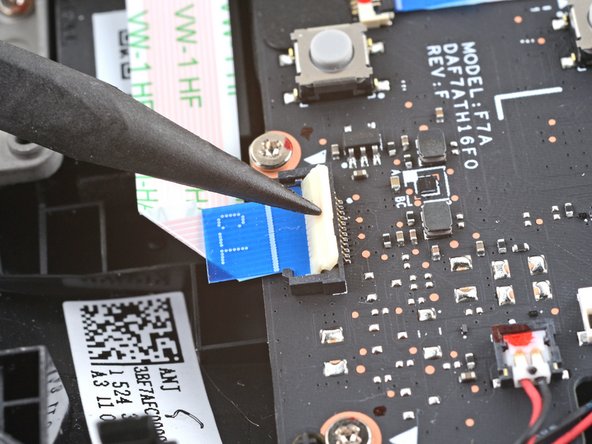
スパッジャーのの先端を使って、ボタンボードケーブルのZIFコネクタ上の小さなロッキングフラップを跳ねあげます。
-
ピンセットを使って、コネクタからケーブルをスライドして外します。
-
-
-
ハサミでプラスチックカードの長辺側を半分に切断します。
-
カードの鋭利な角を丸く切ってください。バッテリーに穴を開けてしまうリスクを軽減できます。
-
-
-
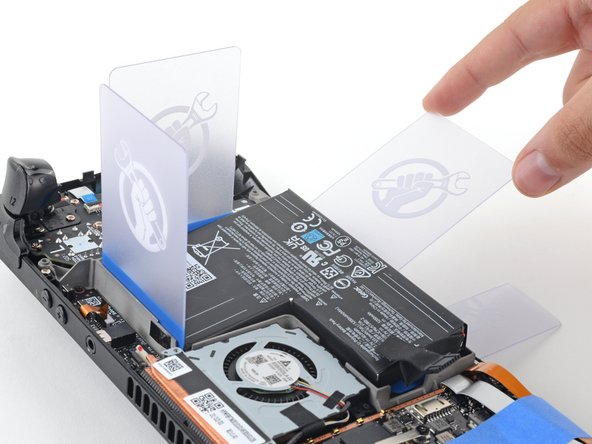
カットしたプラスチックカードをバッテリーの右下端付近に差し込みます。
-
カードをバッテリーの接着剤をスライスするように押し込みます。左右に揺らしながら進めてください。
-
-
-
バッテリーの下端に沿ってプラスチックカードを挿入し、バッテリーをフレームからこじ開けます。
-
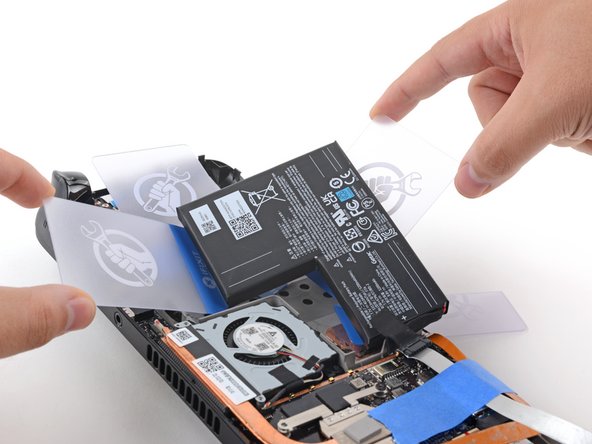
バッテリーを持ち上げて、Steam Deckから離し、すべての接着剤から完全に分離します。
-
うまくいかない場合は、バッテリーの接着剤が緩くなるまで、すべての端の部分を加熱してこじ開ける作業を繰り返してください。
-
-
-
バッテリーを外します。
-
糸くずの出ない布をイソプロピルアルコール(90%以上)で湿らせ、バッテリーウェルに残った接着剤を取り除きます。あまり多く使いすぎないように、 フレームの切り抜き から滴り落ちないようにしてください。
-
新しい接着剤の保護ライナーの片面を剥がして捨て、古いバッテリーを参考に、新しいバッテリーに接着します。
-
粘着ライナーの残りの面を剥がして捨てる。バッテリーを所定の位置に置き、しっかりと押さえる。
-


このデバイスを再組み立てするには、インストラクションを逆の順番に従って作業を進めてください。
電子廃棄物(e-waste)は 適切な方法で処分してください。
修理が上手く進みませんか?ベーシックなトラブルシューティングを行うか、 Steam Deckのアンサーコミュニティに尋ねてみましょう。
このデバイスを再組み立てするには、インストラクションを逆の順番に従って作業を進めてください。
電子廃棄物(e-waste)は 適切な方法で処分してください。
修理が上手く進みませんか?ベーシックなトラブルシューティングを行うか、 Steam Deckのアンサーコミュニティに尋ねてみましょう。
26 の人々がこのガイドを完成させました。
以下の翻訳者の皆さんにお礼を申し上げます:
100%


これらの翻訳者の方々は世界を修理する私たちのサポートをしてくれています。 あなたも貢献してみませんか?
翻訳を始める ›


10 件のコメント
Is it safe to apply small amounts of >90% isopropyl alcohol under the battery to loosen the adhesive bond? Or would that drip into the screen or other components and potentially cause damage?
Your mileage may vary. Isopropyl alcohol may be an effective method to loosen the adhesive, but you run the risk of excess leaking onto or into the display or other components, due to the cutouts on the battery tray. Your second sentence is spot-on, hence the recommendation to carefully use heat instead.
Why couldn’t they of used pull tabs for the adhesive so this process would not be so difficult and tedious. It would also be less risk of over heating the battery/steam deck or puncturing the battery. This is really the only design choice I can criticize of the steam deck. Pull tabs would of made this a repair the average person could achieve.
I feel like patience is everything in this scenario I mean. Just take your time and relax & it will all be ok ! When dealing with particular situations like this just take you're time simple as that I promise. Especially, since Ifixit.com has some of the best guides EVER!!
It seems crazy to me that they made this process so difficult, surely battery is one of (if not THE) most common things that you'll need to eventually replace? I suppose they must have been limited by what they could achieve?
Having just done a Battery Replacement on the Steam Deck the amount of adhesive is a bit high the use of Pull Tabs would have been wonderful. Thanks iFixit and Valve for making the process easier.
I have a question if battery health is a 22%. Will a new battery fix it or is there something wrong with the board.
Most probably battery replacement will fix it. Especially if you really see short battery time and you could observe that it shrink after heavy using of Steam Deck.
However, it's possible that it's some false error, so if battery works fine for you, I wouldn't bother. Also, if battery health dropped quickly, it might indicate overheating
Why they made this so difficult? We are in 2023, this device uses a very small battery in my opinion, it should be more or lesse the double of current size, and it's very difficult to replace it.
10/10 not too bad a job at all.
For me I found the original adhesive was to the left and right of the gaps you jam the cards in, so going in diagonally was the way to do it easily.
Only used a heat gun for 2 minutes and was eventually successful with gentle prying.
Everything was as expected.
Directions that come with the new battery direct to charge to 100% and leave on charge for 2h, then fully discharge until off, finally charge once more to 100%.
If your Steam Deck won't charge or turn on, you might need to disconnect your battery and then plug it back in.
I thought my battery had gone completely dead but when I plugged the battery back in, the Steam Deck would then accept a charge.
My Deck wouldn't accept at charge or respond at all prior to disconnecting the battery.
Make sure to try this trick before completely removing your battery.
Thanks iFixit for making these guides.
Duane Degn - 返信