メインコンテンツにスキップ

Stapler Spring Replacement

必要な工具と部品

  1. Stapler Spring Replacement, Spring: 手順 1、 2の画像 1 Stapler Spring Replacement, Spring: 手順 1、 2の画像 2
    • Open the stapler by gripping the handle to access the spring.

  2. Stapler Spring Replacement: 手順 2、 1の画像 1
    • Pry open the hook found on the pusher using the tweezers.

    • Hold the handle firmly to prevent the stapler from snapping back.

  3. Stapler Spring Replacement: 手順 3、 1の画像 1
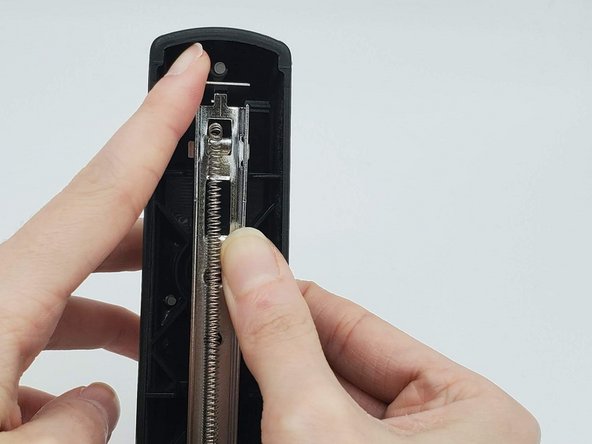
    • Unhook the end of the spring from the pusher.

    • Pinch the spring firmly between your fingers to keep it from snapping back.

  4. Stapler Spring Replacement: 手順 4、 2の画像 1 Stapler Spring Replacement: 手順 4、 2の画像 2
    • Unhook the other end of the spring from the inside of the handle.

    • The spring should be unthreaded from the holes on the handle's metal part.

  5. Stapler Spring Replacement: 手順 5、 2の画像 1 Stapler Spring Replacement: 手順 5、 2の画像 2
    • Press down on the metal part inside the handle with your thumbs until it will not go down anymore.

  6. Stapler Spring Replacement: 手順 6、 2の画像 1 Stapler Spring Replacement: 手順 6、 2の画像 2
    • Push the hammer, the rectangular piece, up and away from the metal part.

  7. Stapler Spring Replacement: 手順 7、 1の画像 1
    • Release the metal part inside the handle so it comes away from the hammer.

    • Keep hold of the metal part to keep it from snapping closed.

  8. Stapler Spring Replacement: 手順 8、 1の画像 1
    • Hook one end of the new spring onto the pusher's hook.

  9. Stapler Spring Replacement: 手順 9、 1の画像 1
    • Clamp the pusher's hook closed using your thumb.

  10. Stapler Spring Replacement: 手順 10、 1の画像 1
    • Thread the other end of the new spring through the top rectangular hole toward the back.

  11. Stapler Spring Replacement: 手順 11、 1の画像 1
    • Thread the new spring through the bottom hole, bringing the end of spring toward you.

    • The spring should create a loop when done threading.

  12. Stapler Spring Replacement: 手順 12、 2の画像 1 Stapler Spring Replacement: 手順 12、 2の画像 2
    • Hook the new spring to the hook on the inside of the handle's metal part.

  13. Stapler Spring Replacement: 手順 13、 2の画像 1 Stapler Spring Replacement: 手順 13、 2の画像 2
    • Press the metal part down with your thumbs until it aligns with the hammer's hole.

  14. Stapler Spring Replacement: 手順 14、 2の画像 1 Stapler Spring Replacement: 手順 14、 2の画像 2
    • Reattach the hammer back onto the metal part.

  15. Stapler Spring Replacement: 手順 15、 2の画像 1 Stapler Spring Replacement: 手順 15、 2の画像 2
    • Close the handle until it clicks back into place.

    • Be careful not to staple your fingers when closing the stapler.

終わりに

To reassemble your device, follow these instructions in reverse order.

10 の人々がこのガイドを完成させました。

作成者

2人の作成者と共同で作成されました。

Lauren McCabe

メンバー登録日: 01/16/20

331 ポイント

1ガイドが承認済み

チーム

University of North Texas, Team S1-G13, Raign Spring 2020 University of North Texas, Team S1-G13, Raign Spring 2020人のメンバー

UNT-RAIGN-S20S1G13

2 メンバー

6のガイドは作成済み

9 件のコメント

Just what I needed. Thank you! Super clear

Daniela Labra - 返信

Can I replace the black rubber piece that goes on my swingling desk top stapler 70 sheet it came off and my dog chewed it up.

Edith Corkell - 返信

fron this sale ski o donde venden los repuestos de esta engrapadora en Venezuela gran caracas

Romulo -

Ihr Artikel war sehr leicht zu verstehen und ich habe es geschafft, vielen Dank gacha life!

Lily Collins - 返信

コメントを追加

統計データ:

過去 24時間: 223

過去 7 日: 1,461

過去 30 日: 6,130

今までの合計 150,852