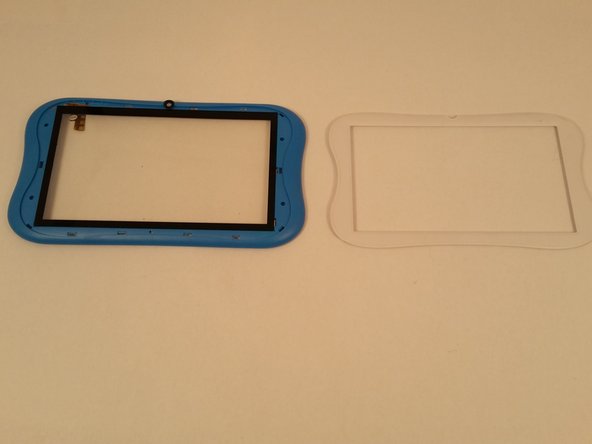
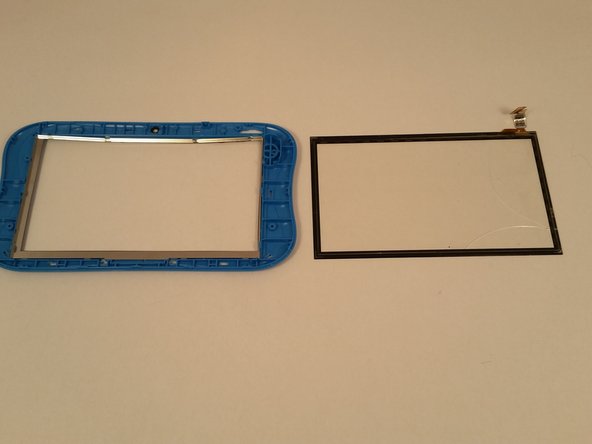
メインコンテンツにスキップ

Sprout Channel Cubby Digitizer Replacement

必要な工具と部品

  1. Sprout Channel Cubby Digitizer Replacement, Dissasemble the device: 手順 1、 2の画像 1 Sprout Channel Cubby Digitizer Replacement, Dissasemble the device: 手順 1、 2の画像 2
    • Use an opening tool to push in and release sixteen small plastic clips around the edge of the case. As the clips are released, gradually pry the case apart.

    • It is easiest to start on the corners.

  2. Sprout Channel Cubby Digitizer Replacement, Digitizer: 手順 2、 1の画像 1
    • Once opened, carefully peel back the black electric tape around the digitizer.

  3. Sprout Channel Cubby Digitizer Replacement: 手順 3、 1の画像 1
    • Unclasp the electrical plastic strip by gently pulling up on the white colored clasp.

  4. Sprout Channel Cubby Digitizer Replacement: 手順 4、 1の画像 1
    • Unscrew the five screws holding down the motherboard.

  5. Sprout Channel Cubby Digitizer Replacement: 手順 5、 1の画像 1
    • Once all five screws are removed, you should be able to lift up the motherboard.

  6. Sprout Channel Cubby Digitizer Replacement: 手順 6、 1の画像 1
    • Remove the four remaining screws.

    • This can be done with the battery still attached but is easier if it is unattached.

  7. Sprout Channel Cubby Digitizer Replacement: 手順 7、 1の画像 1
    • Remove the metal sheet covering the screen and digitizer.

    • Removing the screen is a very fragile process and needs to be done slowly. The nylon spudger is the best tool for this.

  8. Sprout Channel Cubby Digitizer Replacement: 手順 8、 2の画像 1 Sprout Channel Cubby Digitizer Replacement: 手順 8、 2の画像 2
    • Remove all of the white pegs located along the perimeter of the plastic. You'll need to remove all of the pegs to remove the white front face.

  9. Sprout Channel Cubby Digitizer Replacement: 手順 9、 2の画像 1 Sprout Channel Cubby Digitizer Replacement: 手順 9、 2の画像 2
    • To take out the digitizer, remove the connector ribbon from the plastic and then slowly apply pressure to the corner and edges of the digitizer.

終わりに

To reassemble your device, follow these instructions in reverse order.

5 の人々がこのガイドを完成させました。

作成者

6人の作成者と共同で作成されました。

David Meyers

メンバー登録日: 08/26/15

244 ポイント

1ガイドが承認済み

チーム

USF Tampa, Team 14-101, Meier Fall 2015 USF Tampa, Team 14-101, Meier Fall 2015人のメンバー

USFT-MEIER-F15S14G101

4 メンバー

12のガイドは作成済み

4 件のコメント

Ok I opened up the back and I accidentally pressed a little on the battery and now my screen is all white no picture. What did I do is there a way to fix the picture?

deysi gallegos - 返信

Most likely the LCD is broken and needs to be replaced.

Stephen Martinez -

You don't need to remove the mother board or the battery from the LCD to replace the digitizer. Once you remove the screws from the motherboard you can lift it up to access the screw for the front bezel and access the bezel clips underneath. Taking the battery off the LCD will most likely damage the LCD, so don't even mess with it. After you have the front bezel removed, flip the entire assembly over and you can replace the digitizer. Make sure you remove all the black foam and adhesive from the case after the digitizer is removed. This makes assembly easier and prevents damage to the new digitizer.

Stephen Martinez - 返信

I replaced my digitizer screen and it is still not working, what is the screen under the first screen called and it is still showing a dysfunctional screen

pam - 返信

コメントを追加

統計データ:

過去 24時間: 0

過去 7 日: 0

過去 30 日: 1

今までの合計 3,732