この翻訳は、ソースガイドの最新の更新を反映していない可能性があります。 翻訳の更新に協力してください。 または ソースガイドを参照してください。
はじめに
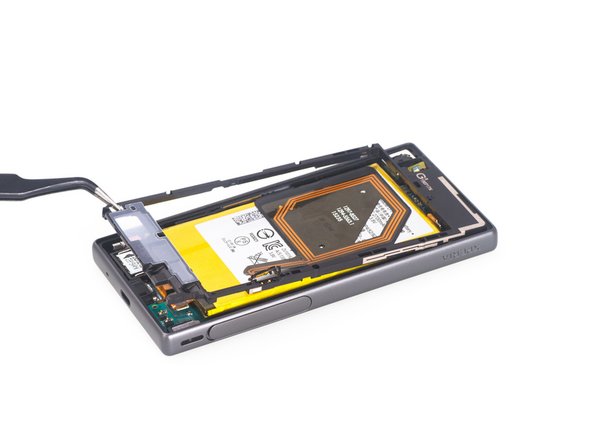
Sony Xperia Z5 CompactのLCDスクリーンアセンブリを自分で分解して交換する場合は、このガイドを参照してください。
必要な工具と部品
ビデオの概要
-
-
バックカバーを温めて、圧着剤を柔らかくします。
-
吸盤カップを取り付けてデバイス上部に隙間を作ります。その隙間にギターのピックを差し込み、その下に付けられた圧着剤を切り込みながらスライドします。
-
バックカバーを外します。
If the adhesive strips are being heated to remove the back, does this mean the waterproof feature will no longer work?
yes, you get a replacement set from ebay / amazon about $4
also, i dont reccommend the sucker - the back cover is glass (not plastic) i've had the suction crack it on occasioninstead, work a thin tool araound the edge - don't go any deeper than 1.5mm and be patient ! - it comes off eventually!
-
-


デバイスを再組み立てする際は、これらのインストラクションを逆の順番に従って作業を進めてください。
デバイスを再組み立てする際は、これらのインストラクションを逆の順番に従って作業を進めてください。
23 の人々がこのガイドを完成させました。
以下の翻訳者の皆さんにお礼を申し上げます:
93%

Midori Doiさんは世界中で修理する私たちを助けてくれています! あなたも貢献してみませんか?
翻訳を始める ›

18 件のコメント
But what kind of glue do we need to use when we reconnect the screen and the case?
screen replacement is possible without removing the back cover and logic board, similar to the Z1 compact. Simply remove the metal cover once you took the screen off to disconnect the lcd/digi cable.
Yeah, I'm confused as to why everything from the back needs to be taken out, when you have to heat up the front sticker anyways and disconnect it. Seems fairly simple to just heat up, cut side adhesive, lift, unplug.
Have you done the repair that way, Toby Liedke?
I tried to repair it from the front, the problem with that is you would have to do some damage to the metal that lies between the LCD screen assembly and the motherboard assembly. The actual connection for the cables lies behind it, hence the approach from the back cover which leads to taking the whole thing apart anyway. This was my first time, I did it 'cause I really like the phone and I really don't feel any need of getting another one yet.
If you break your touchscreen digitizer, DO NOT buy the separate digitizer thinking it's cheaper. I made this mistake only to find that the LCD is glued permanently to the digitizer and it's impossible to separate them even after heating. Broke the LCD. Definitely buy the entire LCD+digitizer assembly.
I'm still having trouble - I bought an LCD+digitizer and have put the new one in. The touchscreen still doesn't respond. I've checked all the connections and all seem secure, including the small square one on the back of the LCD in step 9, figure 3 that's not mentioned. Any idea which is the actual connection of the digitizer? Thanks.
Never mind, just needed a reboot. Whew!
Hi
Did you buy the LCD+digitizer from here?
It was a new product?
It works fine?
I would like tu buy it but i´m not so sure... tell me yor experience.
Thanks!!
(sorry for my English. I´m from Mexico.)
Hi guys,
I just finished to replace the dislplay following perfectly the guide, everything looks good but I found a problem that I do not understand. During a call the screen becomes black and even pushing all buttons it doesn't work, only when the call is ended it turns to normal. Anyone can explane me why? And how I can fix it? Reboot the phone?
Tnx guys
You should check proximity sensor, when you place call it should detect that you've placed phone close to ear and shut off screen to prevent you accidentaly pressing something on screen while you talking. By way you describing it, it looks like proximity sensor is triggered all the time, it can be because of bad quality replacement LCD, something that left between proximity sensor and glass. You should check that, also there is some software solution that can help:
Thanks Srpko,
I will try to get in the Agent Menu and Test the Proximity Sensor, in anycase could be the LCD which is not of high quality because of the Owner request of a chipper solution but it looked strange in anycase seen that during mz first check it worked correctly during a receiving call.
I will let you know if I solved the problem with this procedure .
Tnx Again for your answer
What should I use to heat up the front and back cover? Can I use a hair dryer?
i buy a new display touch screen. i replaced it and now the phone doesn’t turn on. (tilt) even if i connect the old display nothing happend.
only if the display connector is diconnected the phone turns on.
somebosy knows why?
meanwhile i buy the same phone again and the same happaning again.
so i have 2 xperiaz5 that turns on only with the disconnectet xonnectro of tghe display =(