メインコンテンツにスキップ

Sony Xperia Z Ultra Headphone Jack Replacement

必要な工具と部品

  1. Sony Xperia Z Ultra Headphone Jack Replacement, Battery: 手順 1、 1の画像 1
    • Use the small suction cup to lift the back panel:

    • Press the small suction cup on to the middle of the back panel.

  2. Sony Xperia Z Ultra Headphone Jack Replacement: 手順 2、 1の画像 1
    • While holding the Sony Xperia Z ultra down with your left hand, slightly pull the small suction cup upwards to create a small opening between the back panel and the front panel.

    • While continuing to pull the small suction cup upwards, insert the spudger in the small opening.

    • Pry the front panel downwards with the spudger while continuing to pull the small suction cup upwards.

  3. Sony Xperia Z Ultra Headphone Jack Replacement: 手順 3、 1の画像 1
    • Remove the back panel by pulling the small suction cup upwards.

  4. Sony Xperia Z Ultra Headphone Jack Replacement: 手順 4、 1の画像 1
    • Remove the following six screws with a Phillips #000 screwdriver:

    • five silver 2.1 mm screws

    • one gold 3.1 mm screw

  5. Sony Xperia Z Ultra Headphone Jack Replacement: 手順 5、 1の画像 1
    • Pry the plastic motherboard shield open by placing the spudger under the shield and running it along the edges.

  6. Sony Xperia Z Ultra Headphone Jack Replacement: 手順 6、 1の画像 1
    • Use care to remove the motherboard shield, as it may break. The motherboard shield is made of a very thin plastic.

    • Remove the motherboard shield by lifting the lower end upwards first.

  7. Sony Xperia Z Ultra Headphone Jack Replacement: 手順 7、 2の画像 1 Sony Xperia Z Ultra Headphone Jack Replacement: 手順 7、 2の画像 2
    • Detach the battery connection cable by prying it upward with the spudger.

  8. Sony Xperia Z Ultra Headphone Jack Replacement: 手順 8、 1の画像 1
    • Pry the upper end of the antenna upwards with the spudger.

  9. Sony Xperia Z Ultra Headphone Jack Replacement: 手順 9、 1の画像 1
    • Detach the antenna by pulling the upper end upwards and outwards.

  10. Sony Xperia Z Ultra Headphone Jack Replacement: 手順 10、 1の画像 1
    • Insert the spudger underneath the battery and run it back and forth to remove any adhesive.

  11. Sony Xperia Z Ultra Headphone Jack Replacement: 手順 11、 1の画像 1
    • Remove the battery from the phone.

  12. Sony Xperia Z Ultra Headphone Jack Replacement, Headphone Jack: 手順 12、 1の画像 1
    • Use care to remove the headphone jack connection, as it may snap if excessive force is used. The headphone jack connection is extremely thin.

    • Detach the headphone jack connection by prying it upwards with the spudger.

  13. Sony Xperia Z Ultra Headphone Jack Replacement: 手順 13、 1の画像 1
    • Use care to remove the earphone jack connection, as it may snap if excessive force is used. The earphone jack connection is extremely thin.

    • Detach the earphone jack connection by prying it upwards with the spudger.

  14. Sony Xperia Z Ultra Headphone Jack Replacement: 手順 14、 2の画像 1 Sony Xperia Z Ultra Headphone Jack Replacement: 手順 14、 2の画像 2
    • Disconnect the ribbon cable at the bottom right of the motherboard. (It's shown tucked under the motherboard in this photo, which is incorrect—don't do this!)

  15. Sony Xperia Z Ultra Headphone Jack Replacement: 手順 15、 1の画像 1
    • Detach the upper end of the motherboard by pulling the top end upwards.

  16. Sony Xperia Z Ultra Headphone Jack Replacement: 手順 16、 2の画像 1 Sony Xperia Z Ultra Headphone Jack Replacement: 手順 16、 2の画像 2
    • Remove the yellow clip that secures the headphone jack slot with a pair of tweezers.

    • The motherboard is still attached but moved outside of the image in order for the components being worked on to be more visible.

  17. Sony Xperia Z Ultra Headphone Jack Replacement: 手順 17、 3の画像 1 Sony Xperia Z Ultra Headphone Jack Replacement: 手順 17、 3の画像 2 Sony Xperia Z Ultra Headphone Jack Replacement: 手順 17、 3の画像 3
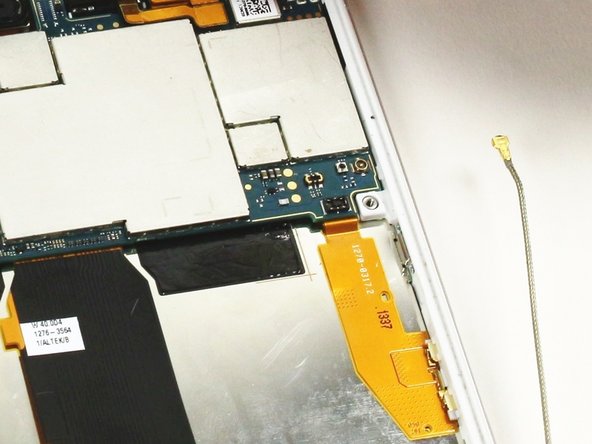
    • Push the red stopper of the headphone jack connection through the plastic tunnel with the spudger.

    • Use care to guide the head phone jack connection through the plastic tunnel, as it may deform and break if forceful or sudden movements is used. The headphone jack is made of a very thin plastic.

    • While holding the back end of the headphone jack connection, grasp the headphone jack connection with the pair of tweezers and guide it through the plastic tunnel.

    • Remove the headphone jack connection from the device.

終わりに

To reassemble your device, follow these instructions in reverse order.

2 の人々がこのガイドを完成させました。

作成者

4人の作成者と共同で作成されました。

Aaron Quinn

メンバー登録日: 10/01/15

911 ポイント

3のガイドは作成済み

チーム

Cal Poly, Team 4-6, Maness Fall 2015 Cal Poly, Team 4-6, Maness Fall 2015人のメンバー

CPSU-MANESS-F15S4G6

4 メンバー

10のガイドは作成済み

0 件のコメント

コメントを追加

統計データ:

過去 24時間: 0

過去 7 日: 0

過去 30 日: 2

今までの合計 2,131