はじめに
このガイドでは適切に機能しないイヤスピーカーを交換するための必須手順を取り扱っています。
必要な工具と部品
-
-
-
スパッジャーをしっかりとバッテリーの右側に差し込んで、バッテリーとケースの間の圧着剤を緩めながらスライドします。
-
スパッジャーをバッテリー下部の中央に差し込んで圧着剤を緩めます。スパッジャーを丁寧にバッテリーの下に垂直に差し込んでこじ開けます。圧着剤は強力に付けられているため、この作業には時間がかかります。
I agree that it would be better to overlay red the two vertical cables. Other than that, this step is rather time consuming, than complicated. Obviously you should be attentive to not damage the cables, but if you put moderate force during 3-4 minutes, the battery will finally separate from the case.
Wondering if it’s safe to use hair dryer at this step.
strixaluco - 返信
-
-
-
電話の上部中央に留められたコッパーテープをプラスチックの開口ツールを使って外します。接着力が強いため、少し力が必要です。
-
続いて、プラスチックの開口ツールを使って、コネクターを持ち上げて接続を外します。コネクターはコッパーテープに留められたままにします。
-
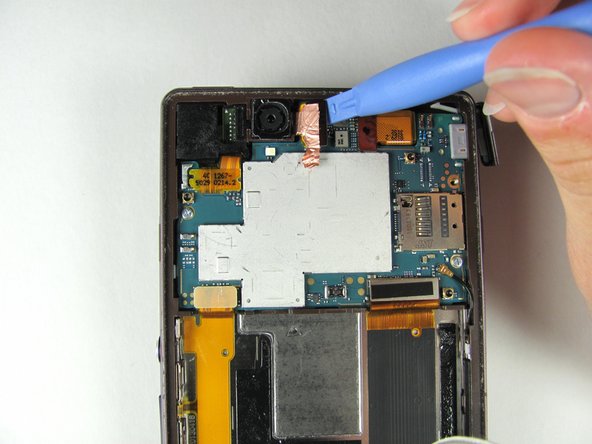
コッパーテープとコネクターをゆっくりと上向きに引っ張り、バックカメラを取り出します。簡単に取り出せるはずです。
-
-
-
プラスチックの開口ツールを使って、丁寧に赤色のテープをマザーボードから外します。このコネクターは電話の上部右端に付いています。
-
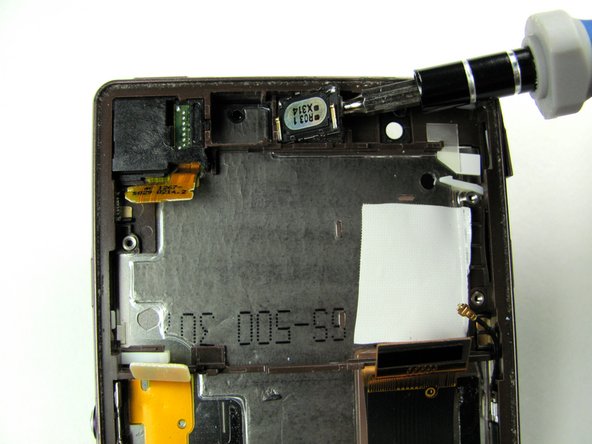
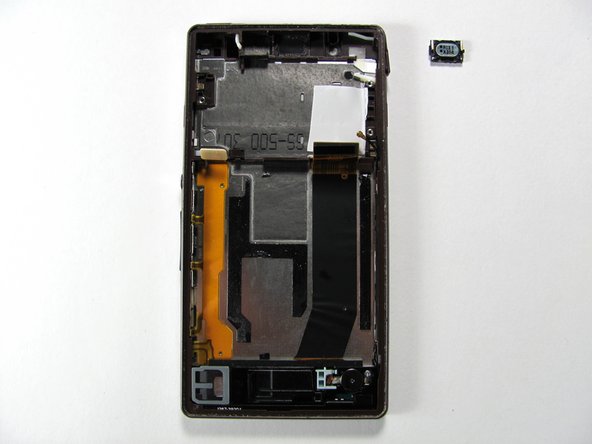
指を使って、丁寧にコネクターをフロントカメラから外して取り出します。フロントカメラの部品は簡単に外せます。
-


デバイスを再組み立てする際は、これらのインストラクションを逆の順番に従って作業を進めてください。
デバイスを再組み立てする際は、これらのインストラクションを逆の順番に従って作業を進めてください。
12 の人々がこのガイドを完成させました。
以下の翻訳者の皆さんにお礼を申し上げます:
100%

Midori Doiさんは世界中で修理する私たちを助けてくれています! あなたも貢献してみませんか?
翻訳を始める ›
チーム

Cal Poly, Team 2-7, Amido Winter 2014 Cal Poly, Team 2-7, Amido Winter 2014人のメンバー
CPSU-AMIDO-W14S2G7
4 メンバー
25のガイドは作成済み
6 件のコメント
@cagnes06, when you say "the display is no longer working" do you mean the screen stopped working completely? Or do you mean that while you are making calls the display no longer works? Thank you for taking the time to read and reply.
Hi, I fixed the hear speaker without removing the battery or the rear facing camera (to retain the integrity of the copper strip) The camera just slides out of its housing when you lift out the motherboard. The other connectors just need folding back out of the way. Doing it minus all the other steps reduced the time significantly. I had everything pulled apart as necessary in about 5 minutes.
I fixed the speaker by pulling up the prongs that connect to the motherboard. My guess is that one of them was a little low, which affected the connection. Putting back together again was another 4 minutes or so, for a total of about 10 minutes. Hope that helps others avoid damaging the rear facing camera and bits under the battery.
Would it be possible to list steps that you performed (or alternatively - steps you skipped) ?
thanks for the comment. as you mentioned folding the ribbons was sufficient. no need of removing the battery and copper ribbon for camera. thanks!
I can fully confirm that you don’t need to remove the battery in order to get to the ear speaker. I wouldn’t say that it’s a difficult task to do provided that you have proper tools. It took me around 15 minutes to disassemble my phone. My problem were interruptions when making calls and I solved it by pulling up the prongs that connect the ear speaker to the motherboard, as Andrew wrote.
Best,
Michael