メインコンテンツにスキップ

Sony Xperia XA1 Ultra Loudspeaker Replacement

必要な工具と部品

  1. Sony Xperia XA1 Ultra Loudspeaker Replacement, Back Assembly: 手順 1、 2の画像 1 Sony Xperia XA1 Ultra Loudspeaker Replacement, Back Assembly: 手順 1、 2の画像 2
    • Wedge your finger under the bottom ridge of the SD card insert.

    • Pull outwards with your fingers to remove the SD card from the left side of device.

  2. Sony Xperia XA1 Ultra Loudspeaker Replacement: 手順 2、 1の画像 1
    • Use a hair dryer to heat each corner of the phone.

    • Alternate heating each corner for a minute to loosen the adhesive binding the back cover to the phone.

    • Don't heat one area for too long; the phone may get damaged from overheating.

  3. Sony Xperia XA1 Ultra Loudspeaker Replacement: 手順 3、 1の画像 1
    • Press a suction cup on a heated corner of the device.

    • Hold the phone down and gently lift the suction cup to create a small gap.

    • You may hear crunching or popping sounds when you lift up the back cover.

  4. Sony Xperia XA1 Ultra Loudspeaker Replacement: 手順 4、 1の画像 1
    この手順で使用する道具:
    Plastic Cards
    $2.99
    購入する
    • Insert your iFixit Opening Tool in the small gap between your phone and the back cover.

    • Lift up on the iFixit Opening Tool and insert your plastic card in the small gap between your phone and the back cover.

  5. Sony Xperia XA1 Ultra Loudspeaker Replacement: 手順 5、 1の画像 1
    • Slide your plastic card along the side of your phone to loosen the adhesive.

    • Move the card along the sides of the phone to lift all of the corners.

  6. Sony Xperia XA1 Ultra Loudspeaker Replacement: 手順 6、 1の画像 1
    • Lift up the back cover by lifting up the sides of the phone with your hand.

    • Apply a new strip of adhesive for reassembly.

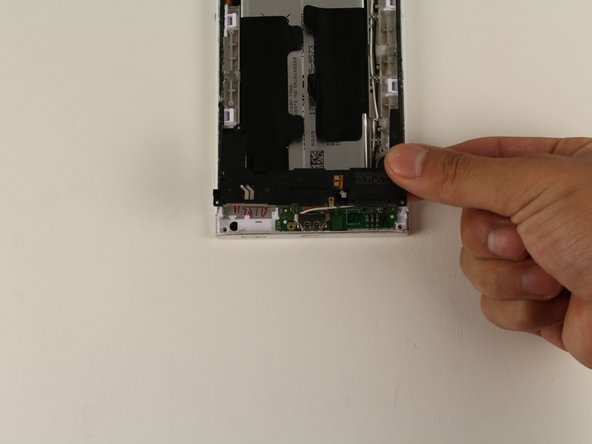
  7. Sony Xperia XA1 Ultra Loudspeaker Replacement, Loudspeaker: 手順 7、 1の画像 1
    • Remove the five 4mm T5 screws connecting the speaker to your phone.

  8. Sony Xperia XA1 Ultra Loudspeaker Replacement: 手順 8、 2の画像 1 Sony Xperia XA1 Ultra Loudspeaker Replacement: 手順 8、 2の画像 2
    • Insert your iFixit Opening Tool underneath the speaker and gently lift up.

    • Once the speaker is slightly lifted, use your hands to remove the piece from the device.

終わりに

To reassemble your device, follow these instructions in reverse order.

ある他の人がこのガイドを完成しました。

作成者

3人の作成者と共同で作成されました。

Jacob Jung

メンバー登録日: 04/18/18

1,429 ポイント

9のガイドは作成済み

チーム

Cal Poly, Team S16-G3, Livingston Spring 2018 Cal Poly, Team S16-G3, Livingston Spring 2018人のメンバー

CPSU-LIVINGSTON-S18S16G3

4 メンバー

9のガイドは作成済み

0 件のコメント

コメントを追加

統計データ:

過去 24時間: 0

過去 7 日: 0

過去 30 日: 4

今までの合計 954