メインコンテンツにスキップ

Sony Xperia TL Camera Replacement

必要な工具と部品

  1. Sony Xperia TL Camera Replacement, Remove Top Plastic Section: 手順 1、 3の画像 1 Sony Xperia TL Camera Replacement, Remove Top Plastic Section: 手順 1、 3の画像 2 Sony Xperia TL Camera Replacement, Remove Top Plastic Section: 手順 1、 3の画像 3
    • Use the plastic opening tool to pry the top plastic section off.

  2. Sony Xperia TL Camera Replacement, Remove Bottom Plastic Section: 手順 2、 2の画像 1 Sony Xperia TL Camera Replacement, Remove Bottom Plastic Section: 手順 2、 2の画像 2
    • Use the plastic opening tool to pry the bottom plastic section off.

  3. Sony Xperia TL Camera Replacement, Unscrewing the Back Off: 手順 3、 3の画像 1 Sony Xperia TL Camera Replacement, Unscrewing the Back Off: 手順 3、 3の画像 2 Sony Xperia TL Camera Replacement, Unscrewing the Back Off: 手順 3、 3の画像 3
    • Remove the four 5mm screws.

    • Use the plastic opening tool to pry off the back.

  4. Sony Xperia TL Camera Replacement, Battery: 手順 4、 3の画像 1 Sony Xperia TL Camera Replacement, Battery: 手順 4、 3の画像 2 Sony Xperia TL Camera Replacement, Battery: 手順 4、 3の画像 3
    • Use the plastic opening tool to detach the ribbon running across the battery.

    • Use the plastic opening tool to detach the ribbon connecting the battery to the motherboard.

  5. Sony Xperia TL Camera Replacement, Sony Xperia TL Auxiliary Cord Replacement: 手順 5、 2の画像 1 Sony Xperia TL Camera Replacement, Sony Xperia TL Auxiliary Cord Replacement: 手順 5、 2の画像 2
    • Use the plastic opening tool to unlatch the cord's ends off the motherboard and loud speaker module. The cord can be located on the right side of the phone.

  6. Sony Xperia TL Camera Replacement, Motherboard: 手順 6、 3の画像 1 Sony Xperia TL Camera Replacement, Motherboard: 手順 6、 3の画像 2 Sony Xperia TL Camera Replacement, Motherboard: 手順 6、 3の画像 3
    • Use the Phillips #00 to remove the 3 5mm screws.

    • Lift the plastic cover off.

    • Use the plastic opening tool to pry the motherboard out of the phone shell.

  7. Sony Xperia TL Camera Replacement, Camera: 手順 7、 3の画像 1 Sony Xperia TL Camera Replacement, Camera: 手順 7、 3の画像 2 Sony Xperia TL Camera Replacement, Camera: 手順 7、 3の画像 3
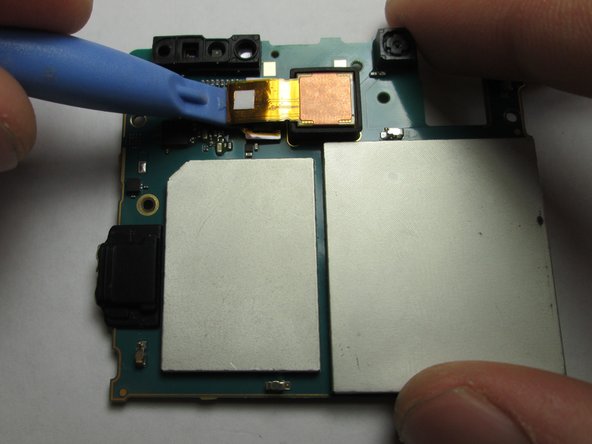
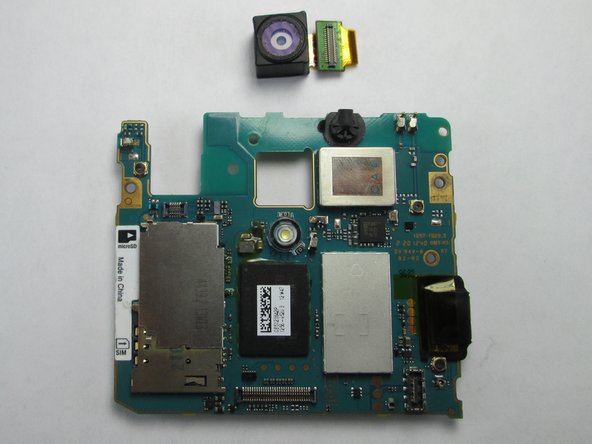
    • 'Use the plastic opening tool to detach the camera from the motherboard.'

    • The camera attachment is on the back of the motherboard.

終わりに

To reassemble your device, follow these instructions in reverse order.

2 の人々がこのガイドを完成させました。

作成者

2人の作成者と共同で作成されました。

Adam Giniger

メンバー登録日: 09/22/14

1,303 ポイント

8のガイドは作成済み

チーム

USF Tampa, Team 4-4, Brown Fall 2014 USF Tampa, Team 4-4, Brown Fall 2014人のメンバー

USFT-BROWN-F14S4G4

3 メンバー

10のガイドは作成済み

0 件のコメント

コメントを追加

統計データ:

過去 24時間: 0

過去 7 日: 0

過去 30 日: 0

今までの合計 196