メインコンテンツにスキップ

Sony Xperia T2 Ultra Dual Motherboard Replacement

必要な工具と部品

  1. Sony Xperia T2 Ultra Dual Motherboard Replacement, Rear Case: 手順 1、 1の画像 1
    • Using the spudger, pry open the back cover by starting alongside the edge of the back cover.

  2. Sony Xperia T2 Ultra Dual Motherboard Replacement: 手順 2、 1の画像 1
    • Once the part of the back cover has been opened up. Slide the spudger to pry completely detach the cover from the phone.

  3. Sony Xperia T2 Ultra Dual Motherboard Replacement, Removing the internal cover: 手順 3、 1の画像 1
    • Using the Phillips #00 Precision screwdriver, take out 8 silver screws (3.15mm) and 5 gold screws (3.9mm) for a total of all the screws attached to the flat plate. 3 of the gold screws are located at the top of the phone and the other 2 screws are located at the bottom of the phone.

  4. Sony Xperia T2 Ultra Dual Motherboard Replacement: 手順 4、 2の画像 1 Sony Xperia T2 Ultra Dual Motherboard Replacement: 手順 4、 2の画像 2
    • To remove the internal cover, use the plastic spudger tool and pry the cover from the phone as shown in the picture.

  5. Sony Xperia T2 Ultra Dual Motherboard Replacement, Removing Chip: 手順 5、 1の画像 1
    • To take out the back facing camera, flip open the flap labelled ‘film’ to reveal the chip that connects to the motherboard.

  6. Sony Xperia T2 Ultra Dual Motherboard Replacement: 手順 6、 1の画像 1
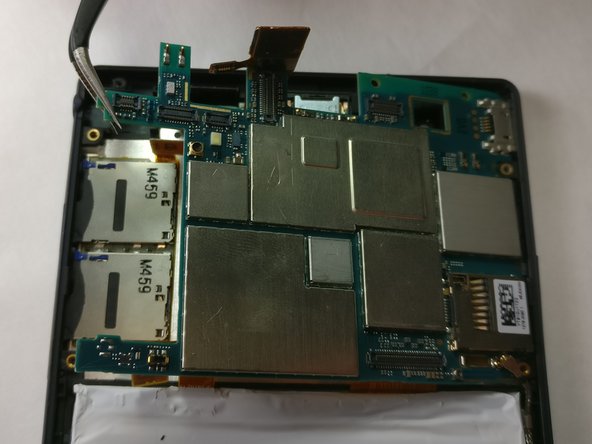
    • Use the tweezer, carefully pry open the chip for the back facing camera.

  7. Sony Xperia T2 Ultra Dual Motherboard Replacement, Remove back facing camera: 手順 7、 1の画像 1
    • Then using the tweezer, carefully remove the back facing camera component.

  8. Sony Xperia T2 Ultra Dual Motherboard Replacement, Removing the Front Camera: 手順 8、 1の画像 1
    • Using the tweezer, carefully pry open the chip for the front facing camera as shown. Then using the tweezer, carefully remove the front facing camera component.

  9. Sony Xperia T2 Ultra Dual Motherboard Replacement, Removing chip: 手順 9、 1の画像 1
    • Using tweezer, locate the audio jack as shown and pull out the chip connected to the motherboard.

  10. Sony Xperia T2 Ultra Dual Motherboard Replacement, Remove audio jack: 手順 10、 1の画像 1
    • Carefully remove the audio jack by using the tweezers and pull firmly straight out of the motherboard.

  11. Sony Xperia T2 Ultra Dual Motherboard Replacement, Motherboard: 手順 11、 2の画像 1 Sony Xperia T2 Ultra Dual Motherboard Replacement, Motherboard: 手順 11、 2の画像 2
    • Using tweezers, locate the battery connector and carefully pull up to disconnect it.

  12. Sony Xperia T2 Ultra Dual Motherboard Replacement: 手順 12、 2の画像 1 Sony Xperia T2 Ultra Dual Motherboard Replacement: 手順 12、 2の画像 2
    • Carefully remove the button circuit connector by using tweezers and gently pulling up.

  13. Sony Xperia T2 Ultra Dual Motherboard Replacement: 手順 13、 2の画像 1 Sony Xperia T2 Ultra Dual Motherboard Replacement: 手順 13、 2の画像 2
    • Carefully remove the silver plug by using the tweezers to lift straight up.

  14. Sony Xperia T2 Ultra Dual Motherboard Replacement: 手順 14、 2の画像 1 Sony Xperia T2 Ultra Dual Motherboard Replacement: 手順 14、 2の画像 2
    • Carefully remove the SIM card connector using tweezers by gently pulling it straight up.

  15. Sony Xperia T2 Ultra Dual Motherboard Replacement: 手順 15、 2の画像 1 Sony Xperia T2 Ultra Dual Motherboard Replacement: 手順 15、 2の画像 2
    • Using tweezers, carefully remove the motherboard by pulling it up and out of the backing.

終わりに

To reassemble your device, follow these instructions in reverse order.

4 の人々がこのガイドを完成させました。

作成者

2人の作成者と共同で作成されました。

Brayden Ratekin

メンバー登録日: 03/01/17

197 ポイント

1ガイドが承認済み

チーム

IUPUI, Team S1-G3, Harley Spring 2017 IUPUI, Team S1-G3, Harley Spring 2017人のメンバー

IUPUI-HARLEY-S17S1G3

4 メンバー

3のガイドは作成済み

2 件のコメント

Mayrka D5322 ke bad cahiy

Goving Ram Goving Ram - 返信

I have a sony xperia dual ultra T2

RAM 1GB ITS REALLY POOR FOR THE TAB

HOW CAN I CHANGE THE RAM.

ANS ME PLEASE

MP - 返信

コメントを追加

統計データ:

過去 24時間: 0

過去 7 日: 1

過去 30 日: 5

今までの合計 3,603