はじめに
What helped me a lot was the teardown of the Sony MDR-1000X by dinoofsg Sony MDR-1000X Noise Cancelling Headphone Teardown
The Headphones seem to built very similar.
The Replacement part is the Sony SP-73 Battery also meant for the MDR-1000X.
必要な工具と部品
-
-
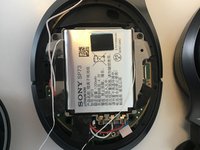
The Battery is on the right side where the charging port is.
-
The Earpads are held in place by 6 notches. You need to get next to them under the plastic ring that goes around the pad. Best would be with a plastic spudger but you could do it with anything flat and thin. Once you have popped one notch you can probably pull the whole thing off. If not just pop the rest with the same method.
-
Be sure to remember which way the earpad was in, as they only fit in one direction.
-
Now you need to get behind the inserted foam to the marked 4 screws(orange). You can remove the foam entirely like me. Its held on with a few small dots of glue. Or you can probably also just lift the foam and get to the screws that way
-
-
-
Carefully pull the shell off, as there are still cables connecting the two. The microphone(green) will probably hold the shell a bit back on the upper side, but just pull carefully. The microphone ist just lightly sticking to the white pad so you can just pull it off carefully. This will also make reassembly easier later on.
-
(Optional) Next you want to disconnect the ribbon cable connecting the touch pad. Its held on with small connector where you need to flip the small black plastic bracket upwards. Then you can pull it out. (Note: you can skip this step but be careful around the wires not to tug them.)
-
In the third picture you can hopefully see how the bracket is flipped up.
After removing the 4 screws, the cover should come off easily. Otherwise, try to lift the cover carefully with a guitar pick or a card (credit card or similar).
The "outer shell" means the corrugated part with the touch-sensitive surface. I had to put a screwdriver into the gap to separate it with some force.
Daniel -
Under Section 2 Part 2: Next you want to disconnect the ribbon cable connecting the touch pad. Its held on with small connector where you need to flip the small black plastic bracket upwards. Then you can pull it out.
Unfortunately while trying to remove the ribbon from the connector, the whole connector came away from the circuit board.
Is there any way to re-connect the socket to the circuit board? I can't see how the socket is secured on to the circuit board.
if the entire connector is torn off this will be a kinda difficult soldering repair where you will need to take out the entire board and see whether the soldering pads are torn off as well. If not you may be able to resolder the connector. If the solder pads are torn as well a repair is possible as well but very time consuming and difficult. If you don’t have good soldering experience I don't think the whole thing would be feasible sadly.
Fynn -
-
-
-
-
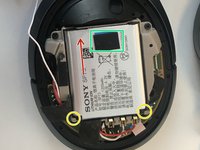
Now that everything is free you can remove the battery. Its held in place by a glue strip on the back so you need to be careful when pulling it out
-
I found it easiest pushing dental floss under the battery on the upper side and then carefully pulling lengthwise to cut the glue. This way you reduce the risk of bending the battery when trying to pry it out.
-
When pulling the battery out, pull it out on the side marked with the red arrow, as the other side is held in place with notches(yellow)
-
Remove the marked(green) foam Pad to put on the new battery.
The part I misunderstood was about the ribbon removal. I couldn’t see the black part that needed to be flicked up. Since I didn’t understand it I thought I’d leave it in place and work. When trying to force the battery out, the ribbon got pulled out. After putting the new battery in, tried to put the ribbon through what appeared to be a narrow slit but wasn’t successful. Then thought it is the black connector that needs to be pulled out. Alas, it’s not a full connector as I’d thought! It was only a half connector. The ribbon needs to be put in place and the black “half” when pushed down, locks it in place! Well, better luck next time! How did they design it in this incredible miniature connector and assemble it? Wow!
btw this comment belongs to the previous step (step 2), 2nd and 3rd bullet point
Daniel -
-
-
-
Put the microphone in the Hole shown by the Red arrow. The cable goes the path marked in orange.
-
Put the Ribbon Cable from the touch pad in again. Don't forget to push down the small black plastic bracket.
-
Now you can just put the outer shell back on. Hold it in place and get the screws back in, from the other side
-
If you have removed the foam just put it back in. It holds perfectly without glue for me but if you want to be sure you could put a few drops in.
-
The Earpads can just be pressed into place by hand. They only go in one direction so if you can't click all notches back in, try it the other way around.
-


To reassemble your device, follow these instructions in reverse order.
To reassemble your device, follow these instructions in reverse order.
27 の人々がこのガイドを完成させました。

11 件のコメント
Great guide. Easy to follow
thanks. do you know where to get the akku? I only find 1050mAh
I also only found the 1050mAh kind as a replacement. You can use that without problems. Still an improvement over the capacity of an old original battery in my opinion.
Fynn -
I got a replacement SP-73 lookalike from Cellonic. Cost me €12. Guide worked like a charm.
Tom -
My WH-1000xm2 battery started dying quickly (it would only last a few minutes after a charge) some time ago, so I decided to replace the battery. At the end I found that the new battery lasted longer (because it came fully charged) but after the first run out, it would not charge anymore. So the problem is likely on the charging board (even the phone red light does not turn on when connected to micro USB). When I looked close at the charging board, the ribbon cable was a bit melted, so I believe the problem is in it. What is the exact ribbon I have to purchase if I want to replace the one from the charging board?
I don't have an engineering bone in my body but am able to follow instructions and tinker successfully to some degree. Thanks for your instructions on how to replace the battery, they worked a treat and my headphones are as good as new.
You need to push the dental floss with a thin object like a butter knife so it can go under the battery. It's easier if two people do this step. One to hold the headphones and the other to pull the dental floss.
When poping off the ear pads you insert something “under the plastic ring that goes around the pad” from the OUTSIDE of the ear pad ring. I wasted several minutes trying from the inside of the ring.
arf493 - 返信
Thank you arf493. You have saved me a lot of frustration.
Frank Underwood - 返信
Arf493 is dead on. I started and couldn't get it until i read the comments and had it in a dew seconds.
Aaron Geerlings - 返信