メインコンテンツにスキップ

Sony Vaio PCG-981L Fan Replacement or Cleaning

必要な工具と部品

  1. Sony Vaio PCG-981L Fan Replacement or Cleaning, Keyboard, Speakers, and Speaker Panel: 手順 1、 2の画像 1 Sony Vaio PCG-981L Fan Replacement or Cleaning, Keyboard, Speakers, and Speaker Panel: 手順 1、 2の画像 2
    • Turn the laptop off and unplug it.

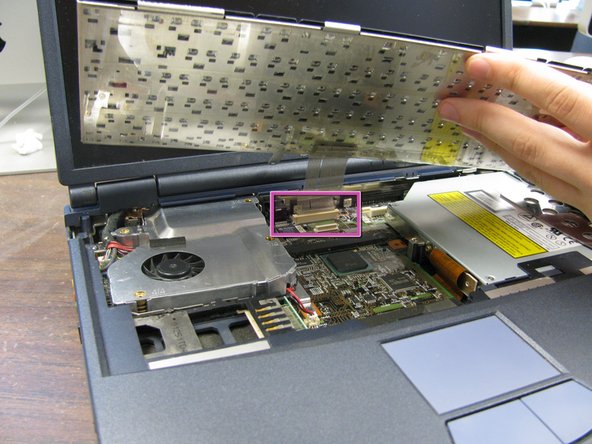
    • Remove the screw on the left-hand side of the computer towards the back using a small Phillips #0 screwdriver.

  2. Sony Vaio PCG-981L Fan Replacement or Cleaning: 手順 2、 2の画像 1 Sony Vaio PCG-981L Fan Replacement or Cleaning: 手順 2、 2の画像 2
    • Open the laptop with the screen facing you.

    • Carefully lift the left side of the panel and unhook the right side. Do not pull beyond the length of the ribbon cable that secures it to the motherboard.

    • If the ribbon cable is not properly separated from the motherboard irreversible damage will occur.

    • To separate the ribbon cable from the motherboard, grip it near the base and gently pull.

    • If you do not want to replace the keyboard skip to step 5.

  3. Sony Vaio PCG-981L Fan Replacement or Cleaning: 手順 3、 3の画像 1 Sony Vaio PCG-981L Fan Replacement or Cleaning: 手順 3、 3の画像 2 Sony Vaio PCG-981L Fan Replacement or Cleaning: 手順 3、 3の画像 3
    • To remove the keyboard, lift it a few inches from the computer, taking care not to pull beyond the length of the ribbon cable that secures it to the motherboard.

    • Forcefully removing the ribbon cable can cause irreversible damage.

    • Separate the ribbon cable from the motherboard by placing your fingers at the base and pulling gently.

  4. Sony Vaio PCG-981L Fan Replacement or Cleaning: 手順 4、 3の画像 1 Sony Vaio PCG-981L Fan Replacement or Cleaning: 手順 4、 3の画像 2 Sony Vaio PCG-981L Fan Replacement or Cleaning: 手順 4、 3の画像 3
    • Attach the new keyboard’s ribbon cable to the motherboard by carefully inserting it into the white plastic outlet located at the top center of the motherboard.

    • Set the keyboard in place.

  5. Sony Vaio PCG-981L Fan Replacement or Cleaning: 手順 5、 3の画像 1 Sony Vaio PCG-981L Fan Replacement or Cleaning: 手順 5、 3の画像 2 Sony Vaio PCG-981L Fan Replacement or Cleaning: 手順 5、 3の画像 3
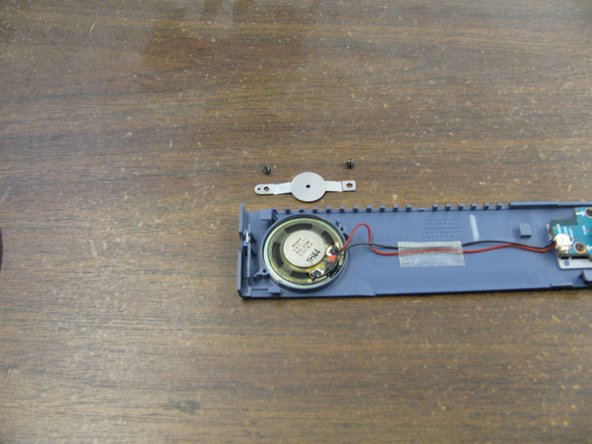
    • There are two speakers on the underside of the speaker panel, one on each end. Unplug both sets of the black and red wires from the circuit board by gently pulling at the base.

    • Remove the screws (two per speaker) with the Phillips #0 screwdriver. Then remove the metal brackets holding the speakers in place.

    • Remove the adhesive tape securing the speaker wires to the panel.

  6. Sony Vaio PCG-981L Fan Replacement or Cleaning: 手順 6、 3の画像 1 Sony Vaio PCG-981L Fan Replacement or Cleaning: 手順 6、 3の画像 2 Sony Vaio PCG-981L Fan Replacement or Cleaning: 手順 6、 3の画像 3
    • The speakers are cemented to the panel. To remove the speakers from the panel, place either the screw driver or tweezers in the hole on the outer edge of the speaker and pry it off.

    • When replacing the old speakers, make sure to align the notch inside the molds with indents on the outer rim of the new speakers.

  7. Sony Vaio PCG-981L Fan Replacement or Cleaning: 手順 7、 1の画像 1
    • Put the speaker panel's ribbon cable back in place.

  8. Sony Vaio PCG-981L Fan Replacement or Cleaning, Fan: 手順 8、 1の画像 1
    • This picture is a top view of the computer after the speakers and keyboard have been removed.

  9. Sony Vaio PCG-981L Fan Replacement or Cleaning: 手順 9、 1の画像 1
    • Locate the fan's screw and remove it using a small Phillips screwdriver.

  10. Sony Vaio PCG-981L Fan Replacement or Cleaning: 手順 10、 1の画像 1
    • Carefully unplug the fan's power cable. This separates the connection from the fan to the motherboard.

    • Pull in the direction of the red arrows in the image to properly unplug the cable.

  11. Sony Vaio PCG-981L Fan Replacement or Cleaning: 手順 11、 1の画像 1
    • Once the screw is removed and the power cable is unplugged, gently pull out the fan.

    • Pull in the direction of the red arrows to remove the fan. Do not touch the fan blades. Instead, grip the fan from the metal casing surrounding the blades as shown.

  12. Sony Vaio PCG-981L Fan Replacement or Cleaning: 手順 12、 1の画像 1
    • This picture shows the fan removed from the computer.

    • Clean the fan using compressed air.

終わりに

To reassemble your device, follow these instructions in reverse order.

作成者

8人の作成者と共同で作成されました。

Genaro Sanchez

メンバー登録日: 04/14/10

46 ポイント

2のガイドは作成済み

チーム

Cal Poly, Team 18-68, Johann Spring 2010 Cal Poly, Team 18-68, Johann Spring 2010人のメンバー

CPSU-JOHANN-S10S18G68

4 メンバー

9のガイドは作成済み

0 件のコメント

コメントを追加

統計データ:

過去 24時間: 0

過去 7 日: 1

過去 30 日: 6

今までの合計 5,347