メインコンテンツにスキップ

Sony Vaio VPCEG37FM Hard Drive Replacement

必要な工具と部品

  1. Sony Vaio VPCEG37FM Hard Drive Replacement, Battery: 手順 1、 1の画像 1
    • Unlock the battery by sliding the lock upwards.

  2. Sony Vaio VPCEG37FM Hard Drive Replacement: 手順 2、 2の画像 1 Sony Vaio VPCEG37FM Hard Drive Replacement: 手順 2、 2の画像 2
    • Slide the release upwards and lift out the battery to remove.

    • Once battery is removed, long press the Power button for 30-60s and discharge any remaining power inside of the computer.

    • Put on the ESD bracelet, making sure the metal circle is touching your skin. Remove the alligator clip from the other end of the bracelet and insert the jack into the ground plug of an active electrical outlet. (the round hole). Do not move forward until you are grounded.

  3. Sony Vaio VPCEG37FM Hard Drive Replacement, Hard Drive: 手順 3、 1の画像 1
    • Using a Phillips #1 screwdriver, remove the 2 6.5mm screws around the hard drive case.

    • The screws are attached to the hard drive case.

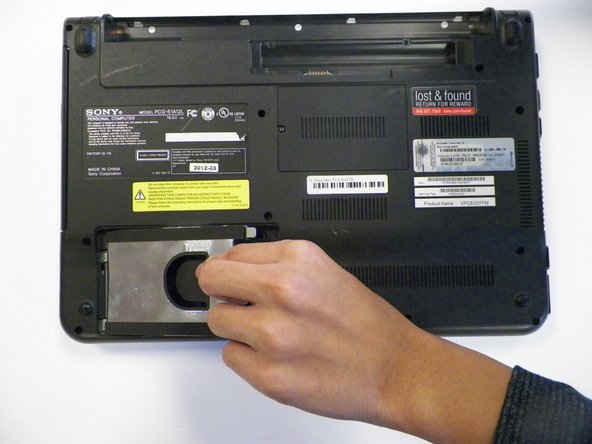
  4. Sony Vaio VPCEG37FM Hard Drive Replacement: 手順 4、 1の画像 1
    • Gently remove the hard drive case to expose the actual hard drive.

    • Be sure that the two screws are completely unscrewed before removing to not damage any of the parts.

  5. Sony Vaio VPCEG37FM Hard Drive Replacement: 手順 5、 2の画像 1 Sony Vaio VPCEG37FM Hard Drive Replacement: 手順 5、 2の画像 2
    • To remove the hard drive, slide the hard drive forward and lift up.

    • The hard drive should come out easily with little to no resistance.

終わりに

To reassemble your device, follow these instructions in reverse order.

作成者

2人の作成者と共同で作成されました。

Nicholas Nguyen

メンバー登録日: 09/26/17

106 ポイント

1ガイドが承認済み

チーム

University of North Texas, Team S3-G4, Thompson Fall 2017 University of North Texas, Team S3-G4, Thompson Fall 2017人のメンバー

UNT-THOMPSON-F17S3G4

4 メンバー

12のガイドは作成済み

0 件のコメント

コメントを追加

統計データ:

過去 24時間: 1

過去 7 日: 5

過去 30 日: 17

今までの合計 1,892