メインコンテンツにスキップ

Sony Vaio VPC-Y2190X Fan Replacement

必要な工具と部品

  1. Sony Vaio VPC-Y2190X Fan Replacement, Battery: 手順 1、 1の画像 1
    • Flip your laptop so that the bottom is facing up.

  2. Sony Vaio VPC-Y2190X Fan Replacement: 手順 2、 1の画像 1
    • Slide the “Lock” switch to the right.

    • Slide and hold the “Release” switch to the left.

  3. Sony Vaio VPC-Y2190X Fan Replacement: 手順 3、 2の画像 1 Sony Vaio VPC-Y2190X Fan Replacement: 手順 3、 2の画像 2
    • While holding the “Release” switch, lift the lip of the battery.

    • Lift the battery up and out of the laptop.

  4. Sony Vaio VPC-Y2190X Fan Replacement, Hard Drive: 手順 4、 1の画像 1
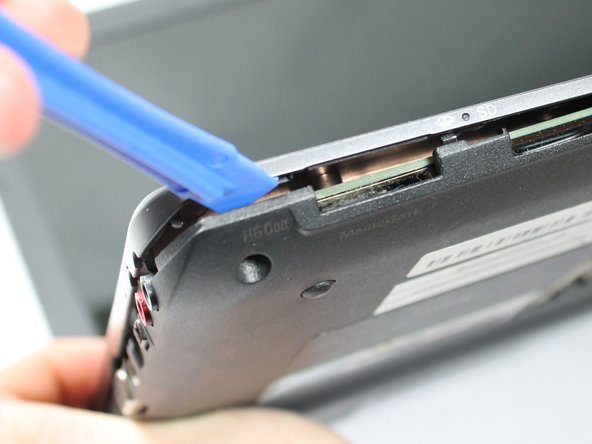
    • Using a #0PH screwdriver, unscrew the three 4.80mm screws on the back of the device.

    • The screws are held into the panel by washers, they will not fall out once unscrewed.

  5. Sony Vaio VPC-Y2190X Fan Replacement: 手順 5、 1の画像 1
    • Remove the panel.

    • Use the #0PH screwdriver to remove the four 3.61mm screws.

  6. Sony Vaio VPC-Y2190X Fan Replacement: 手順 6、 2の画像 1 Sony Vaio VPC-Y2190X Fan Replacement: 手順 6、 2の画像 2
    • Carefully lift the hard drive.

    • Remove the hard drive by pulling it to the left.

  7. Sony Vaio VPC-Y2190X Fan Replacement, Fan: 手順 7、 1の画像 1
    • Remove all nine 5.63mm screws with the #0PH screwdriver.

    • Remove the four 8.62mm screws with the #0PH screwdriver.

  8. Sony Vaio VPC-Y2190X Fan Replacement: 手順 8、 3の画像 1 Sony Vaio VPC-Y2190X Fan Replacement: 手順 8、 3の画像 2 Sony Vaio VPC-Y2190X Fan Replacement: 手順 8、 3の画像 3
    • Flip your Vaio so that the keyboard is facing up.

    • Use the iFixit Opening Tool to lift the keyboard from the frame, starting at the ESC key corner.

    • Gently slide the iFixit Opening Tool along the edge of the keyboard.

    • The keyboard is connected to the frame with a wire, do not fully lift the keyboard from the frame

  9. Sony Vaio VPC-Y2190X Fan Replacement: 手順 9、 2の画像 1 Sony Vaio VPC-Y2190X Fan Replacement: 手順 9、 2の画像 2
    • The cable is located under the keyboard, just above the touchpad.

    • Use the iFixit Opening Tool to flip the clip up in order to release the cable.

    • Detach the cable from the frame.

    • Remove the keyboard from the frame.

  10. Sony Vaio VPC-Y2190X Fan Replacement: 手順 10、 3の画像 1 Sony Vaio VPC-Y2190X Fan Replacement: 手順 10、 3の画像 2 Sony Vaio VPC-Y2190X Fan Replacement: 手順 10、 3の画像 3
    • Use the iFixit Opening Tool to lift the edge of the clip from the cable.

    • Gently pull the cable away from the clip.

    • Repeat the first two steps on the second clip shown in the picture.

  11. Sony Vaio VPC-Y2190X Fan Replacement: 手順 11、 2の画像 1 Sony Vaio VPC-Y2190X Fan Replacement: 手順 11、 2の画像 2
    • Use the iFixit Opening Tool to detach the cable from the motherboard.

    • Use the small needle nose pliers to pull the cable from the motherboard.

  12. Sony Vaio VPC-Y2190X Fan Replacement: 手順 12、 3の画像 1 Sony Vaio VPC-Y2190X Fan Replacement: 手順 12、 3の画像 2 Sony Vaio VPC-Y2190X Fan Replacement: 手順 12、 3の画像 3
    • Use the iFixit Opening Tool to flip the clip up in order to release the first cable.

    • Use the small needle nose pliers to pull the second cable from where it is attached.

    • Use the small needle nose pliers to detach the third cable from motherboard.

  13. Sony Vaio VPC-Y2190X Fan Replacement: 手順 13、 2の画像 1 Sony Vaio VPC-Y2190X Fan Replacement: 手順 13、 2の画像 2
    • Use the iFixit Opening Tool to lift the back of the Vaio from the frame.

    • Slide the iFixit Opening Tool around the edges of the frame.

  14. Sony Vaio VPC-Y2190X Fan Replacement: 手順 14、 3の画像 1 Sony Vaio VPC-Y2190X Fan Replacement: 手順 14、 3の画像 2 Sony Vaio VPC-Y2190X Fan Replacement: 手順 14、 3の画像 3
    • Use the small needle nose pliers to pull the cable connector from the motherboard.

    • Push the flap to the side so you can access the screw beneath.

    • Use the #0PH screwdriver on the one 5.63mm screw.

  15. Sony Vaio VPC-Y2190X Fan Replacement: 手順 15、 1の画像 1
    • Unscrew the 5.63mm screw tethering the motherboard to the laptop with a #0PH screwdriver.

    • Remove the piece from the motherboard.

  16. Sony Vaio VPC-Y2190X Fan Replacement: 手順 16、 3の画像 1 Sony Vaio VPC-Y2190X Fan Replacement: 手順 16、 3の画像 2 Sony Vaio VPC-Y2190X Fan Replacement: 手順 16、 3の画像 3
    • Flip the motherboard upside down to access the other side.

    • Use a #0PH screwdriver to remove the three 3.61mm screws holding the fan to the motherboard.

    • Remove the fan from the motherboard.

終わりに

To reassemble your device, follow these instructions in reverse order.

作成者

4人の作成者と共同で作成されました。

Rachel Shrader

メンバー登録日: 01/31/19

271 ポイント

2のガイドは作成済み

チーム

0 件のコメント

コメントを追加

統計データ:

過去 24時間: 1

過去 7 日: 4

過去 30 日: 5

今までの合計 382