メインコンテンツにスキップ

Sony Vaio Fit 13A Battery Replacement

必要な工具と部品

  1. Sony Vaio Fit 13A Battery Replacement, Back Cover: 手順 1、 2の画像 1 Sony Vaio Fit 13A Battery Replacement, Back Cover: 手順 1、 2の画像 2
    • Starting with the laptop top-down, locate and remove the twelve 1mm Phillips #0 screws securing the back cover to the main body of the computer.

  2. Sony Vaio Fit 13A Battery Replacement: 手順 2、 2の画像 1 Sony Vaio Fit 13A Battery Replacement: 手順 2、 2の画像 2
    • Use the Plastic Opening Tools or Metal Spudger to carefully loosen back cover from the body of the computer.

    • Be sure to avoid headphone jack when removing back cover by lifting cover away from computer and up.

  3. Sony Vaio Fit 13A Battery Replacement: 手順 3、 1の画像 1
    • Lift off back cover to access inner components of computer.

  4. Sony Vaio Fit 13A Battery Replacement, Battery: 手順 4、 2の画像 1 Sony Vaio Fit 13A Battery Replacement, Battery: 手順 4、 2の画像 2
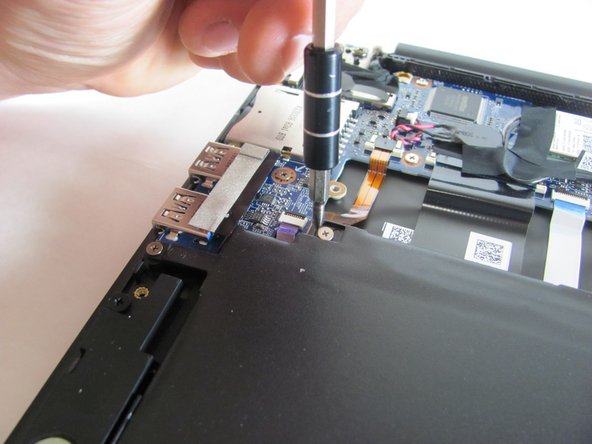
    • Locate and remove the ten 1mm Phillips #0 screws that are securing the battery in place.

  5. Sony Vaio Fit 13A Battery Replacement: 手順 5、 2の画像 1 Sony Vaio Fit 13A Battery Replacement: 手順 5、 2の画像 2
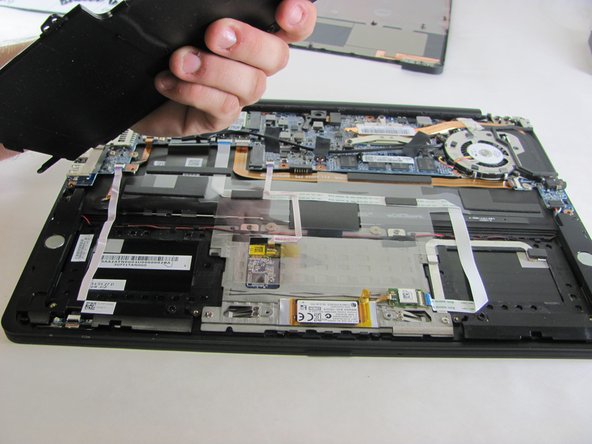
    • Remove the battery with the Plastic Opening Tool by placing the tool between the battery and the computer and cautiously prying it out.

終わりに

To reassemble your device, follow these instructions in reverse order.

3 の人々がこのガイドを完成させました。

作成者

5人の作成者と共同で作成されました。

Alex Prange

メンバー登録日: 01/08/15

527 ポイント

3のガイドは作成済み

チーム

Cal Poly, Team 21-19, Maness Winter 2015 Cal Poly, Team 21-19, Maness Winter 2015人のメンバー

CPSU-MANESS-W15S21G19

4 メンバー

12のガイドは作成済み

0 件のコメント

コメントを追加

統計データ:

過去 24時間: 0

過去 7 日: 6

過去 30 日: 20

今までの合計 7,777