メインコンテンツにスキップ

Sony SLT Alpha-65V Back Panel Disassembly

必要条件のみ
この修理ガイドは、他のガイドの前提条件として使用されます。それ自体は不完全で、単独で使用されることはありません。

必要な工具と部品

  1. Sony SLT Alpha-65V  Back Panel Disassembly, LCD Screen: 手順 1、 2の画像 1 Sony SLT Alpha-65V  Back Panel Disassembly, LCD Screen: 手順 1、 2の画像 2
    • Remove the two 4.0 mm Phillips #00 screws on the base of the camera.

    • Remove the 3.0 mm Phillips #00 screw on the hinge of the screen.

  2. Sony SLT Alpha-65V  Back Panel Disassembly: 手順 2、 2の画像 1 Sony SLT Alpha-65V  Back Panel Disassembly: 手順 2、 2の画像 2
    • Remove the two 2.0 mm Phillips #00 screws on the bottom-right side of the screen.

    • Remove the two 2.0 mm Phillips #00 screws on the bottom-left side of the screen.

  3. Sony SLT Alpha-65V  Back Panel Disassembly: 手順 3、 1の画像 1
    • Use the plastic opening tool to gently pry the screen open around the entire screen.

  4. Sony SLT Alpha-65V  Back Panel Disassembly: 手順 4、 3の画像 1 Sony SLT Alpha-65V  Back Panel Disassembly: 手順 4、 3の画像 2 Sony SLT Alpha-65V  Back Panel Disassembly: 手順 4、 3の画像 3
    • The brown ribbon and white light on the edge of the screen are extremely loose and will fall off off. Keep the screen flat at all times to make sure they don't come out.

    • Use a plastic opening tool to disconnect the silver wires from the screen's circuitry and completely remove the screen from the camera.

  5. Sony SLT Alpha-65V  Back Panel Disassembly, Back Panel: 手順 5、 1の画像 1
    • Unscrew the four 4.0 mm Phillips #00 screws with a on the base of the camera below the the scheme that separates the front and back panels.

    • Unscrew the 5.0 mm Phillips #00 screw on the bottom right of the camera.

  6. Sony SLT Alpha-65V  Back Panel Disassembly: 手順 6、 1の画像 1
    • Unscrew the 4.0 mm Phillips #00 screw on bottom of the left side of the camera.

    • Unscrew the 5.0 mm Phillips #00 screw near the top of the left side of the camera.

  7. Sony SLT Alpha-65V  Back Panel Disassembly: 手順 7、 1の画像 1
    • Be careful when pulling the back panel away as it will still be connected to the body of the camera by two strips of film.

    • When unscrewing the 5.0 mm screw on the dial, make sure to hold onto the dial that becomes detached after taking out the screw.

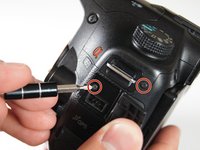
    • Unscrew the two 4.0 mm Phillips #00 screw at the top of the camera by the eyepiece.

    • Unscrew the 5.0 mm Phillips #00 screw of the dial below the other two screws.

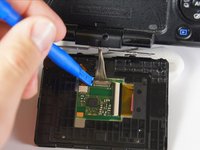
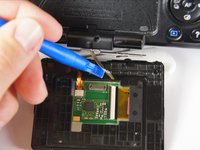
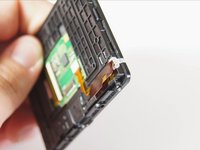
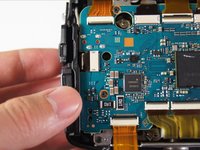
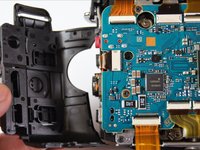
    • Once all the screws are removed, carefully use your hands to detach the back panel from the camera. Working around the edges can help as well.

  8. Sony SLT Alpha-65V  Back Panel Disassembly: 手順 8、 3の画像 1 Sony SLT Alpha-65V  Back Panel Disassembly: 手順 8、 3の画像 2 Sony SLT Alpha-65V  Back Panel Disassembly: 手順 8、 3の画像 3
    • Remove the two 4.0 mm Phillips #00 screws on the right of the camera that are located on the upper right side and under the "Remote" port flap.

    • Detach the right side panel with the remote and HDMI ports of the camera by gently pulling on the panel.

  9. Sony SLT Alpha-65V  Back Panel Disassembly: 手順 9、 1の画像 1
    この手順で使用する道具:
    Tweezers
    $4.99
    • When the back panel is removed, be careful when moving the camera. There are parts inside the camera which now may come loose.

    • Use tweezers to remove the blue and orange ribbon connectors from their connection points pictured here.

終わりに

To reassemble your device, follow these instructions in reverse order.

作成者

5人の作成者と共同で作成されました。

Dima Kyle

メンバー登録日: 04/21/15

513 ポイント

2のガイドは作成済み

チーム

Cal Poly, Team 14-11, Amido Spring 2015 Cal Poly, Team 14-11, Amido Spring 2015人のメンバー

CPSU-AMIDO-S15S14G11

4 メンバー

13のガイドは作成済み

0件のガイドコメント

コメントを追加

統計データ:

過去 24時間: 0

過去 7 日: 0

過去 30 日: 7

今までの合計 119