メインコンテンツにスキップ

Sony NEX-7 Top and Back Shell Replacement

必要条件のみ
この修理ガイドは、他のガイドの前提条件として使用されます。それ自体は不完全で、単独で使用されることはありません。

必要な工具と部品

  1. Sony NEX-7 Top and Back Shell Replacement, Battery: 手順 1、 2の画像 1 Sony NEX-7 Top and Back Shell Replacement, Battery: 手順 1、 2の画像 2
    • We need to turn off the camera because we are removing components that could get damaged if the power is still on.

    • If the camera is on, rotate the power switch on top of the camera counterclockwise to turn the camera off.

  2. Sony NEX-7 Top and Back Shell Replacement: 手順 2、 1の画像 1
    • Flip the camera over such that the power switch points down.

    • Slide the switch on the bottom of the camera grip towards the lens to open the battery door.

  3. Sony NEX-7 Top and Back Shell Replacement: 手順 3、 1の画像 1
    • With the battery door open, push the blue lever in the battery compartment to release the battery.

  4. Sony NEX-7 Top and Back Shell Replacement, SD card: 手順 4、 1の画像 1
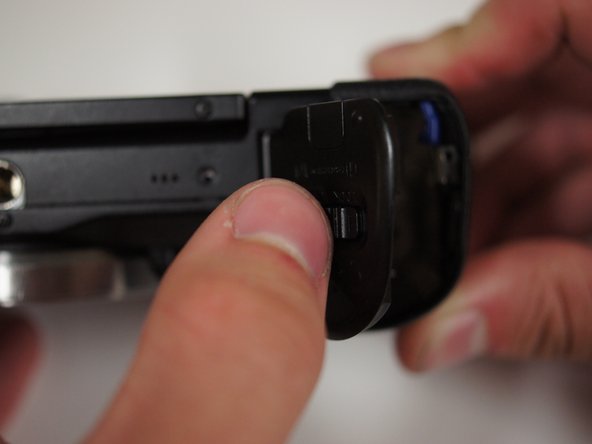
    • To the left of the battery compartment, the SD card needs to be pushed down slightly with your fingers, which will cause the card to eject.

    • Pull the card out with your fingers.

  5. Sony NEX-7 Top and Back Shell Replacement, Lens: 手順 5、 2の画像 1 Sony NEX-7 Top and Back Shell Replacement, Lens: 手順 5、 2の画像 2
    • First, turn the camera upside down.

    • Press the button located next to silver lens mount and rotate the lens counterclockwise.

    • Pull the lens away from the camera body.

    • After removing the lens, replace the lens or attach the body cap as soon as possible to prevent damage to the shutter.

  6. Sony NEX-7 Top and Back Shell Replacement, Top and Back Shell: 手順 6、 1の画像 1
    • Start by removing the two 5/32" #00 screws on the bottom of the camera using the Phillips #00 screwdriver.

  7. Sony NEX-7 Top and Back Shell Replacement: 手順 7、 2の画像 1 Sony NEX-7 Top and Back Shell Replacement: 手順 7、 2の画像 2
    • Remove the 5/32" #00 screw at the top of the compartment using the Phillips #00 screwdriver.

    • Remove the two 5/32" #00 screws from inside the compartment using the Phillips #00 screwdriver.

  8. Sony NEX-7 Top and Back Shell Replacement: 手順 8、 2の画像 1 Sony NEX-7 Top and Back Shell Replacement: 手順 8、 2の画像 2
    • Close the battery door by pushing it down until it latches shut.

  9. Sony NEX-7 Top and Back Shell Replacement: 手順 9、 1の画像 1
    • Looking at the left side of the camera, lift open the door that has 'HDMI' written on it.

    • Remove the two visible 5/32" #00 screws using the Phillips #00 screwdriver.

  10. Sony NEX-7 Top and Back Shell Replacement: 手順 10、 3の画像 1 Sony NEX-7 Top and Back Shell Replacement: 手順 10、 3の画像 2 Sony NEX-7 Top and Back Shell Replacement: 手順 10、 3の画像 3
    • Looking at the back of the camera, press the button with a lightning bolt on it to pop the flash open.

    • Remove the three 5/32" screws from within the flash compartment using the Phillips #00 screwdriver.

    • Close the flash compartment.

  11. Sony NEX-7 Top and Back Shell Replacement: 手順 11、 1の画像 1
    • The top of the camera is attached by three wires and a ribbon cable. Remove the top slowly and gently!

    • Lift the top of the camera off of the body.

    • Let the top hang to the side so you have room to work with the components inside the device.

  12. Sony NEX-7 Top and Back Shell Replacement: 手順 12、 1の画像 1
    • Using tweezers or your fingers, gently remove the blue ribbon cable from the port.

  13. Sony NEX-7 Top and Back Shell Replacement: 手順 13、 2の画像 1 Sony NEX-7 Top and Back Shell Replacement: 手順 13、 2の画像 2
    • Place the tips of your tweezers on either side of the red jack.

    • Gently pull the red plug out of the jack.

    • Repeat those steps for the yellow jack and plug.

    • Now that the top is free, place it aside for later.

  14. Sony NEX-7 Top and Back Shell Replacement: 手順 14、 1の画像 1
    • Lift the LCD screen with your fingers such that the screen is bent slightly away from the camera.

  15. Sony NEX-7 Top and Back Shell Replacement: 手順 15、 3の画像 1 Sony NEX-7 Top and Back Shell Replacement: 手順 15、 3の画像 2 Sony NEX-7 Top and Back Shell Replacement: 手順 15、 3の画像 3
    • Starting at the bottom, gently pry the back panel away from the body of the camera using your fingers.

    • Once the back panel is free from the body, rotate the camera such that back is facing you and pull the back panel past the screen by rotating it to fit around the screen.

    • The back panel will be easier to take off if the LCD screen has been extended away from the camera by about 60 degrees.

    • Set the back panel aside.

終わりに

To reassemble your device, follow these instructions in reverse order.

作成者

4人の作成者と共同で作成されました。

Jay Miley

メンバー登録日: 04/22/14

5,046 ポイント

13のガイドは作成済み

チーム

Cal Poly, Team 10-55, Amido Spring 2014 Cal Poly, Team 10-55, Amido Spring 2014人のメンバー

CPSU-AMIDO-S14S10G55

4 メンバー

31のガイドは作成済み

0 件のコメント

コメントを追加

統計データ:

過去 24時間: 0

過去 7 日: 0

過去 30 日: 0

今までの合計 64