メインコンテンツにスキップ

Sony NEX-5T LCD Screen Replacement

必要な工具と部品

  1. Sony NEX-5T LCD Screen Replacement, Battery: 手順 1、 1の画像 1
    • Open the battery compartment by sliding the lock to the right.

  2. Sony NEX-5T LCD Screen Replacement: 手順 2、 1の画像 1
    • Push in the blue lever.

    • The battery is on a spring so make sure you have control over it, or it might fly out.

  3. Sony NEX-5T LCD Screen Replacement: 手順 3、 2の画像 1 Sony NEX-5T LCD Screen Replacement: 手順 3、 2の画像 2
    • Pull the battery out.

  4. Sony NEX-5T LCD Screen Replacement, LCD Screen: 手順 4、 2の画像 1 Sony NEX-5T LCD Screen Replacement, LCD Screen: 手順 4、 2の画像 2
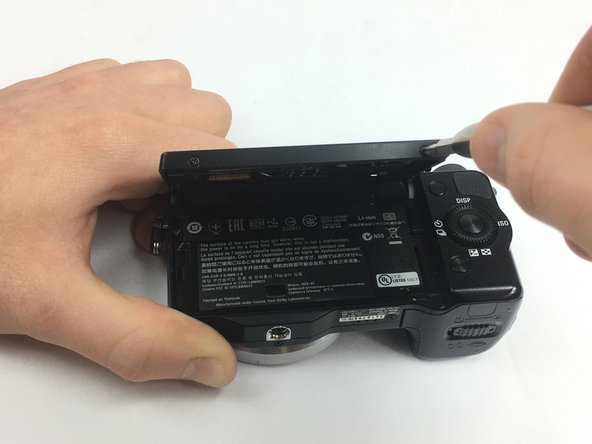
    • Pick up the device with the LCD screen facing you.

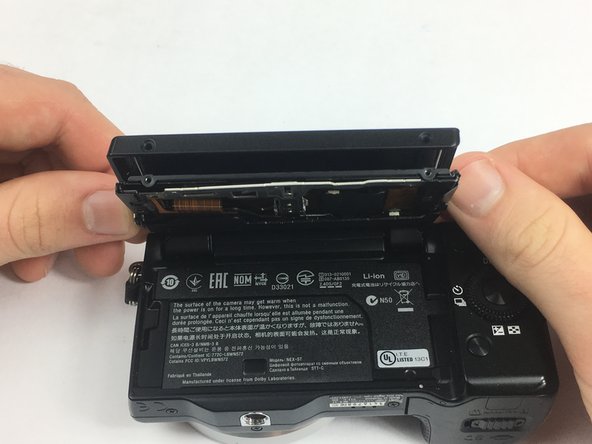
    • While gripping with one hand, lift up on the LCD screen to reveal screws underneath

  5. Sony NEX-5T LCD Screen Replacement: 手順 5、 1の画像 1
    • Unscrew and remove the eight1.2mm Phillips 00 screws.

    • Make sure to apply adequate pressure while unscrewing these screws to avoid stripping them.

    • Removing these screws will loosen the plates which cover the LCD screen.

  6. Sony NEX-5T LCD Screen Replacement: 手順 6、 2の画像 1 Sony NEX-5T LCD Screen Replacement: 手順 6、 2の画像 2
    この手順で使用する道具:
    Tweezers
    $4.99
    購入する
    • Remove the black plate by using your fingers or tweezers.

    • This plate may be difficult to remove. Try to manipulate the position of the screen in order to make removal easier.

  7. Sony NEX-5T LCD Screen Replacement: 手順 7、 3の画像 1 Sony NEX-5T LCD Screen Replacement: 手順 7、 3の画像 2 Sony NEX-5T LCD Screen Replacement: 手順 7、 3の画像 3
    • Remove the second plate by pulling it away from the camera. You can use tweezers or your fingers for this step.

  8. Sony NEX-5T LCD Screen Replacement: 手順 8、 3の画像 1 Sony NEX-5T LCD Screen Replacement: 手順 8、 3の画像 2 Sony NEX-5T LCD Screen Replacement: 手順 8、 3の画像 3
    • Rotate the camera so the lens is facedown and the power button is pointing away from you.

    • Remove the two 1.2mm Phillips 00 screws shown in the image.

  9. Sony NEX-5T LCD Screen Replacement: 手順 9、 2の画像 1 Sony NEX-5T LCD Screen Replacement: 手順 9、 2の画像 2
    • Remove the 2 metal side coverings from the side of the LCD.

    • You may have to manipulate the position of the LCD screen to allow easier removal.

  10. Sony NEX-5T LCD Screen Replacement: 手順 10、 3の画像 1 Sony NEX-5T LCD Screen Replacement: 手順 10、 3の画像 2 Sony NEX-5T LCD Screen Replacement: 手順 10、 3の画像 3
    • Use tweezers to peel back the small black film.

  11. Sony NEX-5T LCD Screen Replacement: 手順 11、 3の画像 1 Sony NEX-5T LCD Screen Replacement: 手順 11、 3の画像 2 Sony NEX-5T LCD Screen Replacement: 手順 11、 3の画像 3
    • Rotate the camera, and lift up on the LCD screen.

    • Be careful you do not pull the LCD too far from the camera because wires are still attached.

    • This will reveal a large black rectangular film which you can peel back with tweezers.

  12. Sony NEX-5T LCD Screen Replacement: 手順 12、 3の画像 1 Sony NEX-5T LCD Screen Replacement: 手順 12、 3の画像 2 Sony NEX-5T LCD Screen Replacement: 手順 12、 3の画像 3
    • Rotate the camera and use your fingers or tweezers to disconnect the first wire.

    • Remove the wire gently to avoid damage.

  13. Sony NEX-5T LCD Screen Replacement: 手順 13、 3の画像 1 Sony NEX-5T LCD Screen Replacement: 手順 13、 3の画像 2 Sony NEX-5T LCD Screen Replacement: 手順 13、 3の画像 3
    • Lift the tab of the ZIF connector and pull the wire away from the motherboard.

  14. Sony NEX-5T LCD Screen Replacement: 手順 14、 1の画像 1
    • You may remove the loose black film from the back of the LCD screen.

    • When purchasing a new LCD screen be mindful that some do not come with the original plastic frame. You may have to separate these pieces by pushing the LCD out of the frame from behind.

    • It takes force to break the adhesive bond, but be mindful to not break the frame when applying force.

    • Upon reassembly place the tape on the inner edges of the LCD frame. When pressed back together there may be excess, use a knife to remove this overlap.

終わりに

To reassemble your device, follow these instructions in reverse order.

5 の人々がこのガイドを完成させました。

作成者

2人の作成者と共同で作成されました。

Robert Phillips

メンバー登録日: 03/02/17

321 ポイント

2のガイドは作成済み

チーム

USF Tampa, Team S13-G2, Cagle Spring 2017 USF Tampa, Team S13-G2, Cagle Spring 2017人のメンバー

USFT-CAGLE-S17S13G2

3 メンバー

12のガイドは作成済み

3 件のコメント

Where does one find the replacement screen? I’m in sore need of this myself.

Will Evans - 返信

I was able to get the screen working with a new replacement, but without the double-sided tape it feels like a cludge.

Will Evans - 返信

where did you find the screen, if i may?

Haziq Husni -

コメントを追加

統計データ:

過去 24時間: 3

過去 7 日: 17

過去 30 日: 40

今までの合計 3,201