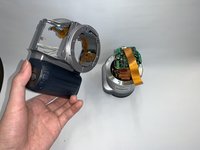
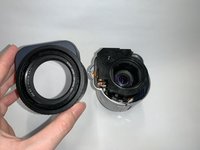
メインコンテンツにスキップ

Sony Mavica MVC-CD1000 Lens Replacement

必要な工具と部品

  1. Sony Mavica MVC-CD1000 Lens Replacement, Battery: 手順 1、 1の画像 1
    • Rotate the camera so that the bottom cover is facing you.

  2. Sony Mavica MVC-CD1000 Lens Replacement: 手順 2、 1の画像 1
    • Press the button down and the battery panel will open up.

  3. Sony Mavica MVC-CD1000 Lens Replacement: 手順 3、 1の画像 1
    • Remove the batteries form the device.

  4. Sony Mavica MVC-CD1000 Lens Replacement, Lens: 手順 4、 2の画像 1 Sony Mavica MVC-CD1000 Lens Replacement, Lens: 手順 4、 2の画像 2
    • Rotate the shell of the base in the anti-clockwise direction so that you can detach it from the lens.

  5. Sony Mavica MVC-CD1000 Lens Replacement: 手順 5、 1の画像 1
    • The outer casing of the lens consists of two outer casings that are secured by an end cap that connects them.

  6. Sony Mavica MVC-CD1000 Lens Replacement: 手順 6、 2の画像 1 Sony Mavica MVC-CD1000 Lens Replacement: 手順 6、 2の画像 2
    • Remove the front end cover from the lens.

  7. Sony Mavica MVC-CD1000 Lens Replacement: 手順 7、 3の画像 1 Sony Mavica MVC-CD1000 Lens Replacement: 手順 7、 3の画像 2 Sony Mavica MVC-CD1000 Lens Replacement: 手順 7、 3の画像 3
    • Place the lens section horizontally on the workbench and pry open the top cover of the lens.

  8. Sony Mavica MVC-CD1000 Lens Replacement: 手順 8、 1の画像 1
    • After removing the shell of lens replace the inside part as shown in the photo.

終わりに

To reassemble your device, follow these instructions in reverse order.

作成者

5人の作成者と共同で作成されました。

YuFan Ma

メンバー登録日: 10/04/19

171 ポイント

2のガイドは作成済み

0 件のコメント

コメントを追加

統計データ:

過去 24時間: 0

過去 7 日: 4

過去 30 日: 11

今までの合計 166