メインコンテンツにスキップ

Sony M-430 Microcassette-Corder Speaker Replacement

必要な工具と部品

  1. Sony M-430 Microcassette-Corder Speaker Replacement, Battery: 手順 1、 1の画像 1
    • Find the arrow on the battery cover on the back of the device.

    • While pressing down on the arrow, slide the cover towards the bottom of the recorder until it clicks.

  2. Sony M-430 Microcassette-Corder Speaker Replacement: 手順 2、 2の画像 1 Sony M-430 Microcassette-Corder Speaker Replacement: 手順 2、 2の画像 2
    • Lift the cover and remove the batteries.

  3. Sony M-430 Microcassette-Corder Speaker Replacement, Back Cover: 手順 3、 2の画像 1 Sony M-430 Microcassette-Corder Speaker Replacement, Back Cover: 手順 3、 2の画像 2
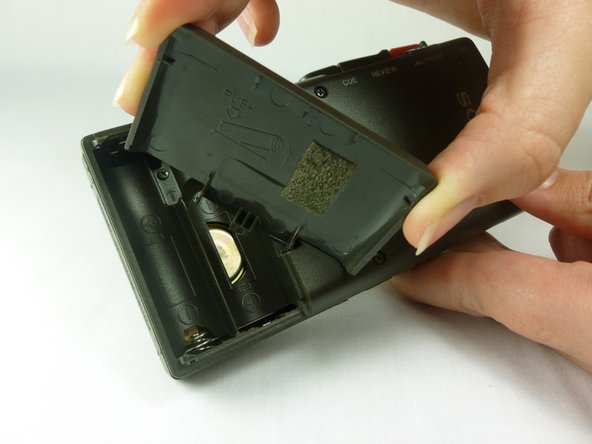
    • Remove the battery cover by first tilting it so it is at a right angle with the rest of the device.

    • Next, twist it to the side as shown in the second picture. The lid should simply snap off.

    • Be careful not to apply too much force, as the lid may break.

  4. Sony M-430 Microcassette-Corder Speaker Replacement: 手順 4、 2の画像 1 Sony M-430 Microcassette-Corder Speaker Replacement: 手順 4、 2の画像 2
    • Use a #00 Phillips head screwdriver to remove the four (1.7x16 mm) screws from the back case.

    • Next, use the same screwdriver to unscrew the (1.7X5 mm) screw, which is located inside the battery compartment.

  5. Sony M-430 Microcassette-Corder Speaker Replacement: 手順 5、 1の画像 1
    • Use a spudger to push in the two tabs located on the bottom of the device.

    • It works best to push the tabs at an upward angle (towards the top of the battery compartment)

    • It may take a decent amount of force in order to push in the tabs.

  6. Sony M-430 Microcassette-Corder Speaker Replacement: 手順 6、 1の画像 1
    • With a firm grip on the larger half, remove the back cover by lifting first on the battery area.

    • The back cover should lift cleanly off.

  7. Sony M-430 Microcassette-Corder Speaker Replacement, Speaker: 手順 7、 1の画像 1
    • The speaker is the large gold circular piece attached under where the batteries would normally be.

    • It is connected to the device with two black wires that run along one side of the motherboard, as shown on the top of the picture.

  8. Sony M-430 Microcassette-Corder Speaker Replacement: 手順 8、 2の画像 1 Sony M-430 Microcassette-Corder Speaker Replacement: 手順 8、 2の画像 2
    • Depending on the replacement speaker you have, there are two places you can desolder the wire.

    • If your replacement speaker has a wire already attached to it, desolder the old wire from where it connects to the motherboard.

    • If the replacement speaker has no wire, desolder the old wire where it connects to the broken speaker.

  9. Sony M-430 Microcassette-Corder Speaker Replacement: 手順 9、 2の画像 1 Sony M-430 Microcassette-Corder Speaker Replacement: 手順 9、 2の画像 2
    • Unscrew the 2 Phillips head screws (2x2.5 mm) around the edge of the speaker with a #00 Phillips screwdriver.

    • Use a pair of tweezers to remove the black tape on the speaker. Put the tape on the back of the new speaker.

  10. Sony M-430 Microcassette-Corder Speaker Replacement: 手順 10、 1の画像 1
    • Now that the speaker is detached from the device, simply tilt the device over and let the speaker fall out.

終わりに

To reassemble your device, follow these instructions in reverse order.

作成者

4人の作成者と共同で作成されました。

Matt Teare

メンバー登録日: 01/20/12

35 ポイント

3のガイドは作成済み

チーム

Cal Poly, Team 10-34, Amido Winter 2012 Cal Poly, Team 10-34, Amido Winter 2012人のメンバー

CPSU-AMIDO-W12S10G34

4 メンバー

7のガイドは作成済み

0 件のコメント

コメントを追加

統計データ:

過去 24時間: 0

過去 7 日: 1

過去 30 日: 4

今までの合計 871