メインコンテンツにスキップ

Sony Handycam CX260V LCD Screen Replacement

必要な工具と部品

  1. Sony Handycam CX260V LCD Screen Replacement, Sony Handycam CX260V Housing Disassembly: 手順 1、 1の画像 1
    • Use a Phillips #00 screwdriver to remove the one 3mm and two 5mm screws located in the battery assembly area.

  2. Sony Handycam CX260V LCD Screen Replacement: 手順 2、 1の画像 1
    • Remove the two 5mm screws located on the top left and bottom of the camera.

    • Remove the 3mm screw located in the middle of the joint attaching the LCD screen to the device.

  3. Sony Handycam CX260V LCD Screen Replacement: 手順 3、 1の画像 1
    • Remove the two 5mm screws from the panel to the right of the LCD screen.

  4. Sony Handycam CX260V LCD Screen Replacement: 手順 4、 1の画像 1
    • Use the plastic opening tool to remove the cover for the recording buttons.

  5. Sony Handycam CX260V LCD Screen Replacement: 手順 5、 1の画像 1
    • Remove the five 5mm screws located on the bottom panel.

    • Remove the bottom panel covering the internal motherboard.

  6. Sony Handycam CX260V LCD Screen Replacement: 手順 6、 1の画像 1
    • Remove the 5mm screw located by the lens and two 5mm screws located under the handle.

    • Remove the leather strap from the device.

  7. Sony Handycam CX260V LCD Screen Replacement: 手順 7、 1の画像 1
    • Remove the 5mm screw to the left of the Record button.

    • Remove the entire right-side panel where the leather strap was located.

  8. Sony Handycam CX260V LCD Screen Replacement: 手順 8、 1の画像 1
    • Use a spudger to remove the LCD joint cover.

  9. Sony Handycam CX260V LCD Screen Replacement: 手順 9、 2の画像 1 Sony Handycam CX260V LCD Screen Replacement: 手順 9、 2の画像 2
    • Remove the three black 5mm screws and one silver 4mm screw located on the front right-side of the camera, near the orange motherboard.

    • The silver screw is located on the front right-side of the camera and is attached to the main panel.

  10. Sony Handycam CX260V LCD Screen Replacement: 手順 10、 1の画像 1
    • Remove the 5mm screw located on the top left near the camera lens.

  11. Sony Handycam CX260V LCD Screen Replacement: 手順 11、 1の画像 1
    • Using tweezers, carefully detach the two wires connected to the bottom motherboard portion of the camera.

    • One white wire, one black wire, and one flat yellow wire are connected to the lens panel.

    • Remove the lens panel.

  12. Sony Handycam CX260V LCD Screen Replacement: 手順 12、 1の画像 1
    • Remove the three 5mm screws.

    • One is located at the bottom of the lens area, and the other two are on the top left and right of the lens area.

    • Carefully remove the camera lens with your hands or a spudger.

    • There are three springs located underneath the lens. Make sure to not lose them.

  13. Sony Handycam CX260V LCD Screen Replacement: 手順 13、 1の画像 1
    • Remove one 5mm screw located on the back left section near the zoom and picture control capturing button.

    • There are two flat blue wires keeping the buttons connected to the main assembly. Carefully set them aside or unplug them.

    • This partially removes the zoom and picture capturing control.

  14. Sony Handycam CX260V LCD Screen Replacement: 手順 14、 1の画像 1
    • Remove one silver 5mm screw located near the tripod mount.

    • Remove the tripod mount screw that has the mount assembly underneath.

  15. Sony Handycam CX260V LCD Screen Replacement: 手順 15、 1の画像 1
    • Remove the silver 5mm screw located on the front right side of the camera by the orange motherboard.

    • Unplug the wire.

    • Remove the silver 5mm screw underneath the wire.

  16. Sony Handycam CX260V LCD Screen Replacement: 手順 16、 1の画像 1
    • Using tweezers, release the clip attaching the main internal system to the mainframe. This allows the rest of the camera to be freely taken apart.

    • The side panel will have cords running through the frame. If you unplug these, the frame will be removable.

  17. Sony Handycam CX260V LCD Screen Replacement, LCD Screen: 手順 17、 1の画像 1
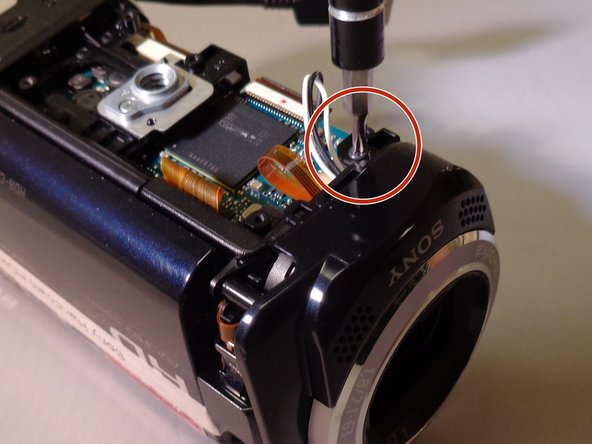
    • Unscrew near the front LCD joint of the camera 2 black 5mm screws and 1 black 3mm screw.

  18. Sony Handycam CX260V LCD Screen Replacement: 手順 18、 1の画像 1
    • Using a screwdriver unscrew 1 black 5mm screw from the mother board.

  19. Sony Handycam CX260V LCD Screen Replacement: 手順 19、 1の画像 1
    • Slightly angle the mother board and remove the LCD screen by unplugging the remaining orange wire from the mother board. Removes the LCD screen and wire assembly connected to the mother board.

終わりに

To reassemble your device, follow these instructions in reverse order.

3 の人々がこのガイドを完成させました。

作成者

4人の作成者と共同で作成されました。

Alejandro Barajas

メンバー登録日: 04/07/15

502 ポイント

3のガイドは作成済み

チーム

Eastern Washington University, Team 1-5, Plummer Spring 2015 Eastern Washington University, Team 1-5, Plummer Spring 2015人のメンバー

EWU-PLUMMER-S15S1G5

4 メンバー

12のガイドは作成済み

0 件のコメント

コメントを追加

統計データ:

過去 24時間: 0

過去 7 日: 0

過去 30 日: 3

今までの合計 395