メインコンテンツにスキップ

Sony Game Console Accessory L3 and R3 Potentiometer Replacement for PS3 & PS4

必要な工具と部品

  1. Sony Game Console Accessory L3 and R3 Potentiometer Replacement for PS3 & PS4, Controller: 手順 1、 1の画像 1
    • Using the Phillips #00 Screwdriver, remove the four 6.0 mm screws securing the rear cover to the controller.

    • Be careful loosening the screws, using the wrong sized screwdriver, or letting the screwdriver slip can permanently damage the screw heads, making removal extremely difficult.

  2. Sony Game Console Accessory L3 and R3 Potentiometer Replacement for PS3 & PS4: 手順 2、 3の画像 1 Sony Game Console Accessory L3 and R3 Potentiometer Replacement for PS3 & PS4: 手順 2、 3の画像 2 Sony Game Console Accessory L3 and R3 Potentiometer Replacement for PS3 & PS4: 手順 2、 3の画像 3
    • Four fragile plastic clips hold the casing together. You can see their locations more clearly in this guide.

    • The clips help hold the seams together. If you break these clips, the controller will still work.

    • Beginning with the left handle:

    • Pinch the left handle of the controller to introduce an opening.

    • Wedge a plastic opening tool into the opening and slide it up towards the joystick.

    • Pull down on tool to pry open the casing.

    • Repeat these steps for the right handle.

  3. Sony Game Console Accessory L3 and R3 Potentiometer Replacement for PS3 & PS4: 手順 3、 3の画像 1 Sony Game Console Accessory L3 and R3 Potentiometer Replacement for PS3 & PS4: 手順 3、 3の画像 2 Sony Game Console Accessory L3 and R3 Potentiometer Replacement for PS3 & PS4: 手順 3、 3の画像 3
    • Wedge a plastic opening tool into the case-splittings and pull down to crack open the casing near the following buttons:

    • Share button

    • Options button

    • Split the plastic covers of the controller apart, taking note that they will still be attached by circuit board ribbons.

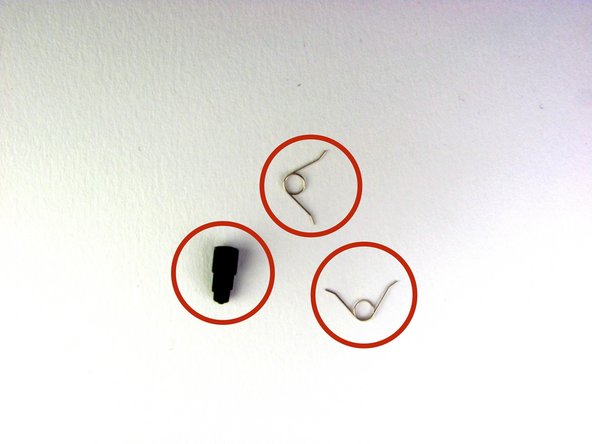
    • Three small pieces are often released from the framework. To prevent loss, maintain a controlled work field.

    • 2 Trigger Springs

    • 1 Grey Reset Button Extension

  4. Sony Game Console Accessory L3 and R3 Potentiometer Replacement for PS3 & PS4, Disassembling DualShock 4 Motherboard Assembly: 手順 4、 1の画像 1
    • Remove the single 6.0 mm Phillips screw found below the battery retainer with the Phillips #00 Screwdriver.

    • Do not forcefully loosen the screw, as it may amount to permanent damage of the threads, making removal impossible.

  5. Sony Game Console Accessory L3 and R3 Potentiometer Replacement for PS3 & PS4: 手順 5、 2の画像 1 Sony Game Console Accessory L3 and R3 Potentiometer Replacement for PS3 & PS4: 手順 5、 2の画像 2
    • Gently detach the touchpad ribbon connected to the motherboard using the blunt forceps. The touchpad ribbon is connected to the motherboard by a connector that flips to tighten and loosen. During reassembly, to reattach the ribbon, the plastic tray will need to be gently removed from the motherboard and the flip-lock flipped up.

  6. Sony Game Console Accessory L3 and R3 Potentiometer Replacement for PS3 & PS4: 手順 6、 2の画像 1 Sony Game Console Accessory L3 and R3 Potentiometer Replacement for PS3 & PS4: 手順 6、 2の画像 2
    • Carefully dislodge the motherboard assembly from the front cover.

    • Vibration motors are loosely attached to the motherboard assembly. Provide support at the two ends to ease the separation.

    • When removing the motherboard assembly, try not to tilt the front cover upside down as the buttons and their covers may fall out.

  7. Sony Game Console Accessory L3 and R3 Potentiometer Replacement for PS3 & PS4, Disassembly Complete: 手順 7、 3の画像 1 Sony Game Console Accessory L3 and R3 Potentiometer Replacement for PS3 & PS4, Disassembly Complete: 手順 7、 3の画像 2 Sony Game Console Accessory L3 and R3 Potentiometer Replacement for PS3 & PS4, Disassembly Complete: 手順 7、 3の画像 3
    • Successful disassembly of the controller will result in the following three parts, respectively:

    • Motherboard Assembly

    • Front Cover

    • Rear Cover

  8. Sony Game Console Accessory L3 and R3 Potentiometer Replacement for PS3 & PS4, De-Solder Worn Potentiometers: 手順 8、 3の画像 1 Sony Game Console Accessory L3 and R3 Potentiometer Replacement for PS3 & PS4, De-Solder Worn Potentiometers: 手順 8、 3の画像 2 Sony Game Console Accessory L3 and R3 Potentiometer Replacement for PS3 & PS4, De-Solder Worn Potentiometers: 手順 8、 3の画像 3
    • Note the Sixaxis conductive film connector is superior to the DualShock 3.

    • De-solder the four (4) potentiometer through hole mounts.

    • De-solder the six (6) potentiometer through hole joints.

    • De-solder the L3 and R3 button joints, then insert and solder the new potentiometers.

    • Note this mainboard asembly uses lead solder, likely 63/37 eutectic. A 80W soldering iron is strongly recommended for de-soldering and re-soldering operations, as solder tends to not easily flow with less heat transfer.

    • Also works on Dual Shock 4

    can you make video please for this

    rayan - 返信

    Note this board is PS3 Sixaxis non DualShock controller which are Superior to the Dual Shock 3

    Also same for Dual Shock 4 PS4 but they all dont have conductive film connector its the sandwich job we all hate

    DARKMATTER - 返信

  9. Sony Game Console Accessory L3 and R3 Potentiometer Replacement for PS3 & PS4: 手順 9、 2の画像 1 Sony Game Console Accessory L3 and R3 Potentiometer Replacement for PS3 & PS4: 手順 9、 2の画像 2
    • Finally found a wall charger that charges PS3 effortlessly. Since no other charger works.

終わりに

To reassemble your device, follow these instructions in reverse order.

6 の人々がこのガイドを完成させました。

作成者

3人の作成者と共同で作成されました。

DARKMATTER

メンバー登録日: 07/10/14

239 ポイント

1ガイドが承認済み

2 件のコメント

I’ve been looking for “better” (longer lasting) potentiometers but cannot find any. With the rise in DIY controller mods, I don’t understand why better components don’t exist.

Robert Remington - 返信

get ones off ebay that r usa and metal spring not plastic

DARKMATTER -

コメントを追加

統計データ:

過去 24時間: 2

過去 7 日: 11

過去 30 日: 40

今までの合計 5,579